

Making pasta has always been fun for me. I love making filled pastas like ravioli and tortellini, and I enjoy experimenting with different flavors of gnocchi. There are the noodle-shaped pastas like fettuccine, chitarra, and pappardelle, which come together quickly and are made even easier using the attachment on my beloved pasta roller – and those all make for great weeknight meals. But lately I’ve found myself really interested in hand-shaped pastas and how to work with the dough to create some of those pretty little shapes!
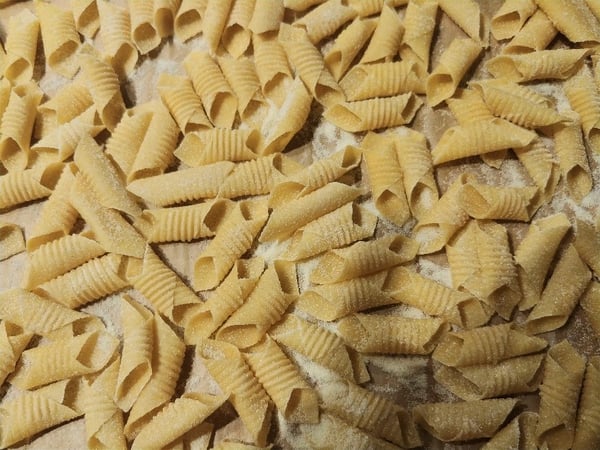
I think I first enjoyed garganelli about 20 years ago when one of our favorite Italian restaurants had it on their menu. It intrigued me, this “penne-but-not-penne” shaped pasta! Much like penne, garganelli is tubular in shape, the ends are on a diagonal, and it has ridges, although not in the same direction as penne. But penne is quite sturdy, whereas the garganelli is much lighter. Once I realized I could see the overlapped ends, it dawned on me that it was hand-rolled. Now I could understand why it felt so light!
Recently, my husband and I were talking about pasta (Isn't that a topic in every marriage?), and agreed that we’ve never been able to consistently find garganelli commercially. In fact, I think I’ve only bought it once or twice over these many years. And with my interest in hand-shaped pastas already at the forefront, the seed was planted for a new journey: I was going to make garganelli!
Now it was a matter of finding the right source to see how it should be done. I have a number of books on pasta, but none of them had what I was looking for. I kind of needed to “see it in action” anyway. There are several chefs on Instagram that inspire my pasta-making, but one in particular has been posting little videos for various hand-shaped pastas. How timely it was that he posted one for garganelli literally two or three days after the conversation my husband and I had!
Now that I had the general idea, I went ahead and prepared my usual basic pasta dough and gave them a go. The shapes turned out beautifully! But then I boiled them and, sadly, those delicate little tubes just collapsed in on themselves like little tires gone flat. The good news was that they held together, so this initial experiment wasn’t a complete loss. And yes, we ate the “flat tires” anyway, with some roasted cherry tomatoes from our balcony garden. They weren’t pretty, but they sure were good!
I realized that this was not going to be as simple as I originally thought but, at this point, I became even more determined to get it right! Working at The Chopping Block, I am lucky enough to be surrounded by a team of truly knowledgeable, talented, and generous chefs who thrive on teaching. So I talked about my garganelli at work whenever I could to whomever would listen (everyone listened!), asking questions and seeking ideas and advice on where to go next. What caused my garganelli to collapse like that? Were they too large in diameter? Too long? Did the pasta dough need to be stronger? Maybe I didn’t let them dry long enough?
Well, my tribe came through! In the end I came away with an arsenal of ways to attack the issue:
First, I started with the dough. I did decide to make a “stronger” dough, meaning that I increased the ratio of semolina to “00” flour. For those of you less familiar, semolina is a finely ground, but still coarse, “hard wheat” flour, giving the dough a bit more firmness and the cooked pasta a bit more of a bite. Italian “00” flour is the Italian version of all-purpose flour, just more finely ground, and gives the pasta a more silky feel than regular all-purpose flour (however, you can certainly use all-purpose flour if that’s what you have on hand). By weight, my basic pasta dough recipe uses about 1/3 semolina to 2/3 “00” flour. After trying a couple of different ratios (this was a “journey”, after all!), I ended up using equal amounts of semolina and “00” flour. This gave me a sturdy-but-pliable dough, and I still ended up with a silky pasta that had a good bite to it.
Second (and something I had not thought of at all on my own), I realized I rolled the dough too thinly when I was sheeting it on my pasta roller. In my mind, since garganelli are little tubes creating sort of a double layer in each bite, I thought the pasta needed to be as thin as it would be for ravioli. The problem is, unlike ravioli, there is no filling to keep the layers from falling together. Turns out these little tubes needed a thicker dough for support!
Third, while I made my first batch of garganelli by rolling up 2-inch squares (this will all make sense in my “how-to” videos below!), making them smaller would (hopefully) also add to the ability for them to support themselves, once boiled. I decided to go with 1.5-inch squares and to make the diameter just a little smaller, as well.
Lastly, I had to extend the time I allowed the pasta to dry. I had let it dry for about 20 minutes, but letting it dry for longer would help add to it being able to maintain it’s structure when boiled. And especially since the dough would be a little thicker, a longer drying time became even more important. I decided to go for a minimum of 45 minutes of drying time.
At last, success! Here is how it all shakes out…
Let me start with what went into my dough. I mentioned above that it was half semolina and half “00” flour, by weight. I used 140 g each, semolina and “00” flour. Into that mixture I blended 2 whole eggs and 2 egg yolks. Once the dough was mixed and kneaded, I wrapped it in plastic and let it rest for about an hour. Today was a particularly humid day, so the dough was a little bit stickier than usual. If you run into the same problem just keep a little bowl aside of a 50-50 mixture of the flours and add a bit at a time, until you get the consistency you’re looking for. And if it’s an extremely dry day and you find you need a bit more liquid, add a touch of water, ½ teaspoon at a time. I then sheeted the pasta to one level below what I normally would use for ravioli. With my pasta roller, I took it to #5 (I usually go to #6 for ravioli). Every pasta roller is different, so you may have to experiment a bit if you are unsure.
Once the dough was sheeted, here is how I portioned it out:
And here is how I stored the portioned sheets until I was ready to use them:
Then each portion of sheeted pasta needs to be cut into squares. If you really get into pasta-making, there are fancy cutters with multiple cutting wheels on them that you can buy. While this would make this measuring and cutting step a little easier, I generally find myself making pasta for only up to four people, so I just don’t feel the need for one. Besides… I kind of enjoy the process!
I cannot tell you how much I love having that stainless steel ruler in my kitchen! It comes in handy so often (think pie crusts!) and when I’m done I can just toss it in the dishwasher. That and my bench scraper are definitely “go-to” items for me. By the way, if you prefer to use a brush to dust off the excess flour from the pasta sheets, you certainly can. Using my hands just gives me one less item to wash up later!
Finally, we’ve come to the fun part: rolling the garganelli!
Really, once you get momentum going, it doesn’t take long at all! If you find that the pasta dough starts to stick to your little rolling pin, you can try running your bench scraper down the sides to remove any dough remnants that may be hanging on. You can also sprinkle just a bit of semolina on the squares to take away any stickiness. I mentioned that it was particularly humid that day and while the squares were sitting out, some of them absorbed moisture from the air and became a bit sticky; sprinkling the semolina definitely helped. By the way, if you want to take a peek at the Instagram video that inspired me, check it out on Mateo Zielonka’s page!
Once you’ve rolled the garganelli, you need to let them dry. While I recommend a minimum of 45 minutes, again the humidity came into play, and I let them go for about 1.25 hours. Touch the garganelli and see how they feel. It is not at all necessary for them to be completely dried out, but you want to feel them firming up. There really shouldn’t be any stickiness to them at all. Again, dusting with semolina will help if you feel they are not drying quickly enough.
We have still have an abundance of cherry tomatoes ripening daily in our balcony garden these days. I love low-roasting them for about an hour (while the garganelli is drying makes for perfect timing!) and making just a light quick sauce with them. I mashed up some roasted garlic, added the roasted tomatoes with their juices, tossed in some chopped thyme, basil, parsley and red pepper flakes, then stirred it all together with a bit of lemon juice and enough extra virgin olive oil to cover the mixture, seasoning with salt and pepper. Once the pasta was boiled, I added enough pasta water to give me the consistency I wanted and tossed with those fresh garganelli.
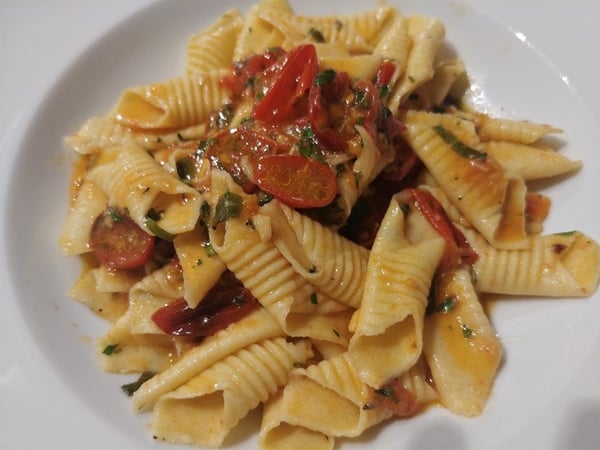
Ah, dinner! And look - the garganelli kept their shape! I wonder which pasta shape I should work on next?
Pasta classes at The Chopping Block are among our most popular! If you want to learn how to make pasta, think about taking a class – it really is a lot of fun! In October we are offering Old School Italian and Know Your Gnocchi (new Fall menu!). If you’d like to dig a bit deeper and spend a little more time, we also have our Pasta Workshop as well as Pasta Boot Camp. Finally, for the budding young chef in your life (ages 12-17), we are also offering Jr. Chef: Homemade Pasta Workshop. I hope to see you there!