

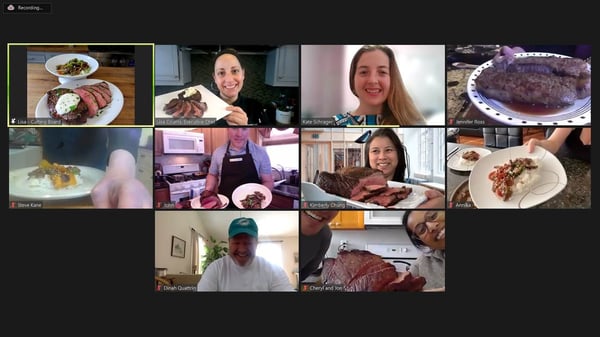
I absolutely love moderating our virtual classes. It’s been so much fun for me to see The Chopping Block's virtual business evolve over the past year. What I love most about our virtual classes is that they allow us to share our love of food, wine and cocktails, outside our two locations in Chicago, and they let us connect with people all over the world! I love being invited into your kitchens, meeting you, your significant others, your cute babies, adorable four-legged friends, and seeing you learn together. I love that you can dress up to go along with the theme of the class, or wear your pajamas. I love that you can cook with family and friends that you haven’t seen in person in quite some time due to COVID. And I really love that you get to cook in your own kitchen, with your own equipment and tools, as I really think that adds a new layer to enhancing your confidence in the kitchen. We are so fortunate that so many of you have become regulars in our virtual classes!
 One skill that students in our virtual classes enjoy learning is how to roast garlic. I’m always surprised that so many people have never done it before. Roasted garlic is simple to make, incredibly delicious, and so versatile. Once you know how to roast garlic, the possibilities are endless – short ribs, mashed potatoes, vinaigrettes (hello, potato salad!), compound butter, garlic bread and hummus, just to name a few favorites.
 Plus, garlic has all sorts of health benefits (I mean, before you mix in into butter and slather it on bread!). Garlic is known to reduce cholesterol and lower blood pressure. It helps fight off colds and defends against heart disease. Oh, and you won’t have to worry about the vampires!
Do you need any more excuses to add garlic to everything? Don’t get me wrong. I love raw garlic and the bite it offers in applications like Caesar dressing and pesto, but garlic completely transforms when roasted. Roasting garlic mellows the strong bite that some garlic-haters (yes, they exist!) and even gives it a mild sweetness, so I’m going to teach you how to roast garlic and store it for all your future uses.
Roasted Garlic
Scroll down for a printable version of this recipe
Prep time: 5 minutes
Cook time: 55 minutes
Total time: 1 hour
Servings: 1 medium Mason jar
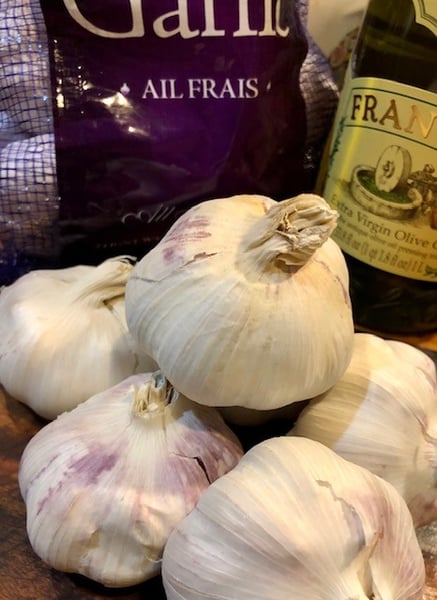
9 heads of garlic
Olive oil or grapeseed oil
Resinous herbs, like rosemary (optional)
1. Preheat the oven to 400 degrees.
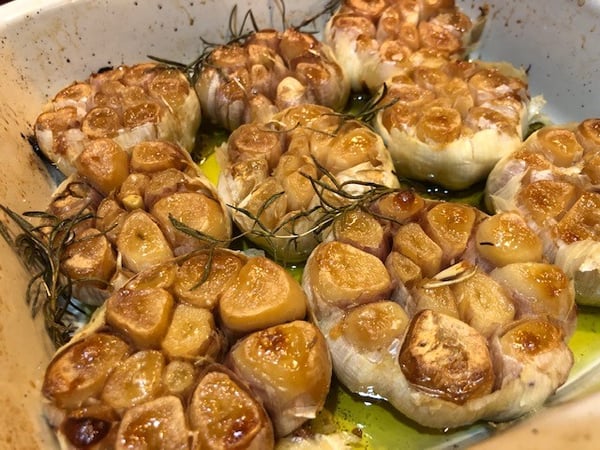
2. Cut off the top of 9 heads of garlic (or more depending on your pan), about 1/2 inch down (this will expose the cloves).
3. Place the heads of garlic, clove side up, in the baking dish/skillet.
4. Drizzle with olive oil (or grapeseed oil) over each head (you can also season with salt and pepper if you’d like, or add a resinous herb, like rosemary, to add more flavor to the oil).
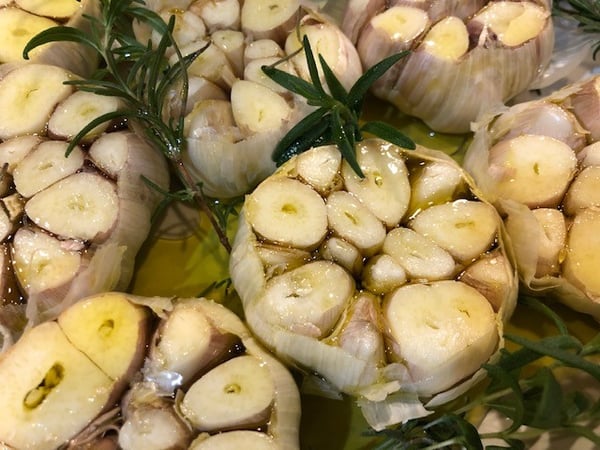 5. Cover the skillet or baking dish with foil.
6. Bake 40 minutes, uncover and continue baking 15 minutes until golden brown.
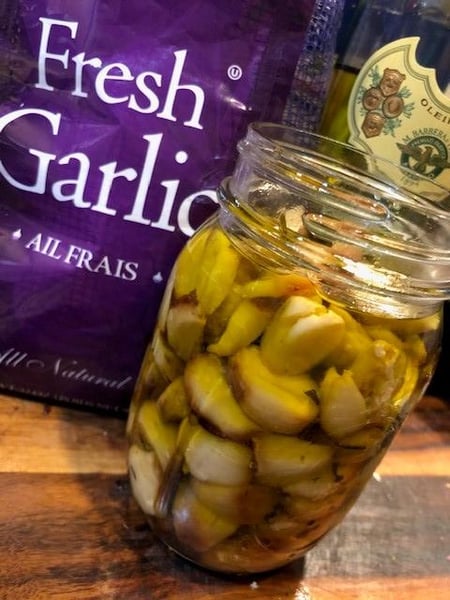
7. Once the garlic is cool enough to handle, but still warm, use a paring knife to remove the individual cloves and place in a storage jar or container. The cloves should slide right out! If you’re making a paste, and aren’t worried about the cloves coming out whole, just squeeze the head of roasted garlic.
 8. Pour the oil from pan that garlic was roasted in over the cloves and top with additional oil to cover the cloves.
 If you don’t have a bunch of heads of garlic on hand, you can absolutely roast one head of garlic at a time by cutting off the top, drizzling with oil, and wrapping in foil.
Other tricks I love for roasting garlic include buying a big bag of whole peeled garlic cloves (thank you, Costco) and follow the same process. Lay the cloves in a single layer, toss with oil, and cover. Roast at 400. The peeled cloves will likely take less time, so check them after 25 minutes. The best part about this is that you don’t have to pick out the cloves from the skins!
You can also confit garlic by putting the whole peeled cloves in a small sauce pan and cover with oil. Simmer on low for 30 20-30 minutes until golden and tender. Store covered in oil.
How long will it last? You can keep roasted garlic in the refrigerator, as long as it’s covered in oil, for up to 2 weeks (mine is always long gone by that point). That oil becomes liquid gold – dip some fresh crusty bread in it, or toss some pasta with it, and you’ll understand. Roasted garlic also freezes wonderfully (hello, ice cube trays – but maybe get designated ones so you don’t wind up with garlic flavored ice water later).
Looking forward to cooking with garlic more? Check out some of our upcoming virtual classes featuring garlic:
- Whole Roasted Chicken with Garlic and Herbs Workshop Sunday, March 28 at 4pm CST
- Virtual Shrimp Scampi and Capellini Friday, April 2 at 7pm CST
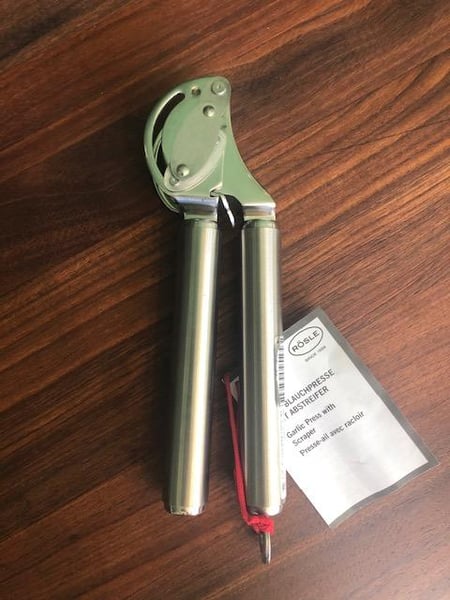
Need a baking dish, cast iron pan or sauce pan to roast or confit your garlic? Or maybe you’re looking for a garlic press for raw garlic? We absolutely love the Rosle garlic press and would be happy to set you up with a curbside order from Lincoln Square. You don’t even have to worry about peeling the garlic – it does all the work for you! Email us at lincoln@thechoppingblock.com, and we’ll set one aside for you.


Roasted Garlic
Ingredients
- 9 heads of garlic
- Olive oil or grapeseed oil
- Resinous herbs, like rosemary (optional)
Instructions
- Preheat the oven to 400 degrees.
- Cut off the top of 9 heads of garlic (or more depending on your pan), about 1/2 inch down (this will expose the cloves).
- Place the heads of garlic, clove side up, in the baking dish/skillet.
- Drizzle with olive oil (or grapeseed oil) over each head (you can also season with salt and pepper if you’d like, or add a resinous herb, like rosemary, to add more flavor to the oil).
- Cover the skillet or baking dish with foil.
- Bake 40 minutes, uncover and continue baking 15 minutes until golden brown.
- Once the garlic is cool enough to handle, but still warm, use a paring knife to remove the individual cloves and place in a storage jar or container. The cloves should slide right out! If you’re making a paste, and aren’t worried about the cloves coming out whole, just squeeze the head of roasted garlic!
- Pour the oil from pan that garlic was roasted in over the cloves and top with additional oil to cover the cloves.