Have you ever looked up a recipe online and ended up buying $70 worth of ingredients to make it? It's so common these days with the millions of recipes available on the internet. Although some dishes, like a mole sauce, really do have 30 or more ingredients, this does not always need to be the case. If there is one thing I have learned in my career, it's that more is not always better. Too many cooks think that by adding 10 spices and everything else they can find in the ethnic cuisine aisle will make their dish taste better. But I strongly disagree! Cooking is an art, (aka “culinary arts”) and with any art, quality over quantity and the power of a single stroke (or ingredient) can be shockingly powerful.
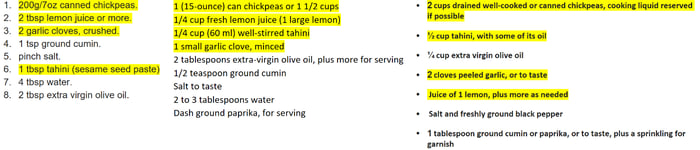
I always tell my students not to take the first recipe you find and run with it. With the ease of searching on the internet, you should find 4-5 recipes for the same dish and take a second to read through them and find the common denominators. If you are looking for a hummus recipe and everyone has chickpeas, tahini, garlic and lemon, you can guess that those are likely the primary ingredients you want to be sure to have. By finding these identical base ingredients, you will be able to create your own version of the recipe without stepping too far off base. Here are three different ingredient lists to make hummus with the common ingredients highlighted.
Next comes the cooking process. Not everyone has a Vitamix or a Ninja blender, and that is fine! I always try to make sure that I have the equipment or a different way to cook the dish in order to create a similar product. If you are making a pureed soup and the recipe says to blend up the roasted cubes of butternut squash, take a step back. Yes, a butternut squash is going to cook faster if you dice and roast it before you puree in a blender with the liquid.
However, cutting it in half and roasting it skin side up will save you time in the long run because the process of peeling and dicing a hard squash like butternut is laborious and difficult. After roasting the halved butternut until tender, you can scoop it with a spoon and an immersion blender will achieve the same, if not better, final product. Remember there are variations to every technique! Here are three different methods for making butternut squash with the blending technique highlighted. Which would you choose?
Recipe 1
- Melt the butter in a large pot, and cook the onion, celery, carrot, potatoes, and squash 5 minutes, or until lightly browned. Pour in enough of the chicken stock to cover vegetables. Bring to a boil. Reduce heat to low, cover pot, and simmer 40 minutes, or until all vegetables are tender.
- Transfer the soup to a blender, and blend until smooth. Return to pot, and mix in any remaining stock to attain desired consistency. Season with salt and pepper.
Recipe 2
- Melt the butter in a soup pot over medium heat, then add the onion, salt, and pepper, and cook for 10 minutes, until the onions are soft.
- Add the roasted butternut squash cubes and cinnamon, and stir for 2 minutes, until the cinnamon smells fragrant.
- Add the stock, bring the liquid to a boil over high heat, then reduce to a simmer. Cook for 2 minutes at a simmer.
- Puree the soup, either using an immersion blender, or by cooling the soup slightly and blending in a blender (you will likely need to do this in batches).
- Taste the soup, and see if it needs more seasoning.
- Serve as is, or with a drizzle of heavy cream and a few pumpkin seeds, if desired.
Recipe 3
- Combine salt and curry powder; set aside.
- Rinse lentils; set aside.
- Heat butter in a large saucepan over medium heat.
- Add curry mixture; stir until fragrant, about 1 minute.
- Add onion, garlic, and ginger; cook until translucent, about 4 minutes.
- Add squash; cook until just beginning to soften, about 5 minutes.
- Add stock and water. Bring to a boil; reduce to a simmer.
- Cook until squash is tender, about 10 minutes.
- Stir in lentils; cook until soft, 10 to 15 minutes.
Now that you have built your own simplified recipe and know how you are going process the ingredients, next comes the seasoning game. If you know that you need 1 teaspoon of salt in your recipe, that does not mean you are going to wait until the end to measure your salt and add it right before you eat. The point of salt is to enhance the flavors of your food and if used correctly, you can bring out the flavors of each ingredient individually to create a harmony of vibrant flavors.
The term “season in layers” is hugely important. If you are following a recipe, your best guideline is to lightly season with salt and pepper every time you add another ingredient to the pot or pan. By doing this you are pulling moisture from each ingredient and allowing the heat to evaporate the water, in turn concentrating your flavors more and more. This trick alone will help you to create a depth of flavor that will shock your pallet. Let's try it in this farro recipe.
Creamy Herb Farro with Wilted Leeks
1½ cup farro
1 Tablespoons unsalted butter
1 leek, sliced in to 1/8-inch ribbons
4 cups chicken or vegetable stock
1 Tablespoon fresh thyme
1 Tablespoon fresh oregano
Salt and pepper to taste
- →Place butter in a pan on medium heat and once melted, add leeks and stir until leeks soften and are translucent.
- →Add thyme and oregano and cook for 30 seconds or until fragrant, then add stock and farro.
- Heat until boiling, reduce heat to a simmer and cover. Cook for 35 minutes and remove from heat, leaving covered for an additional 10 minutes.
- →Season with salt and pepper and serve.
Instead of just seasoning in the final step, I've indicated which steps I would lightly season in with arrows above (→).
My last point goes hand in hand with the seasoning rule. Proper cooking temperature and handling of ingredients can make one ingredient worth three ingredients. I always tell my students to investigate the verbiage in your recipe. If you are instructed to “sear” the meat, that insinuates that you will need to heat your pan on high until it is fully heated and then add your oil and meat. On a regular basis, students in my classes will put a pan on the burner, add the oil immediately, and then after a minute add the meat. But if your pan is not sizzling like the crowd at an NFL game, than it was not hot enough!
Searing is done to create flavor through the browning of proteins (called the Maillard reaction). This is the reaction that occurs after heat denatures the proteins down to their amino acid form and creates the coveted flavor that makes all our pallets smile! If your pan is not hot enough, then you will end up steaming your meat through and thus make it tough as high temp cooking can often do. This goes for baking, braising, stewing, and all cooking techniques. Look up the meaning of words and you may be surprise that you have been doing it wrong for a while.
Culinary arts is a realm that has endless twists and turns, and every person has their own style. This manipulation of food makes it hard to figure out when someone has taken a dish too far from its roots or if it has been over simplified. It's up to you as the cook to make that call. These steps may take a little extra time and research on the first run of a recipe, but they will allow you to learn and create your own recipe that can become your own and perhaps even your signature dish one day!
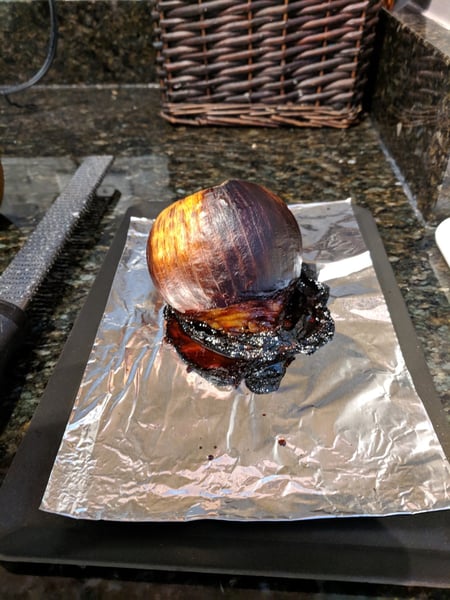
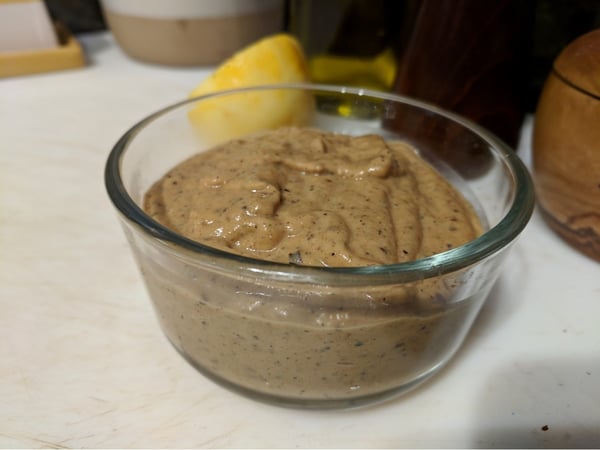
Below is my Charred Onion Cream Sauce recipe. This is the ultimate example of taking one ingredient and making it into many flavors. The pictures show that by cooking this onion properly it builds layers and layers (literally) of flavor and with a few extra ingredients you can create a fantastic sauce, dip, glaze, marinade or whatever you want to use it for.
Charred Onion Cream Sauce
Yield: 4 servings
Active Time: 10 minutes
Start To Finish: 1 hour, 45 minutes
1 large yellow onion
¼ cup Greek yogurt
1 lemon's zest and juice
2 cloves roasted garlic
1½ teaspoon thyme
Salt and pepper, to taste
1. Cut the top and bottom off of the onion and peel away the dry skin.

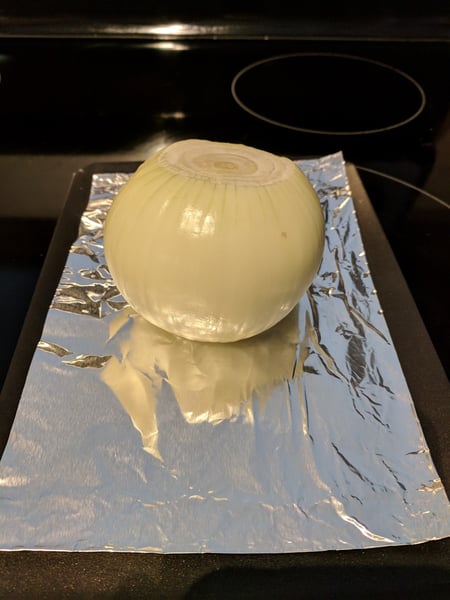
2. Place the onion on a pan with aluminum foil under it and place in a cold oven. Turn the oven to 400°F and cook until onion is fully burnt/charred on the outer layers, about an hour and a half.
3. Remove onion and cut into quarters, place in a blender with all ingredients and puree until smooth. Season to taste with salt and pepper.
The Chopping Block's Culinary Boot Camp and Flavor Dynamics classes focus on the nuances of cooking that may not be understood just by looking at a recipe. Join us for one or both of these amazing classes that will help you be a better cook who doesn't have to rely on recipes to the letter!