

When I want to learn, teach, or write about a new culinary technique, I tend to go down various rabbit holes of online research, cookbooks, recipe testing, and trial and error to figure out how to master that technique for myself but most importantly, for me to teach others. I get a bit obsessed with the subject matter because one of my favorite parts of my job at The Chopping Block is being able to answer as many questions that arise as possible in order for my students to understand and feel comfortable with the material I am teaching. So here I am, a little late to the fermentation game, but nonetheless ready to teach you all I have learned during this new obsessive learning bender of mine.
What is lacto-fermentation you ask? It is the most common form of fermentation for preserving and pickling food.
It is the process by which bacteria break down the sugars in foods and form lactic acid. The “lacto” stands for lactobacillus bacteria. Not to be confused with lactose. Lacto-fermentation doesn’t use dairy. Lacto-fermentation is the oldest form of food preservation in the world. It involves only salt, water and vegetables. The saltwater brine creates an anaerobic environment (free of oxygen) where only lactobacillus bacteria can survive. The lactobacillus bacteria act as a preservative, keeping harmful bacteria from living in the ferment.
Stage one of lacto-fermentation: Vegetables are submerged in a brine that is salty enough to kill off harmful bacteria. The Lactobacillus good guys survive this stage and begin stage two.
Stage two of lacto-fermentation: The Lactobacillus organisms begin converting lactose and other sugars present in the food into lactic acid. This creates an acidic environment that safely preserves the vegetables. This is what gives lacto-fermented foods their classic tangy flavor. The result is a food that is loaded with probiotics and flavor.
Lacto-fermented foods include yogurt, sauerkraut, kimchi and pickles. Not to be confused with the pickling method of foods as a preservative using vinegar, salt, and sugar to produce a pickled vegetable. Fermented vegetables do not use vinegar. Refrigerated pickles at the supermarket are lacto-fermented and good for your gut, but shelf stable room temperature pickles are just vinegar and salt pickles that have been heated in order to preserve them. But the term tends to be used interchangeably.
There is also Ethyl alcohol fermentation; this is where the molecules in starches or sugars are broken down by yeasts into alcohol and carbon dioxide molecules to produce things like wine, beer and other alcoholic beverages and Acetic acid fermentation; this is where starches and sugars from grains and fruit ferment into sour versions of themselves, much like apple cider vinegar. But those topics will be for another blog! Today I will be focusing solely on lacto-fermentation giving you some tips and recipes along the way.
Dill and Garlic Fermented Green Beans
Scroll down for a printable version of this recipe
Yield: 1 quart
Prep Time: 15 minutes
Total Time: 3-4 days
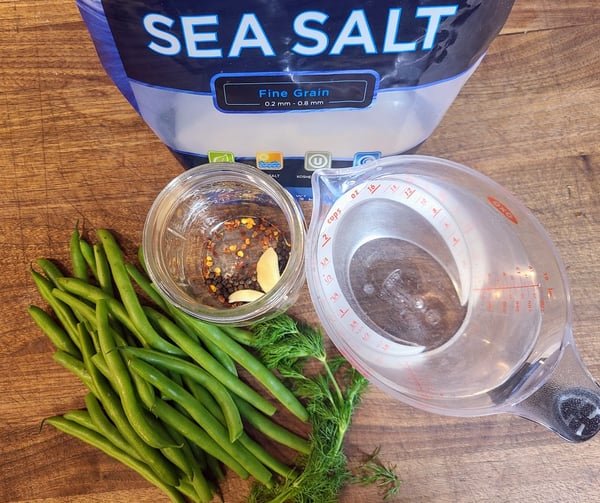
1 pound green beans
2 cloves garlic
2 sprigs of dill
1/2 teaspoon chili flakes
4 cups of filtered water
2 Tablespoons of fine sea salt
1 quart size jar or 2 small jars
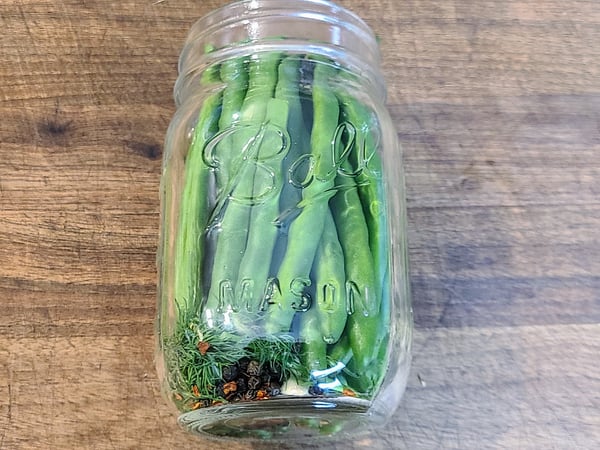
1. Wash and trim the green beans and pack them into your jar. Make sure they fit inside the jar with at least 1” of head space.
2. Add the garlic, dill, and chili flakes to the jar with the green beans.
 3. Make the saltwater brine by mixing 1/2 cup of warm water with the salt and stir until the salt has dissolved.
4. Add the remaining water to the salt water once the salt has dissolved.
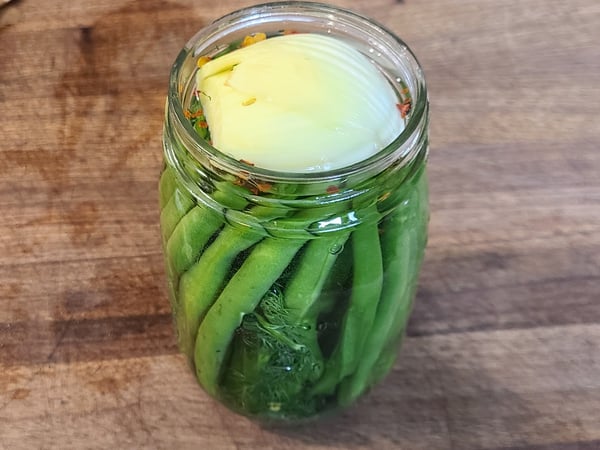
5. Pour the brine into the jar with the green beans. There should be enough to submerge the green beans under the brine. If not, make more brine and add it to the jar. You may need to weigh down the green beans. I used a piece of fennel to keep the beans submerged under the brine.
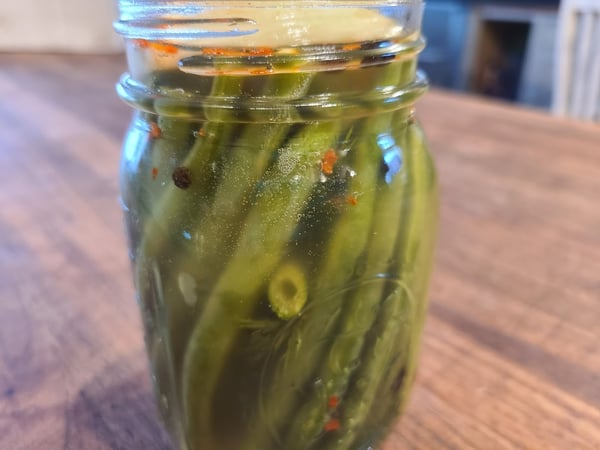
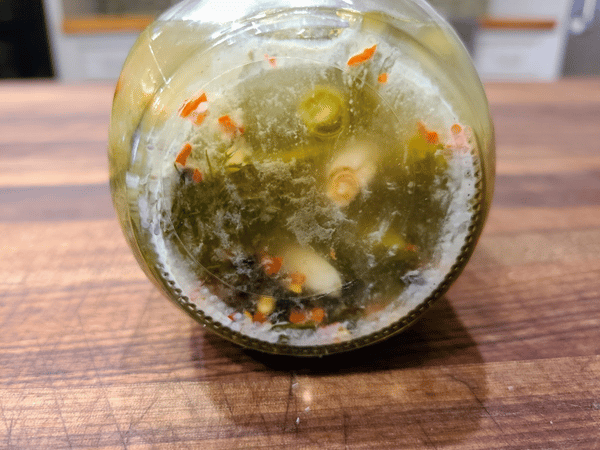
 6. Cover the jar loosely with a lid and store in a cool, dry place away from direct sunlight for 3-7 days. Here is a video of my green beans after fermenting for three days at room temperature:
7. Once the brine is cloudy and bubbly, try a green bean to see if it's ready. It should be sour and smell like pickles.
 8. Store in the refrigerator for up to a month.
Lesson 1: Use filtered water. This is very important because tap water contains chlorine that can hinder the fermentation process.
Lesson 2: Using a high-quality salt is key. The sweet spot for most ferments is a 2-3% brine solution, with a few vegetables benefiting from stronger brine, up to 5% salinity. That’s 20 to 30 grams of salt for each liter of water for most harder veggies and veggies prone to mold like peppers need 3-5%.
Lesson 3: I had a mini panic attack when my green bean liquid started turning cloudy and developed a white film on the bottom of the jar. This is completely normal though and a sign that it is fermenting! On that same note: A white film that is not fuzzy or in round patches is called kahm yeast. It is very common on top of the vegetables and quite safe.
Fermented Kimchi
Yield: 1quart
Prep Time: 30-45 minutes
Total Time: 4-5 days
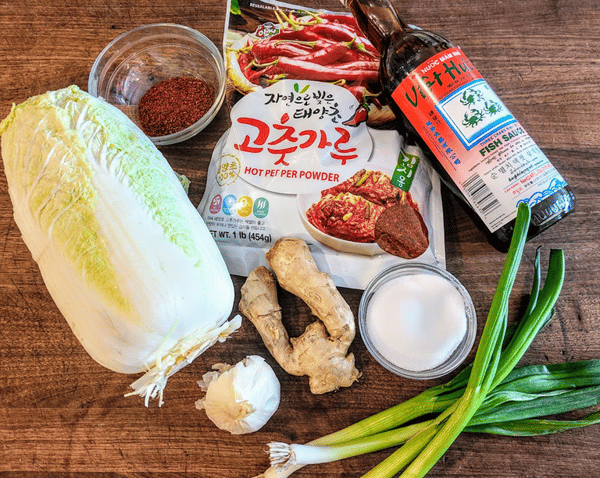
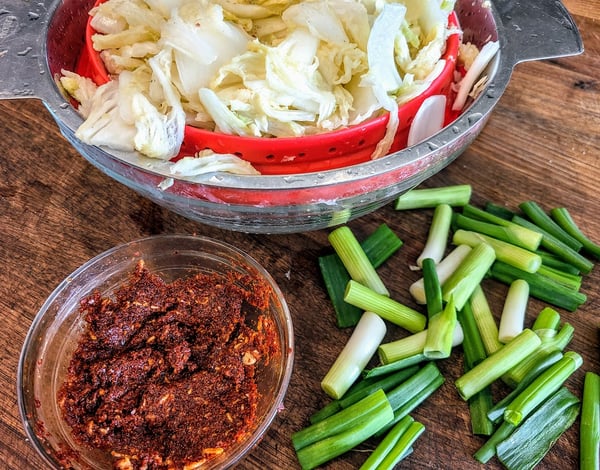
1 medium head Napa cabbage (about 2 pounds)
1/4 cup iodine-free sea salt or kosher salt
Water, preferably distilled or filtered
1 Tablespoon grated garlic (5 to 6 cloves)
1 teaspoon grated peeled fresh ginger
1 teaspoon granulated sugar
2 Tablespoons fish sauce or salted shrimp paste, or 3 Tablespoons water
1 to 5 Tablespoons Korean red pepper flakes (gochugaru)
8 ounces Korean radish or daikon radish, peeled and cut into matchsticks(I did not have any but wish I did!)
5 medium scallions, trimmed and cut into 1-inch pieces
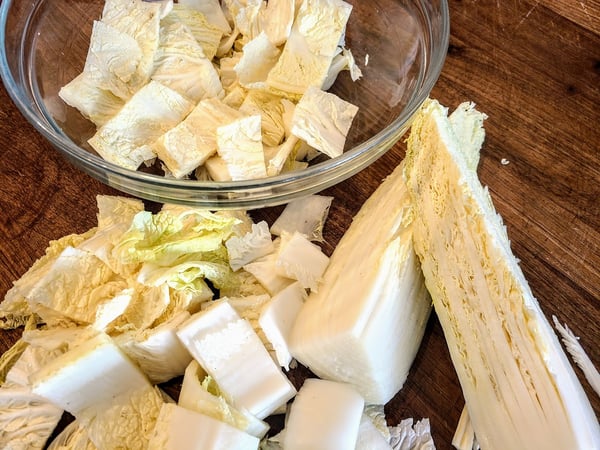
1. Cut the cabbage lengthwise through the stem into quarters. Cut the cores from each piece. Cut each quarter crosswise into 2-inch-wide strips.
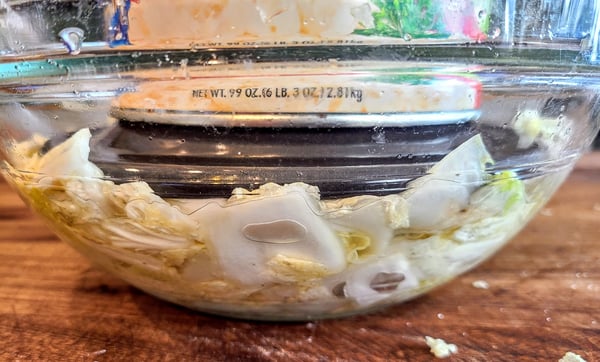
 2. Place the cabbage in a large bowl and sprinkle with the salt. Using your hands, massage the salt into the cabbage until it starts to soften a bit.
3. Add enough water to just cover the cabbage. Put a plate on top of the cabbage and weigh it down with something heavy. Let stand for 1 to 2 hours.
 4. Rinse the cabbage under cold water 3 times. Set aside to drain in a colander for 15 to 20 minutes. Meanwhile, make the spice paste.
5. To make the spice paste mix the garlic, ginger, sugar, and fish sauce, shrimp paste, or water and stir into a smooth paste. Stir in the gochugaru, using 1 tablespoon for mild and up to 5 tablespoons for spicy (I used 4 tablespoons); set aside until the cabbage is ready.
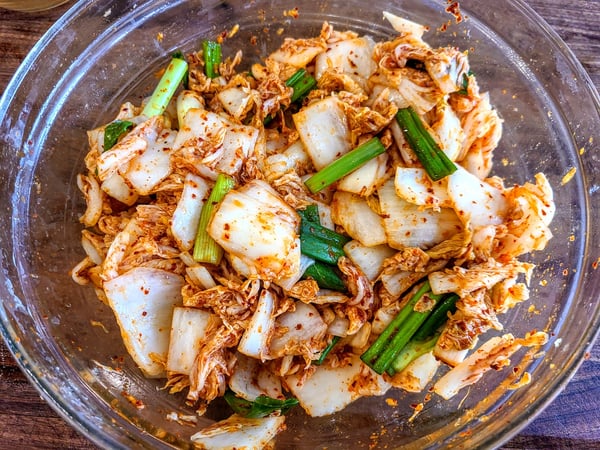
 6. Gently squeeze any remaining water from the cabbage and add it to the spice paste. Add the radish and scallions.
7. Using your hands, gently work the paste into the vegetables until they are thoroughly coated. Gloves are optional here but highly recommended to protect your hands from stings, stains and smells!
 8. Pack the kimchi into a 1-quart jar. Press down on the kimchi until the brine (the liquid that comes out) rises to cover the vegetables, leaving at least 1 inch of space at the top. Seal the jar.
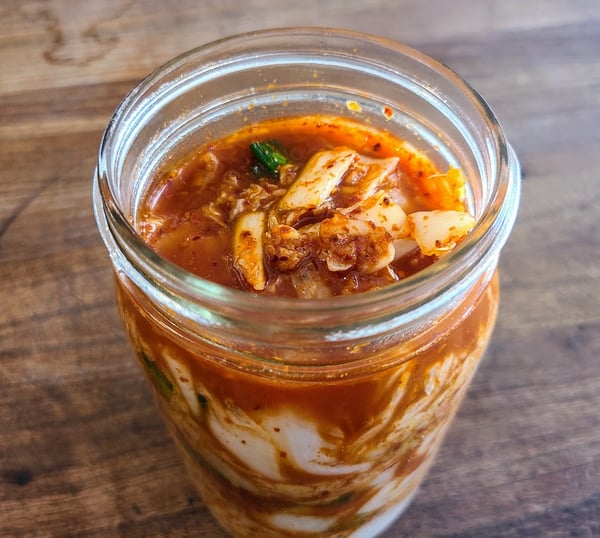 9. Place a bowl or plate under the jar to help catch any overflow. Let the jar stand at cool room temperature, out of direct sunlight, for 1 to 5 days. You may see bubbles inside the jar and brine may seep out of the lid.
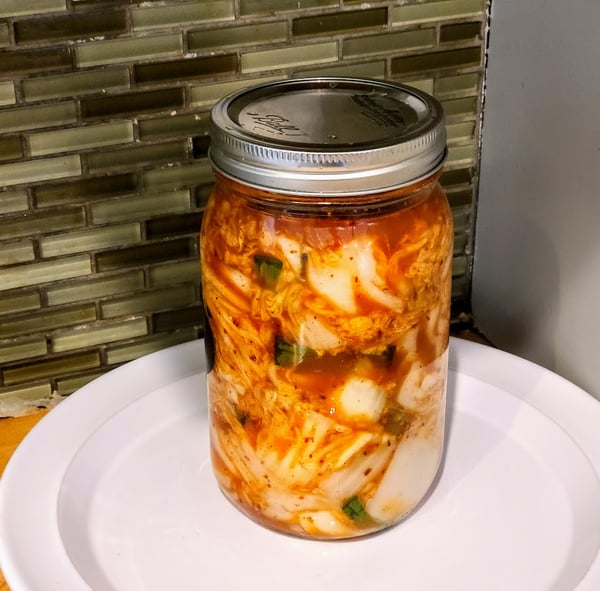 10. Check the kimchi once a day, opening the jar and pressing down on the vegetables with a spoon to keep them submerged under the brine. Taste a little at this point, too! When the kimchi tastes ripe enough for your liking, transfer the jar to the refrigerator. You may eat it right away, but it's best after another week or two.
Lesson 4: Make sure to burp the lid daily to release gasses built up during the fermentation process and make sure vegetables are still submerged. Don’t worry if you do not see bubbles right away some vegetables take longer to ferment than others and it is not necessarily a bad sign.
Lesson 5: You can tell a ferment is safe to eat if it smells sour and pleasant. If it smells rancid, like broccoli or lettuce rotting in your fridge, then something went wrong, and it should be thrown out.
If fermentation still seems a little daunting or dangerous to you, I want to offer an alternative kimchee recipe that comes together very quickly without having to worry if it will be safe to eat. Here is a method for making a kimchee that is not fermented. The result will be somewhat less pungent, but provides the key flavors of this traditional relish in a fraction of the time.
Quick Kimchee
Yield: 5 cups
Active time: 30 minutes
Start to finish: 30 minutes
5 cups water
1/2 cup kosher salt
1 head (about 2 pounds) napa cabbage
5 cloves garlic, peeled
1-inch piece ginger, peeled and sliced
1 large shallot, peeled and sliced
3 Tablespoons fish sauce
2 teaspoons granulated sugar
2 Tablespoons apple juice
1 teaspoon honey
5 Tablespoons Korean chili flakes
2 Tablespoon sesame seeds, toasted
- Place the water and salt in a saucepan and bring to a boil. Stir to ensure all of the salt has dissolved.
- Prepare the cabbage while the water is heating. Remove the bottom inch of the head of cabbage, and discard. Separate the leaves, and slice each leaf lengthwise into 1-inch pieces. Place the sliced cabbage in a large mixing bowl.
- Pour the boiling water over the cut cabbage leaves. Allow the cabbage to soak for 10 minutes. Stir the leaves, and continue to soak for 5 more minutes. The stem should bend without breaking when the cabbage has been properly soaked.
- Pour the cabbage into a colander, and rinse with cold water. Drain thoroughly.
- Place the garlic, ginger, shallot, fish sauce, sugar, apple juice and honey in a blender, and puree until you have a coarse texture. Pour this mixture into a small bowl, and add the chili flakes. Mix well. Note: The shallot should not be completely pureed.
- Transfer the drained cabbage to a bowl, and add the chili mixture and sesame seeds. Using tongs, toss the cabbage to coat it thoroughly with the chili mixture. (If you prefer to mix with your hands, wear gloves to protect your skin from the chilis.) Adjust the seasoning as needed.
Lesson 6: Lacto-fermented food have a wide variety of health benefits including aiding in digestive health, boosting your immune system and are rich in nutrients. Yet another reason to love this method of preserving food!
Lesson 7: Just about any vegetable can be fermented this way. My favorites are asparagus, peppers, garlic, cabbage, and radishes. You can even make chutneys or ferment fruit this way.
I hope these lessons and recipes will serve you well while trying out your own fermented vegetables.
And if you are interested in sourdough fermentation (which is not lacto-fermentation but who hasn't been obsessed with bread baking during this pandemic?), you won't want to miss The Chopping Block's special virtual demonstration class coming up in April. Certified Master Baker and Certified Bread Baker Melina Kelson will demystify the art of sourdough starters and sourdough bread on Sunday, April 11 at 1pm CST. Register now.
Our #tcbcookingchallenge for our private Facebook group this week is fermented foods. Try out one of these recipes or impress us with one of your own! I would love to hear any other lessons or tips you all have learned on lacto fermenting foods in your own kitchen in the comments section below.


Dill and Garlic Fermented Green Beans
Ingredients
- 1 lb green beans
- 2 cloves garlic
- 2 sprigs of dill
- ½ tsp chili flakes
- 4 cups of filtered water
- 2 tablespoons of fine sea salt
- 1 quart size jar or 2 small jars
Instructions
- Wash and trim the green beans and pack them into your jar. Make sure they fit inside the jar with at least 1” of head space.
- Add the garlic, dill, and chili flakes to the jar with the green beans.
- Make the salt water brine by mixing ½ cup of warm water with the salt and stir until the salt has dissolved.
- Add the remaining water to the salt water once the salt has dissolved.
- Pour the brine into the jar with the green beans. There should be enough to submerge the green beans under the brine. If not, make more brine and add it to the jar. You may need to weigh down the green beans. I used a piece of fennel to keep the beans submerged under the brine.
- Cover the jar loosely with a lid and store in a cool, dry place away from direct sunlight for 3-7 days.
- Once the brine is cloudy and bubbly, try a green bean to see if it's ready. It should be sour and smell like pickles.
- Store in the refrigerator for up to a month.