

As a chef, I’m always looking for ways to stretch ingredients and make the most out of quality cuts. Buying a whole primal and breaking it down yourself might seem intimidating, but once you’ve done it a few times, it becomes one of the most satisfying and economical ways to stock your freezer with great steaks.
I recently picked up a whole 7-rib prime rib roast from my local grocery store when it went on sale, and I thought it would be a good time to walk through how I like to break it down.
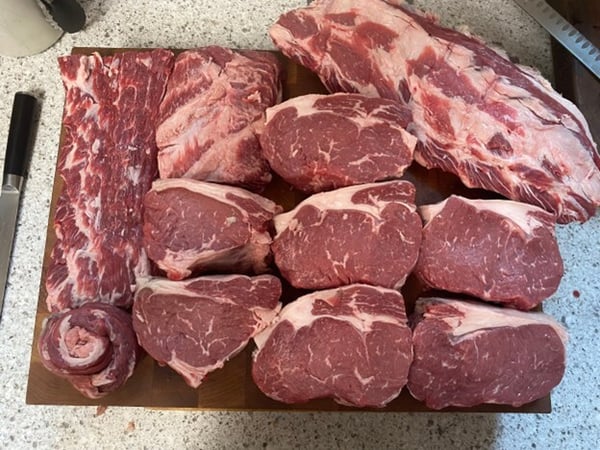
 When I saw the roast for $7.99 a pound, 15 pounds came to about $120. Not cheap, but considering I got nine thick ribeye steaks, a rack of beef back ribs, some scrap meat for tacos, and a pile of fat to render into tallow, it was a great value. Buying all of that separately would have cost at least $200.
 These steaks are cut from the rib section, what you’d know as ribeyes. There are a lot of ways to break down a prime rib, and this is the method I’ve come to prefer. Some folks just slice between the bones and end up with seven massive steaks, but I like to remove the bones and cut more moderately sized steaks that are easier to cook and serve.
I used a curved boning knife and a 10-inch slicer for this project.
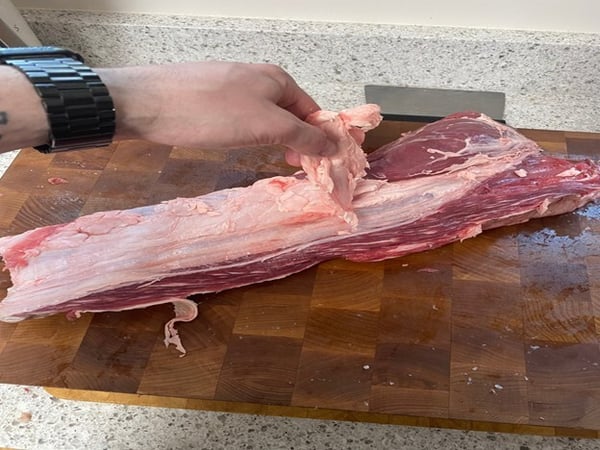
The first step was removing the rib bones in one clean slab. I started on the back side of the roast and made a shallow cut right along where the bones meet the meat. With my non-dominant hand pulling the bones for tension, I used long, steady knife strokes to stay tight to the ribs until the whole rack came off. I set this aside to cook later.


Next, I took off the “tip” muscle, a small, narrow piece that runs the length of the roast. I used my fingers first to find the natural seam where this muscle pulls away from the main roast. Once I had it mostly separated, I used the boning knife to clean up the connective tissue and remove it fully.


I don’t like to remove the cap completely. Instead, I stop just before it fully pulls away, leaving a bit of that fat cap attached to the main muscle. This protects the meat while cooking and gives the steak some nice marbled fat to render out and add flavor.

Once the cap was mostly separated, I cleaned up the fat and silver skin. For anyone unfamiliar, silver skin is a tough membrane you’ll see running through some cuts. It doesn’t break down during cooking and should be removed. As for the fat, not all of it is created equal. Firm, dry fat is great for rendering into tallow; soft, squishy fat usually doesn’t cook down well and can be trimmed away.

From the cap, I cut two steaks. One looked a bit like a skirt steak, and the other was shorter and thicker. Both are good eating.
Next, I cleaned up the rest of the roast, trimming excess fat and tackling any obvious silver skin. Sometimes silver skin hides under a fat cap. Whether or not to remove it depends on your priorities. I like to leave fat intact when I can, so I pick and choose what to trim.
Then it was time to cut the main steaks. I used my slicer knife to cut steaks from the main muscle about three fingers wide. As the roast tapered, I made those steaks a little thicker to keep the portions fairly even.

After all the steaks were cut, I did a final clean-up, trimming fat where needed. I saved every usable piece of fat to render into tallow later. (For more on that, check out Chef Drake’s Liquid Gold blog.) From the tip muscle I removed earlier, I trimmed away the heavy fat and was left with a long strip of meat. I usually roll it up into a spiral and save it for tacos, or tie it and grill it like a small steak.
Each piece got vacuum sealed and labeled with the cut, weight, and date. Anything I wasn’t using right away went into the freezer. If you don’t have a vacuum sealer, parchment followed by plastic wrap and a freezer bag will work. Just push out as much air as you can. Properly wrapped, these steaks will keep well in the freezer for up to a year.
My wife and I like to treat ourselves to a good steak about once a month, so this batch will last us well into next year. These are solid, restaurant-quality steaks, and each one is large enough to feed two to three people easily.
There’s a real satisfaction in breaking down a big piece of meat like this yourself. You get exactly what you want, you waste very little, and you end up with a freezer full of steaks that you cut with your own hands. If you’ve been thinking about tackling a whole prime rib, I hope this gives you a solid place to start.
Learn how to butcher a whole beef tenderloin (as well as whole round fish and whole chicken) in our Culinary Boot Camp. This five-day course will give you the confidence to tackle projects like butchering a big piece of meat on your own.
