

I was recently watching Stanley Tucci: Searching for Italy where Stanley travels to the island of Sicily and enjoys many mouth-watering regional specialties. One of the dishes that’s talked about in this episode are arancini (crispy fried risotto fritters), and ever since then I have had a craving, so they have been on my list of recipes to make at home.
 Arancini are saffron-tinted risotto balls that have been breaded and fried to crispy perfection. With their amazing color coming from saffron, they get their name by their close visual resemblance to small oranges, which is what arancini translates to in English. Arancini can be stuffed with a variety of fillings such as a meat ragu, ground beef or Italian sausage, or just cheese. In all honesty, making arancini from scratch is a bit laborious, so I kept the filling simple and stuffed mine with cheese. Although you can find different versions of arancini throughout Italy, these melt-in-your-mouth fritters are originally a Sicilian street food enjoyed as a snack.
The first step in making arancini is to prepare a saffron risotto, which is amazing in itself even if you don’t go as far as making the arancini. In order to make successful risotto, I have three tips for you:
1. Make sure your cooking stock is warm. This will greatly reduce the amount of time you spend at the stove.
 2. Use the correct type of rice. Look for arborio rice which is easy to find or even better, carnaroli rice. This is said to be the undisputed king of risotto rice and yields the creamiest risotto. Both are short grain varieties of rice and will produce excellent results.
 3. Stir, stir and stir some more! While cooking the risotto, stir the rice as much as you’re able. The stirring allows for the grains of rice to rub up against each other which helps release the starches in the rice creating a creamy consistency.
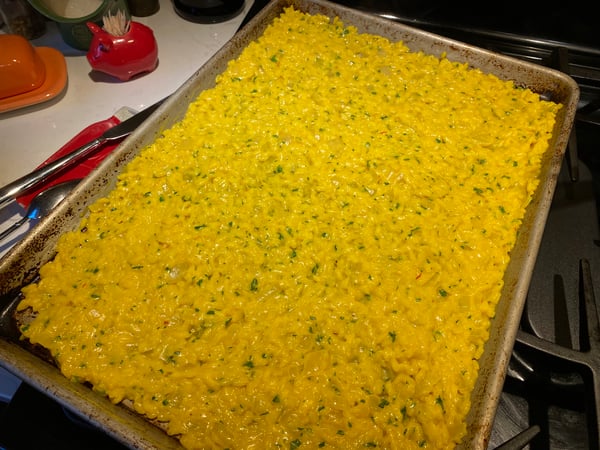
 Once the risotto is done cooking, keeping in mind you want the grains of rice to be cooked all the way through without an “al dente” center, it’s time to chill the risotto. Spread your risotto out in a thin, even layer on a sheet tray or in a large baking dish and place in the refrigerator, uncovered. If you don’t have a lot of time to chill the rice, make sure it’s spread out as thin as possible. It’s important for the starches to gel in order for the rice balls to stick together. The minimum amount of time that I have chilled the rice is 1 hour, and the arancini held together successfully.
 Once your risotto is chilling and you’re ready to move onto the next step, take this time to set yourself up for the arancini assembly and frying part of the recipe. If everything is in its place (mise en place), this will go smoothly. Here’s what you will need:
- A 3-step breading station. Measure your flour, eggs and panko breadcrumbs in three separate, shallow dishes.

- Your cubes of cheese. Think melty cheese here such as mozzarella or fontina. I suggest you have these out at room temperature about an hour before you form the arancini; the cheese cubes will melt much more evenly while frying if they are not cold from the fridge.
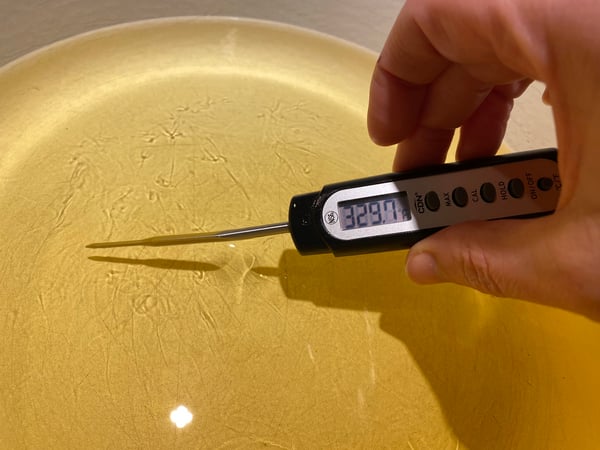
- Your pot of oil heating. Fill a deep, heavy pan such as a French oven just below the halfway mark with a neutral oil such as canola or vegetable. Using a deep fry thermometer (a very important tool to have!), slowly heat the oil until it reaches 325°.
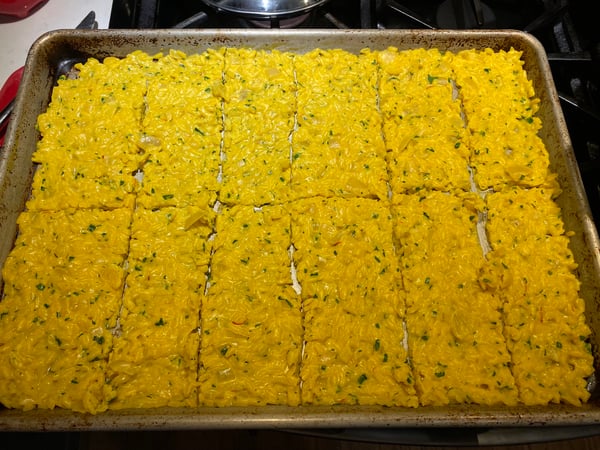
 Now you’re ready to shape, bread and fry the arancini! I have found that dividing the cooked and cooled risotto into 12 equal portions makes the perfect serving size for four people.
 To shape the arancini:
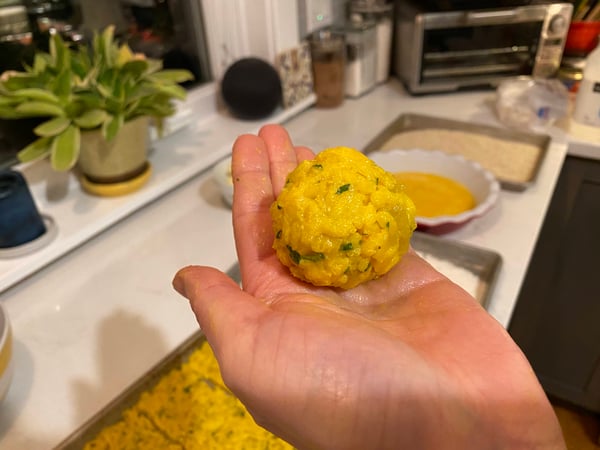
Scoop a portion of the cold risotto into your hand and make a loose ball.
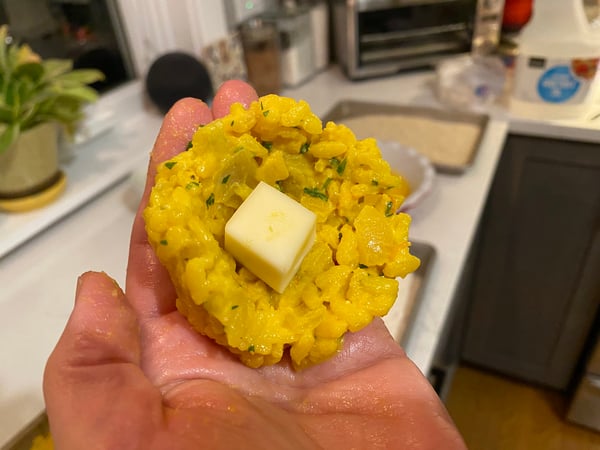
 Using your fingers, form the ball into a cup and add a cube of cheese.
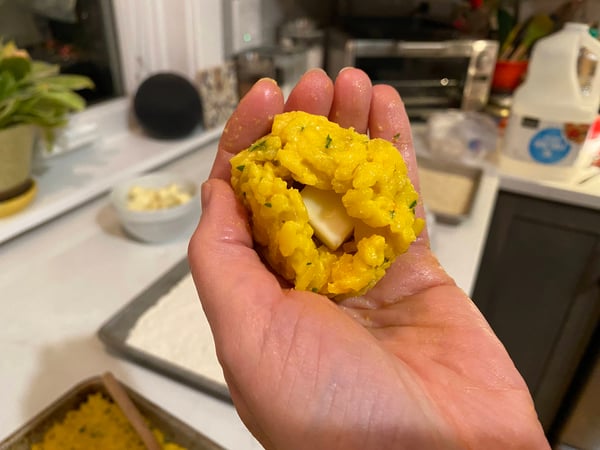 Envelope the cheese with the rice, and roll into a tight ball. In order to be more efficient in your kitchen, form all of the balls before moving onto the breading step.
 To bread the arancini:
Working in batches, gently roll the arancini into the flour with the hand you’re going to keep dedicated to the dry breading ingredients.
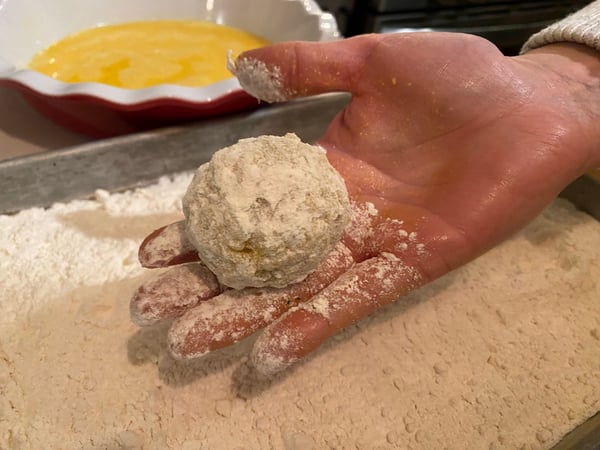 Transfer the floured arancini to the eggs, and use your other hand, the one that will be dedicated to just handling the eggs, and evenly coat the balls.
 Place the arancini into the breadcrumbs, and using your dry hand again, roll until well coated. Again, in order to be most efficient, bread all of the arancini before you begin frying.

 To fry the arancini:
Before you begin, make sure of two things: Your oil is at the correct temperature (325°) and that you have a landing pad for the freshly fried fritters. It can be a rack set over a sheet tray, which is ideal to prevent the bottoms from getting soggy, or a paper towel-lined plate works too.
Place 2 to 3 arancini at a time on your slotted spoon or skimmer, and gently lower into the oil.
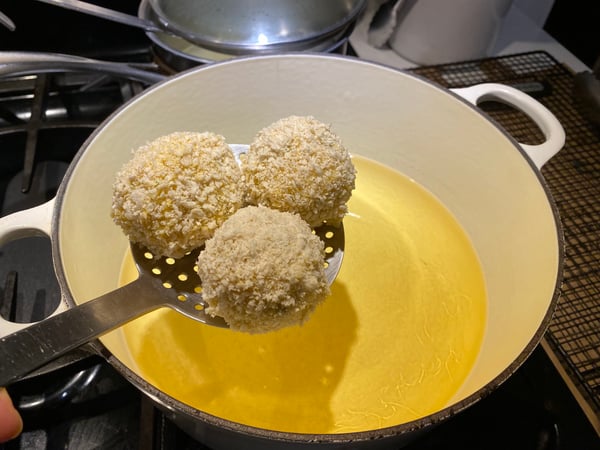 Depending on the size of your pan, you can fry any where from 4 to 6 arancini at a time; just make sure you don’t over crowd the pan. As soon at they hit the oil, the temperature is going to decrease, so compensate by increasing the heat right away and as soon as the temp returns to 325°, reduce the heat again to maintain a consistent temperature.
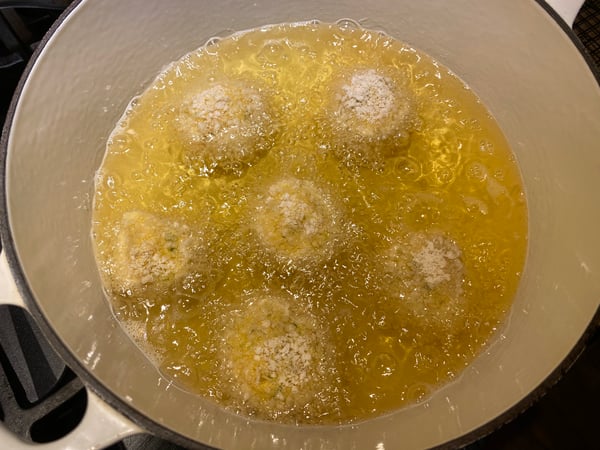
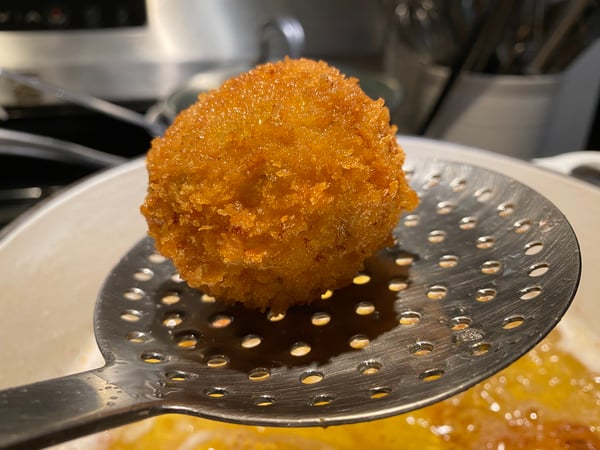
 Fry the fritters, turning once during the process, until the breadcrumbs are golden brown. Transfer the arancini to your landing pad, and continue to fry.
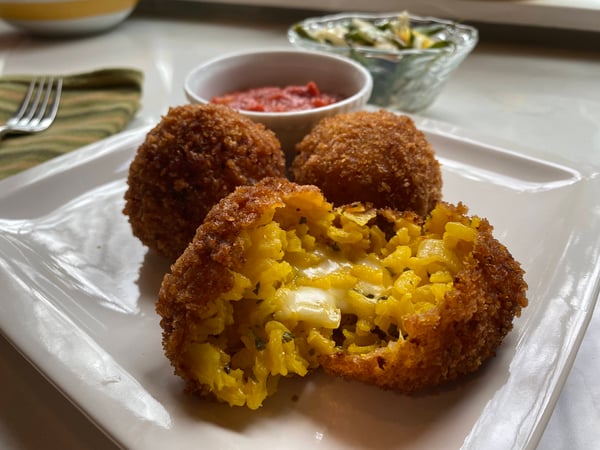
 Once all of your arancini have been fried to crispy perfection, platter them up and serve with warm tomato sauce on the side for dipping. These are great on their own, but to incorporate them into a meal, you can serve a salad and/or any protein of your liking (like Italian sausages!) on the side.
Arancini with Tomato Sauce
Scroll down for a printable version of this recipe
Yield: 4 servings; 12 arancini
Prep time: 30 minutes
Inactive time: 1 hour
Cook time: 30 minutes
Start to finish: 2 hours
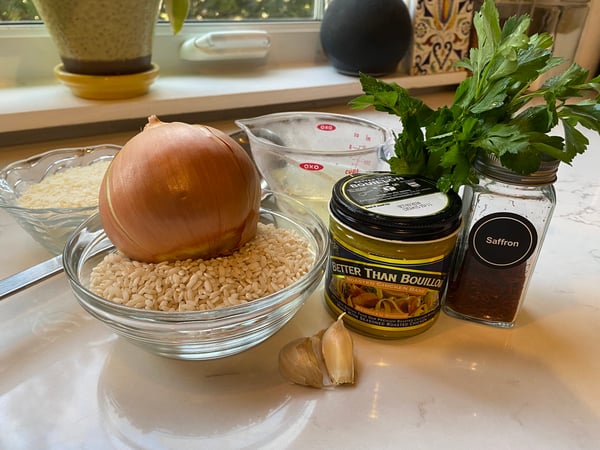
6 cups chicken stock
3 tablespoons butter
1 small or 1/2 onion, very small dice
2 cloves garlic, minced
1 cup arborio rice
1 teaspoon saffron
3/4 cup white wine
2 tablespoons fresh herbs of your choice, rough chopped
3/4 cup parmesan cheese, grated
1/2 stick butter, cut into tablespoon-size pieces
Salt and pepper to taste
Oil for frying
1 1/2 cups all-purpose flour
4 eggs, well beaten
4 cups panko breadcrumbs
1/2 pound fontina or mozzarella cheese, cut into 1/2-inch cubes (you’ll need 12 cubes of cheese), room temperature
Your favorite tomato sauce, warmed
- Heat the stock in a saucepan, and keep over low heat while preparing the risotto base.
- Heat a wide, heavy pan over medium heat, and add the butter. Sauté the onions until softened, 3 to 4 minutes.
- Add the garlic, and cook until aromatic, about 1 minute.
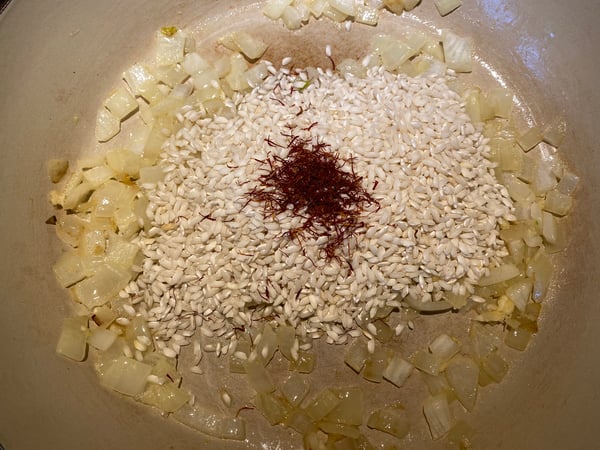
- Stir in the arborio rice and saffron and cook, stirring frequently, to toast the grains.
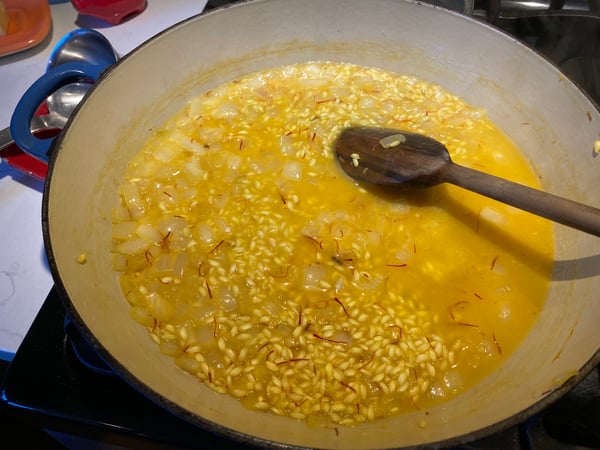
- Deglaze the pan with the white wine, scraping free any browned bits from the bottom of the pan. Cook until the wine has reduced.
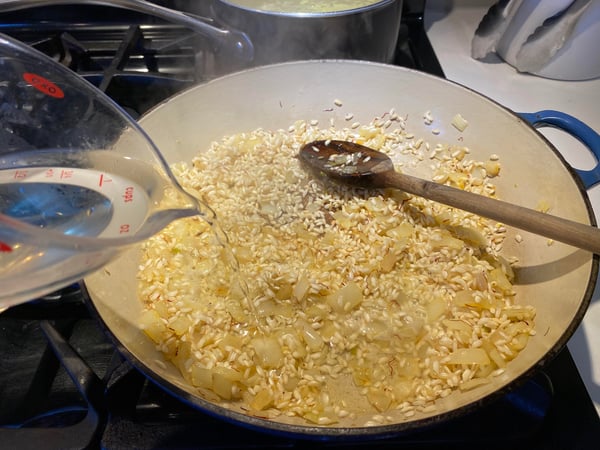
- Add the stock one ladleful at a time, stirring until the pan is dry before adding more. Continue in this fashion until the rice is completely tender all the way through, about 20 minutes. Tip: While cooking the risotto, keep your heat on medium/medium-high heat in order to cook the rice more quickly.
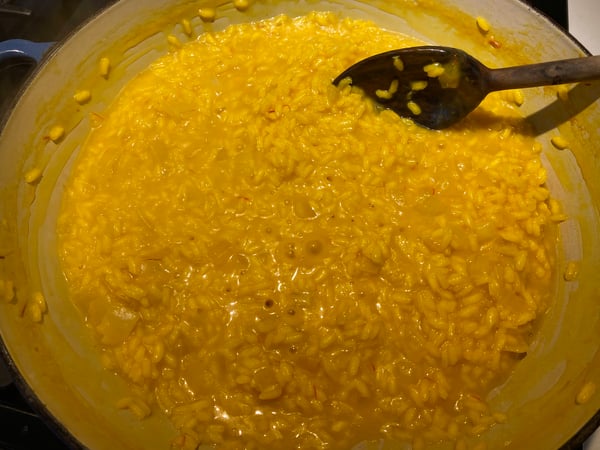
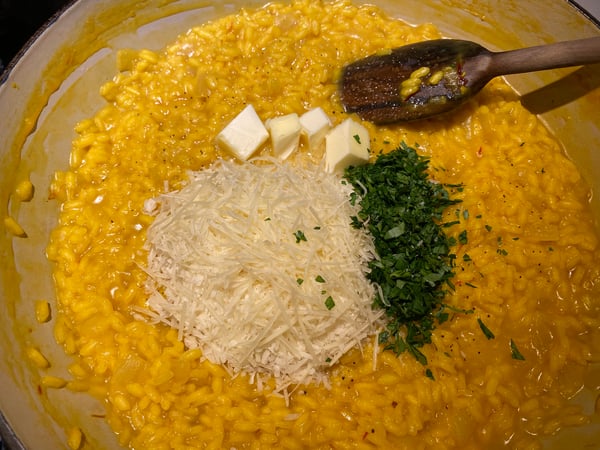
- Remove from the heat, and stir in the fresh herbs, cheese and butter. Season with salt and pepper to taste.
- Spread the risotto out on a sheet tray, in a thin even layer, and refrigerate until cold.
- While the risotto is chilling, start heating the oil. Fill a deep, heavy pot just under the half way mark with oil and heat until 325° on a deep fry thermometer.
- Set up your breading station by placing the flour, eggs and breadcrumbs in three separate, shallow dishes.
- When ready to form the arancini, use a spatula to divide the cold rice into 12 equal sections. Using your hands, form a section of rice into a cup, and place a cube of cheese in the cup. Enclose the rice around the cheese and roll into a ball with your hands. Repeat these steps with the remaining sections of rice and cheese.
- To dredge the arancini, roll a few balls at a time in the flour, coating them well. Transfer to the egg wash and then roll in the panko breadcrumbs until evenly coated. Transfer to a plate or sheet tray.
- Fry the arancini in batches, gently turning them as needed, until golden brown and crisp, 4 to 5 minutes. Tip: Keep an eye on the oil temp, as you will need to increase the heat a bit once you begin frying.
- Using a skimmer, transfer the arancini to a cooling rack set over a sheet tray.
- Transfer to a platter and serve with your favorite tomato sauce.
 Is this a lot of work? Yes. Is it worth it? 100%! It was a Sunday afternoon/evening when I made them at home and had so much fun… maybe that was due in part to the steady flow of red wine while cooking, but I genuinely loved the whole process of creating these Sicilian snacks. Biting into a freshly fried and crispy arancini and finding the melty cheese center made me forget about all of the dirty dishes in the kitchen.
 I hope this blog inspires you to give this recipe a try in your own home, but if you want to cook along with an expert for your first go at it, join us on Sunday, April 16 for a Virtual Arancini Workshop from 11am-1pm, and we’ll cook together and have a lot of fun!


Arancini with Tomato Sauce
Ingredients
- 6 cups chicken stock
- 3 tablespoons butter
- 1 small or 1/2 onion, very small dice
- 2 cloves garlic, minced
- 1 cup arborio rice
- 1 teaspoon saffron
- 3/4 cup white wine
- 2 tablespoons fresh herbs of your choice, rough chopped
- 3/4 cup parmesan cheese, grated
- 1/2 stick butter, cut into tablespoon-size pieces
- Salt and pepper to taste
- Oil for frying
- 1 1/2 cups all-purpose flour
- 4 eggs, well beaten
- 4 cups panko breadcrumbs
- 1/2 pound fontina or mozzarella cheese, cut into 1/2-inch cubes (you’ll need 12 cubes of cheese), room temperature
- Your favorite tomato sauce, warmed
Instructions
- Heat the stock in a saucepan, and keep over low heat while preparing the risotto base.
- Heat a wide, heavy pan over medium heat, and add the butter. Sauté the onions until softened, 3 to 4 minutes.
- Add the garlic, and cook until aromatic, about 1 minute.
- Stir in the arborio rice and saffron and cook, stirring frequently, to toast the grains.
- Deglaze the pan with the white wine, scraping free any browned bits from the bottom of the pan. Cook until the wine has reduced.
- Add the stock one ladleful at a time, stirring until the pan is dry before adding more. Continue in this fashion until the rice is completely tender all the way through, about 20 minutes. Tip: While cooking the risotto, keep your heat on medium/medium-high heat in order to cook the rice more quickly.
- Remove from the heat, and stir in the fresh herbs, cheese and butter. Season with salt and pepper to taste.
- Spread the risotto out on a sheet tray, in a thin even layer, and refrigerate until cold.
- While the risotto is chilling, start heating the oil. Fill a deep, heavy pot just under the half way mark with oil and heat until 325° on a deep fry thermometer.
- Set up your breading station by placing the flour, eggs and breadcrumbs in three separate, shallow dishes.
- When ready to form the arancini, use a spatula to divide the cold rice into 12 equal sections. Using your hands, form a section of rice into a cup, and place a cube of cheese in the cup. Enclose the rice around the cheese and roll into a ball with your hands. Repeat these steps with the remaining sections of rice and cheese.
- To dredge the arancini, roll a few balls at a time in the flour, coating them well. Transfer to the egg wash and then roll in the panko breadcrumbs until evenly coated. Transfer to a plate or sheet tray.
- Fry the arancini in batches, gently turning them as needed, until golden brown and crisp, 4 to 5 minutes. Tip: Keep an eye on the oil temp, as you will need to increase the heat a bit once you begin frying.
- Using a skimmer, transfer the arancini to a cooling rack set over a sheet tray.
- Transfer to a platter and serve with your favorite tomato sauce.