

Does this title leave you a little skeptical? Chocolate pasta? Pasta for dessert? Really? Well, when I first learned there was such a thing, it definitely left me wondering! It was Winter 2021, isolation was still required for many of us, and I was Zooming pasta classes from a chef in Bologna just to keep my head in the game. One of the available classes was on chocolate dessert pasta and, as uncertain as I was, I decided it was now or never so I jumped in – and I’m glad I did! So with Valentine’s Day being a very chocolatey holiday I thought this would be a fun post. However, since most of you probably already have your Valentine’s Day plans made, keep in mind this treat can be made anytime! While we’re making heart-shaped chocolate pasta today, what about a chocolate bunny for Easter or a chocolate flower shape for Summer? And if your dessert plans for tonight are uncertain, you may just want to gather up your ingredients and give this little twist on pasta a go!
In addition to the chocolate craving this day brings, I’ve also been on a citrus binge – ‘tis the season for that, as well! And this dessert definitely satisfies both yearnings, combining chocolate and orange flavors beautifully. When I was first introduced to this, it was as a filled pasta – the class made little square pouches and they were lovely. But I wanted the ability to create different shapes depending on the occasion, so I decided to simplify it with flat cut-out shapes, using the almost cannoli-like filling more as a garnish, along with the silky orange syrup “sauce”. Whether filled or not, the chocolate flavor of the pasta is very mild, but brought out by the flavor components of the filling and sauce. Getting more curious? I hope so!
I should mention that the classes I took centered around completely handmade pasta, utilizing no machinery. The pasta dough was made on a board and it was hand-rolled into a beautiful “sfoglia” from which we cut the shapes to fill. I had made pasta dough by hand many times, but I had never hand-rolled it. It is an amazing experience and I still do it from time to time – it’s definitely a practice-required technique and a true workout! But for the purposes of keeping this as simple as possible, I’m making this dough using a food processor and I’m rolling it out through a hand-cranked pasta roller. If you decide you’d like to prepare and work the dough by hand, by all means feel free to do so!
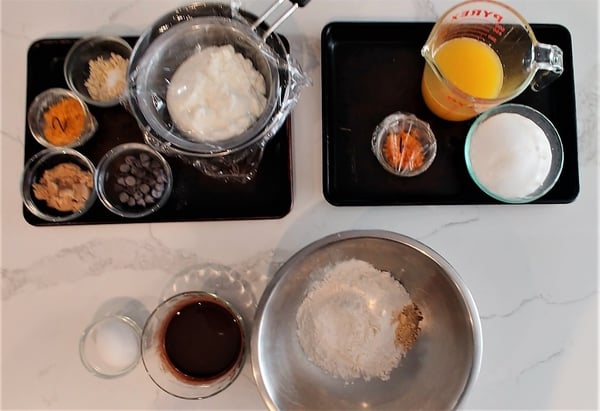
I like to gather all my ingredients ahead of time so I can access them easily along the way. Let me first mention what you will need, then we can get into how I sequence the preparation of the ingredients, the dough, the filling (even though it’s not actually filling anything, I still refer to it as such!) and the sauce.
Chocolate Pasta with Ricotta and Orange Syrup
Scroll down for a printable version of this recipe
Makes: 60 chocolate pasta hearts (15-20 servings)
Prep time: 1.5 hours
Cook time: 25 minutes
Inactive time: 90 minutes
Starting at the bottom of the photo, for the dough you will need:
- 200 g “00” Italian flour
- 1 egg (The egg should weigh 60-65 g WITH the shell – most commercial large eggs in the US fall within this range.)
- 15 g Dutch-processed cocoa powder
- 65 g near-boiling water (In the photo, this has already been combined with the cocoa, but more on that in the instructions that follow.)
- 1 teaspoon powdered ginger (In the photo, the ginger is in the same bowl as the flour.)
The ingredients for the filling are on the tray in the upper-left corner of the photo:
- 300 g drained whole milk ricotta (In the photo, the ricotta is still draining and is covered with a bit of plastic wrap. See instructions on weighing and draining ricotta below.)
- Zest from 2 oranges, reserving the 2 oranges for the sauce (You can use any type of orange; I prefer navel. In the photo, the “2” on the plastic wrap is just a note to myself that this is zest from 2 oranges.)
- 35 g brown sugar
- 30 g dark chocolate
- 20 g candied ginger
- Pinch of kosher salt (not shown in photo)
The ingredients for the sauce are on the tray in the upper-right corner of the photo:
- Zest from 1 orange, setting the zested orange aside (In the photo, the “1” on the plastic wrap is, again, a note to myself that this is zest from 1 orange.)
- Juice from 3 oranges, using the oranges zested for the filling in addition to the one zested for this sauce (Details on juicing and straining follow in the instructions below.)
- Granulated sugar, matching the weight of the strained orange juice (See details in the instructions below.)
I have found the following instructions to be the most efficient way to navigate this recipe. Since some items require “inactive time” for tasks like resting, draining, and cooling, you won’t just be doing the dough first, the filling second and the sauce third. You will be preparing different parts of each of these along the way, which will allow you to actually utilize those inactive moments and you’re not left with nothing to do but wait. So let’s go!
1. Put the ricotta (for filling) into a fine-mesh sieve set over a bowl to begin draining. Note that you want 300 g of drained ricotta, so you’ll need to begin with a bit more. I generally just drain an entire 15-oz (about 425 g) container and simply refrigerate whatever is left after measuring out the 300 g needed here. Lightly cover with plastic wrap or wax paper and let it sit for at least one hour. The length of time this takes is the reason why I set this up first.
2. Whisk together the cocoa powder and near-boiling water (for dough) until smooth. Set aside to cool. Again, since this needs to cool off a bit, I like to get it done close to the beginning.
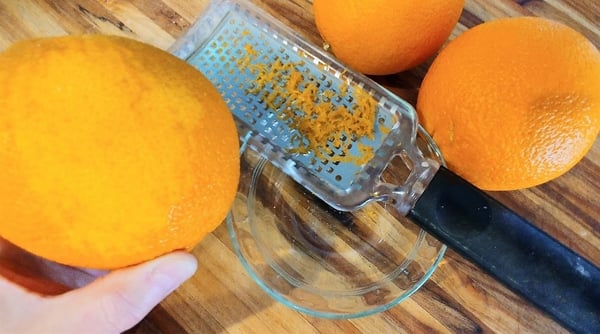
3. Zest all 3 oranges. I like to do these all at once. As you saw in the photos above, I marked the bowl with the zest of 2 oranges (for filling) with a “2”, and the bowl with the zest of 1 orange (for sauce) in a bowl marked with a “1”. I have learned not to trust things like that to memory! I prefer to zest citrus with a Microplane. Note the partially-zested orange in my hand in the photo below. You can see that I’ve only zested the very top layer. You want to go over each part of the orange only one time. This will help you avoid getting into the white pith below, which is very bitter. With the amount of zest used in this recipe, bitterness is definitely not a good idea! Set aside all 3 oranges to use for the sauce.
Now let’s make that chocolate pasta dough!
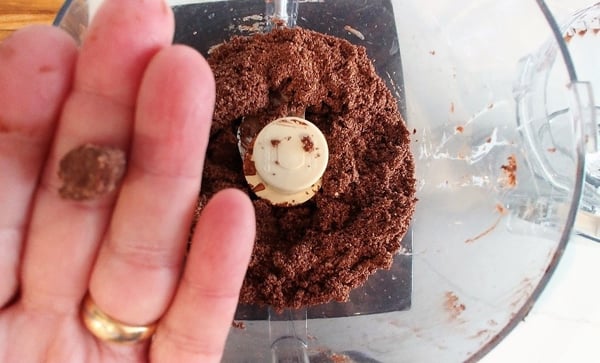
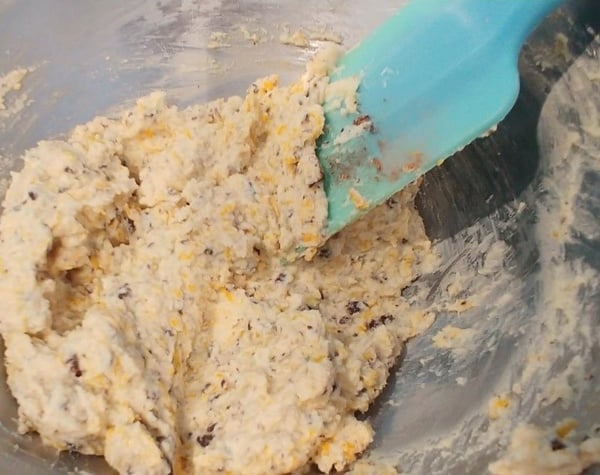
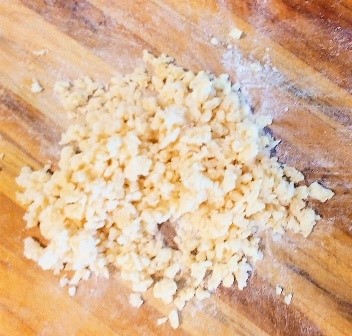
4. In the bowl of a food processor, pulse together the flour and powdered ginger to blend them evenly. Add the egg & cocoa powder/water mixture (a silicone spatula will help you scrape it all out). Process the mixture, scraping down the sides as needed. You’ll know it’s done mixing when, although it looks crumbly, you can pinch a bit between your fingers and it will hold together, as I’ve tried to illustrate below.
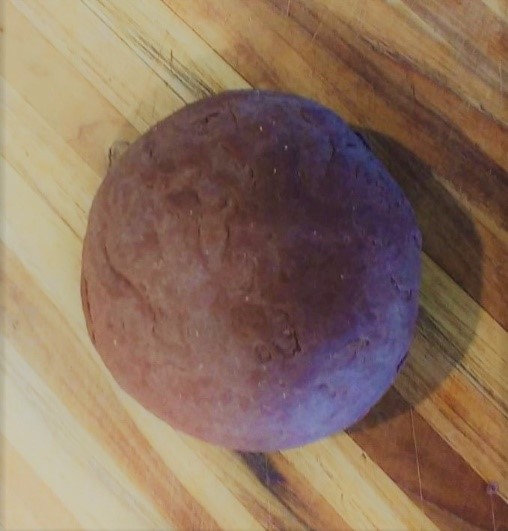
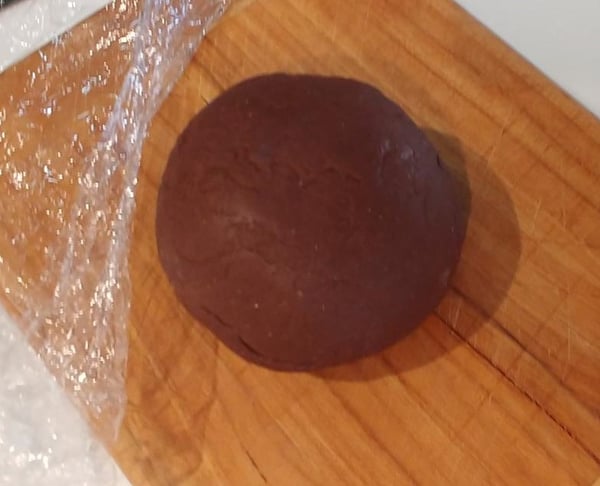
5. Now turn the mixture out onto a wooden board, setting your food processor in the sink (watch your fingers on the blade!). Scoop it all together with your hands and start to knead the dough: stretch it toward the back of your board and fold it forward on itself, press and give it a quarter turn, and repeat. You will be kneading steadily for about 10-15 minutes. As with other egg pasta doughs, you will know you’ve kneaded enough when it’s smooth and soft and springs back when you lightly press into it. If you find it is cracking or not coming together, rinse your hands lightly with water, clap them together to release excess water and start kneading again. Yes, that small amount of water will make difference. I think I did that three times in making this batch of dough. It’s always different, depending on humidity, exact egg size, etc. Once you’re done kneading, form a ball with the dough and wrap it tightly in plastic wrap to rest for at least 30 minutes. Here is a photo of my dough before I wrapped it.
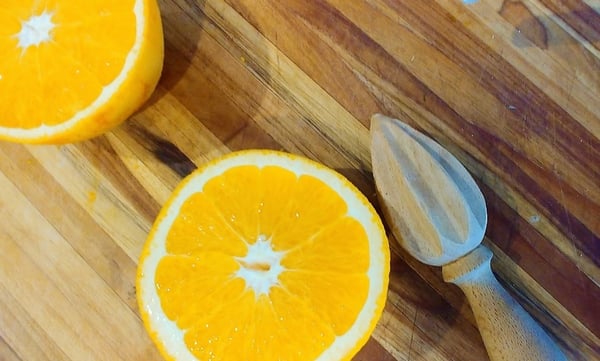
6. While your dough is resting, halve all 3 oranges (for sauce) and juice them over a bowl. These oranges were way too large for me to juice with my handheld citrus juicer. When this happens, I like to use the simple wooden citrus reamer shown in the photo below to extract the juice – it’s fast and easy! Once you’re done, strain the juice through a fine-mesh sieve into a bowl to eliminate the pulp and seeds. You will need to know the weight of your orange juice, so my advice is to place your bowl on a kitchen scale and tare it while empty. Then strain your juice directly into the bowl, make sure you remove the sieve, and you’ll have your juice weight!
 7. Now that you know how much your juice weighs, you can measure out the granulated sugar (for sauce). Match the weight of the orange juice with the same weight of sugar. You may be tempted to simply measure by volume instead, putting the juice in a liquid measuring cup and then matching that with the same dry-measured volume of sugar, but your measurements will be off and so will your flavors. Please go by weight for a better sauce.
8. Chop the dark chocolate (for filling) medium-fine – you don’t want it so fine that it becomes “chocolate dust”, there should be some texture to it. In addition, chop a bit more chocolate for garnish – this can be chopped more coarsely. Set this aside until you plate your dessert.
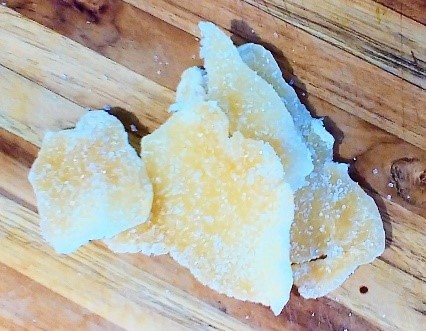
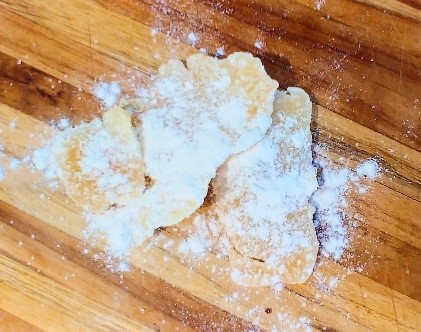
 9. Finely chop the candied ginger (for filling). Sprinkling a bit of flour over the candied ginger will help keep it from sticking too much on your knife – you can’t completely prevent it, but this will help.
 10. By now, plenty of time should have passed for your ricotta to be done draining! Discard any water that drained off and measure out 300 g of drained ricotta, saving the remainder for another use. Put all your filling ingredients into a bowl: ricotta, orange zest, brown sugar, chopped dark chocolate, chopped candied ginger and good pinch of salt. Stir them all together with a silicone spatula, being sure to break up any clumps of brown sugar. Once well-blended, cover and set aside until you plate your dessert.
11. If your dough is finished resting, remove the plastic wrap. You can see what mine looked like at this point in the photo below. Compare this photo to how it looked before I let it rest and you can see that it has darkened and just looks more hydrated and relaxed – kind of like it’s had a restful spa day!
 12. For this recipe, I like to roll a quarter (approximate, no need to measure) of the dough through my pasta roller at a time. Since I will be cutting out shapes, I really don’t have to worry about how wide or narrow my rolled dough is –uniform thickness is the only concern here, and I find the smaller pieces easier to handle. Not everyone’s pasta roller is the same. My Atlas Marcato pasta roller is about 35 years old and starts at a thickness of “1”. For this, I took the dough to a thickness of “5”. To help you, here’s a trick I read about awhile ago: my rolled pasta was the thickness of about 8 stacked Post-It notes! I realize how funny that sounds, but I really do think it’s quite helpful!
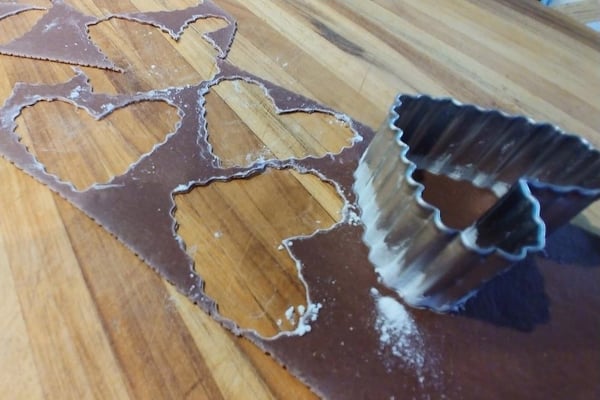
13. After one sheet is rolled out, you can start cutting your shapes. Given the holiday, I used a heart-shaped cookie cutter about 2.25” wide across the top of the heart. Dipping your cutter into flour will help release it from the dough. Don’t worry if a bit of flour sticks to the pasta, it will be fine and no one will ever know. You may find you have to “jiggle” the cutter a bit while pressing down in order to get clean edges. It all depends on your cutter. Cut your pieces as close together as possible to get the most out of your dough. This is not a dough that can be re-rolled. It simply dries out too quickly.
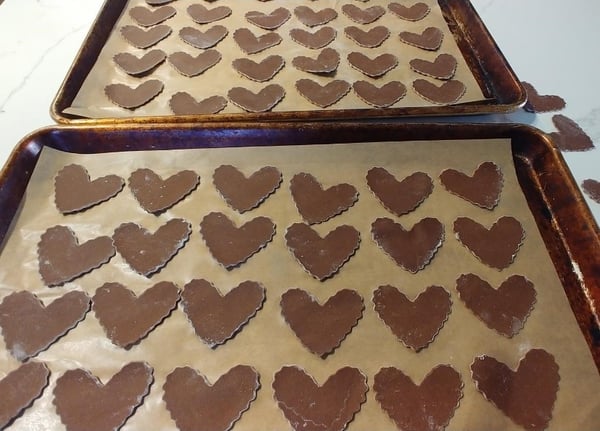
 14. Transfer your cut shapes to parchment-lined sheet pans. Hearts of this size gave me just over 60 pieces. If you are going to cook your pasta immediately, you can leave it out. They will air dry a bit while you make the sauce, but that’s fine. Alternatively, you can prep these ahead of time and freeze them. To do that, place the sheet pan in your freezer so they freeze flat. To minimize the amount of freezer space freezing multiple sheets would use, you can always stack several parchment sheets on one pan. Once frozen, transfer them into a zip-lock bag, squeeze out as much air as possible, and put the bag of pasta in the freezer.
 15. Now for the sauce! Put all your sauce ingredients into a saucepan: strained orange juice, zest, granulated sugar. Be sure your pan is big enough to contain all the ingredients once they start to bubble and boil – a little bit larger is always better than too small. Stir all your ingredients together over medium heat. I cannot stress enough that you need to watch this. You are basically making a simple sugar syrup, using orange juice instead of water, and this will boil over in a flash and when you least expect it – and yes, this is based on personal experience! Continue to stir gently so the sugar dissolves into the juice.
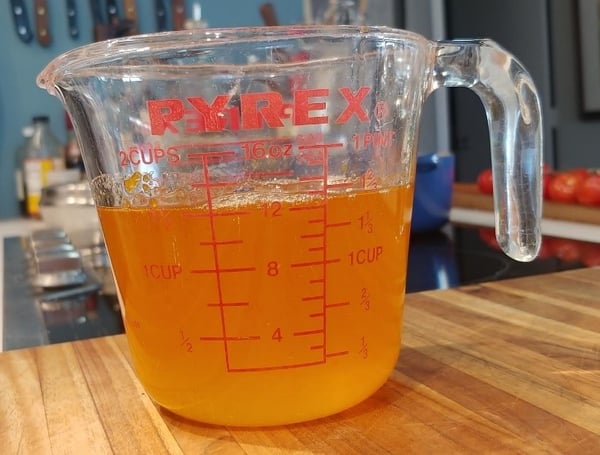
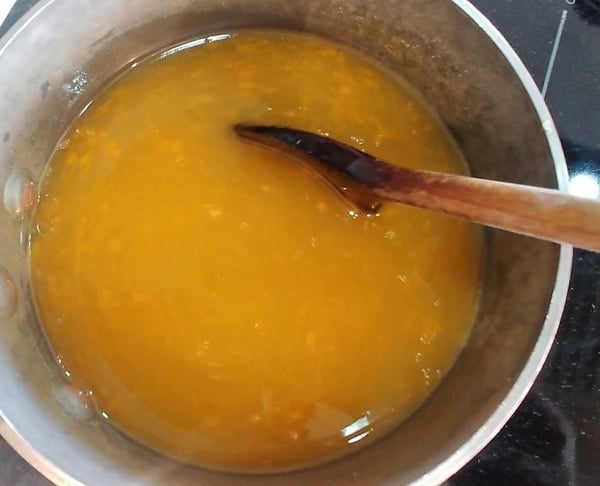 16. Once the mixture starts to bubble, watch your heat. You want it to boil, but gently so – not a heavy rolling boil, which is what can lead to boiling over. Boiling will release water, which will allow the mixture to thicken. My sauce boiled for about 15-20 minutes. Stir on and off while it is boiling. Every once in awhile take a small spoon and, making sure the syrup has cooled enough, give it a taste. It will be done when there some thickness to it, like it is lightly coating your tongue and feels silky in texture. When done, I like to pour it into a glass measuring cup so that if I need to reheat it, I can do so in very short bursts in the microwave. However, this will stay warm enough to use for a good while.
 I feel a word of caution is important here. If by some chance your syrup does boil over, do everything you can to avoid skin contact with the hot syrup – sugar burns can be worse than oil burns, believe it or not. You can always clean your stove, so just turn it off, back away and let it happen. Move your pan, using a towel or pot holder, when you can. It will be a mess, but it does eventually clean up.
17. Set a pot of unsalted water to boil over high heat to cook your pasta. If you have frozen your pasta, you will boil it directly from the freezer – do not thaw first. Once your water is at a rolling boil, add as much pasta as you need and boil for about 2.5 minutes, setting a timer. Using a slotted spoon, remove the pasta to a flat plate. If too much water is on the plate, you can sop it up with a paper towel. It doesn’t need to be bone-dry, but you don’t need your cooked pasta swimming in water. If you are at all uncertain how long to cook for, drop just two or three pieces into the water, remove them one at a time 30 seconds apart and test for doneness to your liking.
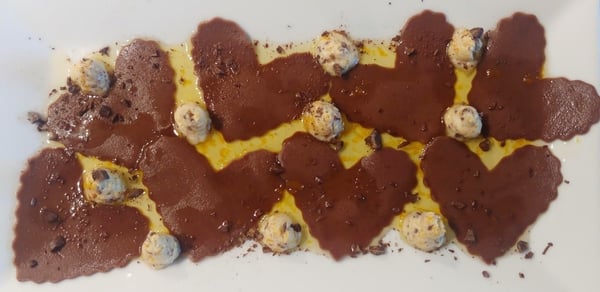
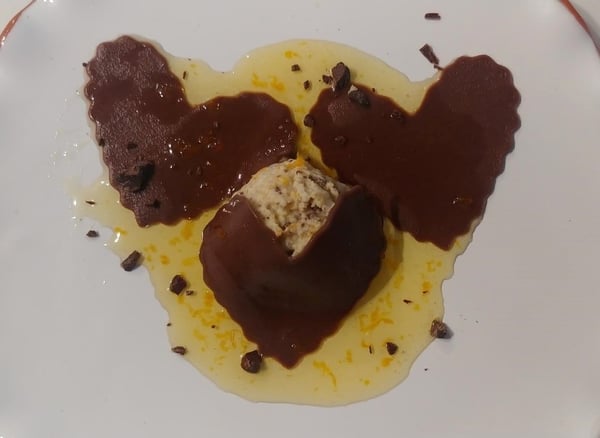
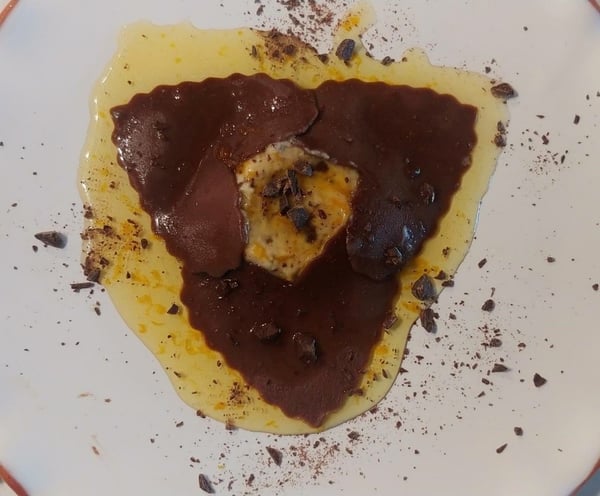
18. Now plate your pasta however you wish. I like to start by spooning out a light layer of warm sauce. Then arrange the warm pasta and the filling as you wish (using a spoon or piping bag), drizzling the final dish with a bit more sauce and sprinkling with that reserved chopped chocolate garnish. Here are a few of ideas to get you started. I think my personal favorite is this first “shareable plate” – a bit of romance befitting Valentine’s Day!
 As for me, I have approximately 40 chocolate pasta hearts remaining in my freezer… guess what my husband and I will be enjoying on Valentine’s Day?
Pasta is fun to make anytime and The Chopping Block offers a variety of pasta-making classes! If pursuing your pasta-making passion sounds like fun, look into our Hands-On Pasta Boot Camp on Saturday, April 8, 2023 at 10am at Lincoln Square. You’ll learn so many pasta-making skills whether you’re new to the craft or have made pasta before! It’s a lot of fun!


Chocolate Pasta with Ricotta and Orange Syrup
Ingredients
- 200 g “00” Italian flour
- 1 egg
- 15 g Dutch-processed cocoa powder
- 65 g near-boiling water
- 1 teaspoon powdered ginger
- 300 g drained whole milk ricotta
- Zest from 2 oranges, reserving the 2 oranges for the sauce
- 35 g brown sugar
- 30 g dark chocolate
- 20 g candied ginger
- Pinch of kosher salt
- Zest from 1 orange, setting the zested orange aside
- Juice from 3 oranges, using the oranges zested for the filling in addition to the one zested for this sauce
- Granulated sugar, matching the weight of the strained orange juice
Instructions
- Put the ricotta (for filling) into a fine-mesh sieve set over a bowl to begin draining.
- Whisk together the cocoa powder and near-boiling water (for dough) until smooth. Set aside to cool.
- Zest all 3 oranges and set aside to use for the sauce.
- In the bowl of a food processor, pulse together the flour and powdered ginger to blend them evenly. Add the egg & cocoa powder/water mixture. Process the mixture, scraping down the sides as needed.
- Now turn the mixture out onto a wooden board. Scoop it all together with your hands and start to knead the dough: stretch it toward the back of your board and fold it forward on itself, press and give it a quarter turn, and repeat. You will be kneading steadily for about 10-15 minutes. Once you’re done kneading, form a ball with the dough and wrap it tightly in plastic wrap to rest for at least 30 minutes.
- While your dough is resting, halve all 3 oranges and juice them over a bowl. Strain the juice through a fine-mesh sieve into a bowl to eliminate the pulp and seeds. Weigh the juice.
- Measure out the granulated sugar. Match the weight of the orange juice with the same weight of sugar.
- Chop the dark chocolate medium-fine. In addition, chop a bit more chocolate for garnish – this can be chopped more coarsely. Set this aside until you plate your dessert.
- Finely chop the candied ginger.
- Discard any water that drained off the ricotta and measure out 300 g of drained ricotta, saving the remainder for another use. Put all your filling ingredients into a bowl: ricotta, orange zest, brown sugar, chopped dark chocolate, chopped candied ginger and good pinch of salt. Stir them all together with a silicone spatula, being sure to break up any clumps of brown sugar. Once well-blended, cover and set aside until you plate your dessert.
- If your dough is finished resting, remove the plastic wrap.
- Roll a quarter (approximate, no need to measure) of the dough through your pasta roller at a time.
- A fter one sheet is rolled out, start cutting your shapes. Dipping your cutter into flour will help release it from the dough. Cut your pieces as close together as possible to get the most out of your dough.
- Transfer your cut shapes to parchment-lined sheet pans. If you are going to cook your pasta immediately, you can leave it out. Alternatively, you can prep these ahead of time and freeze them. P
- Put all of your sauce ingredients into a saucepan: strained orange juice, zest, granulated sugar. Stir all your ingredients together over medium heat. Continue to stir gently so the sugar dissolves into the juice.
- Once the mixture starts to bubble, watch your heat. You want it to boil, but gently so – not a heavy rolling boil, which is what can lead to boiling over. Boiling will release water, which will allow the mixture to thicken. My sauce boiled for about 15-20 minutes. Stir on and off while it is boiling. Every once in awhile take a small spoon and, making sure the syrup has cooled enough, give it a taste. It will be done when there some thickness to it, like it is lightly coating your tongue and feels silky in texture. When done, I like to pour it into a glass measuring cup so that if I need to reheat it, I can do so in very short bursts in the microwave.
- Set a pot of unsalted water to boil over high heat to cook your pasta. If you have frozen your pasta, you will boil it directly from the freezer – do not thaw first. Once your water is at a rolling boil, add as much pasta as you need and boil for about 2.5 minutes, setting a timer. Using a slotted spoon, remove the pasta to a flat plate.
- Plate your pasta however you wish. I like to start by spooning out a light layer of warm sauce. Then arrange the warm pasta and the filling as you wish (using a spoon or piping bag), drizzling the final dish with a bit more sauce and sprinkling with that reserved chopped chocolate garnish.