

The number one question I get asked when I am on the retail floor at The Chopping Block is: What are these cute little Dutch oven thingies and how do you use them? If you are not familiar, cocottes are a small stoneware cooking vessel with handles on the side and a lid. They are oven, broiler, microwave, freezer and dishwasher safe. They come in a wide variety of colors that make storing and serving just a bit more elegant. Who doesn’t love an individual serving of just about anything presented in a vibrant baking dish?
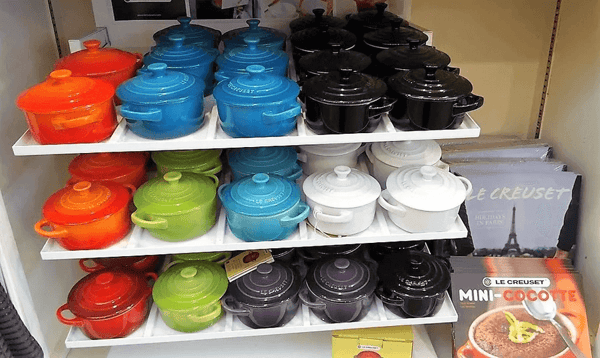 But cocottes are functional besides just being cute! Because of their small size, the baking time is shortened so it makes sense to use them when you are feeding a crowd. They also retain their heat evenly to keep your food warmer longer.
There are so many ways to utilize the infamous Le Creuset cocotte, and I am going to share with you some of my favorite recipes. My top three uses for mini round cocottes would be eggs, desserts and soups, but there are so many other ways you can use them, like this Gruyere Mac n' Cheese with Crispy Bacon.
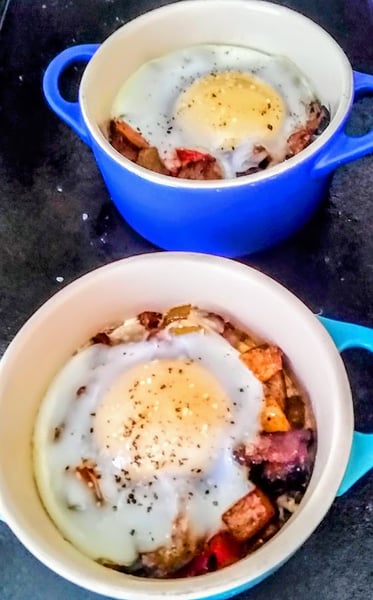 Let’s start with eggs. What you may not know is the term "en cocotte" is a traditional French method of baking eggs individually in these small vessels. You can put any kind of ingredients in the bottom of your cocotte, top it off with and egg and bake at 375° until your desired yolk preference is achieved. For a runny egg and white set, I keep mine in the oven for about 8 to 10 minutes. For a more set yolk ,you are looking at about 15 minutes. If your ingredients going into the vessel are already hot, it would take even less time.
One of my favorite combinations is sautéed breakfast sausage, peppers, mushrooms and spinach with fontina cheese on top. This can work as a hash on the bottom with a cracked egg on top or even as a frittata, like the recipe below. You can also make individual shakshuka, or even creamy cheesy baked eggs. Instead of a tomato sauce base to cook the egg ,you use a cheesy béchamel as a base with and egg on top. I wrote another blog, Around the World in 80 Eggs, that gives some great ideas for egg recipes as well.
.png?width=600&height=555&name=frittata-en-cocotte%202%20(1).png)
Frittata en Cocotte
Yield: 4 individual servings
Active time: 20 minutes
Start to finish: 35 minutes
3 Tablespoons butter
4 sausage links or bacon, sliced
1/4 pound cremini mushrooms, sliced
1/2 red, green or yellow pepper, medium dice
1/2 cup spinach, chiffonade
Salt and pepper to taste
8 eggs
1/4 cup half and half
3/4 cup fontina, cheddar, swiss or gouda cheese, grated
- Preheat the oven to 375° degrees. Place four cocottes on a sheet tray and grease the insides with pan spray or butter.
- Heat a sauté pan over medium heat, and add the butter. Sauté the sausage or bacon, mushrooms, and peppers, stirring occasionally, until they are just starting to caramelize around the edges. Add the spinach, and continue to cook until wilted. Season with salt and pepper to taste.
- While the vegetables are cooking, beat together the eggs and half and half in a medium-size bowl. Season with salt and pepper to taste. Stir in half of the cheese. (Reserve some for the top.)
- Portion out a bit of the hash into each of the cocottes, using it all.
- Pour the egg mixture into the cocottes leaving at least a 1/4-inch rim at the top, and stir once to combine.
- Top with remaining cheese and bake for 25 minutes. You will know they are done when they soufflé and are slightly browned on top. The eggs should be slightly firm and not runny.

Cheesy Baked Eggs
Yield: 4 individual servings
Active time: 20 minutes
Start to finish: 35 minutes
1/4 cup butter
1 shallot, minced
2 cloves garlic, minced
1/4cup all-purpose flour
3 cups cold milk
1 cup soft cheese, grated (cheddar, goat, fontina, mozzarella)
Salt and white pepper to taste
- Pre-heat oven to 375° degrees.
- Heat a saucepan over medium low heat and add the butter. Gently sauté the shallots and garlic until tender and aromatic, about 1 minute.
- Add the flour and cook, stirring frequently, for 1 or 2 minutes.
- Add the cold milk while whisking to avoid lumps. Bring the sauce to a boil. Reduce to a simmer and cook until the sauce is thick, about 5 minutes, stirring occasionally to prevent the bottom of the pan from scorching.
- Add the grated cheese, a little at a time until melted making sure not to get the sauce too hot. You can also reserve some cheese to put on top.
- Spoon the thick creamy cheesy sauce into the cocottes about halfway up. Crack an egg on top of each cocotte and bake for about 8-10 minutes, depending on preference on yolk doneness
- Serve with some toasted bread to soak up all the yumminess!
Another great way to use your cocottes are for desserts. I love having my own perfect portion of dessert and making cobblers, crisps, or crumbles in a cocotte is great for presentation and keeping all the fruit together compared to using a baking dish and spooning the dessert into a bowl. I am a sucker for uniformity!
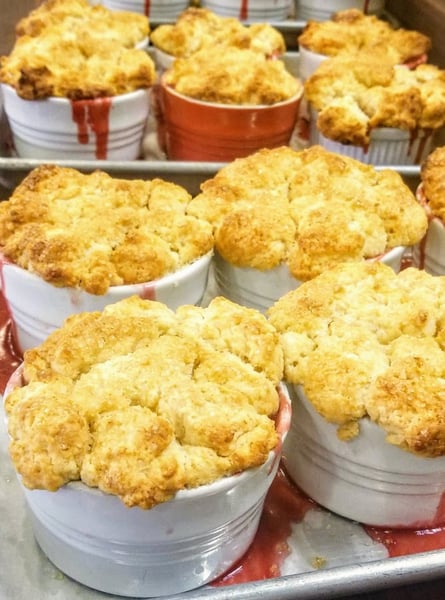 Now all three of these desserts are the same fruit filling but the crust topping is going to be different. You want to be quite generous with filling your cocottes with fruit as it will cook down.
Seasonal Fruit Cobbler, Crisp, or Crumble
Yield: 4 individual servings
Active time: 30 minutes
Start to finish: 1 hour 10 minutes
For the biscuit topping:
2 cups all-purpose flour
1/2 teaspoon salt
1 tablespoon baking powder
2 tablespoons granulated sugar
1 1/4 cups heavy cream
2 tablespoons melted butter for brushing the tops of the biscuits
For the crisp topping:
1/2 cup brown sugar
3/4 cup rolled (“old-fashioned”) oats
3/4 cup all-purpose flour
Pinch fine sea salt
6 tablespoons cold butter, cut into small pieces
For the crumble topping:
1/2 cup all-purpose flour
1/2 cup light brown sugar, packed
1/2 cup granulated sugar
1 teaspoon ground cinnamon
1/2 teaspoon fine sea salt
6 tablespoons cold unsalted butter, cut into 1 tablespoon-size pieces
For the filling:
5 cups seasonal, ripe fruit, diced as needed (My favorite is a combo of peach, strawberry, and blueberry.)
1 teaspoon ground cinnamon
1/4 cup all-purpose flour or cornstarch
1/2 to 3/4 cups granulated sugar, depending on the sweetness of the fruit
1/2 lemon, juiced
Pinch salt
- Preheat oven to 400 degrees. Grease cocottes with butter or pan spray and place them on a sheet tray lined with foil or parchment.
- Combine all filling ingredients and fill greased cocottes generously.
- For the biscuit topping, combine all of the dry ingredients, and then stir in the cream. It should make a stiff dough. If the dough is dry, add more cream a teaspoon at a time.
- Pinch off small balls of biscuit dough and dot them over the top of fruit. Brush the dough generously with melted butter.
- For the crisp and crumble toppings, mix together the ingredients making sure to not fully incorporate the butter. You can use your hands or a pastry blender, leaving pea size pieces throughout the mixture.
- Liberally sprinkle or pack the crisp or crumble topping on top of the fruit in an even layer.
- Bake the cocottes in the oven for about 25-35 minutes. The fruits should be bubbling and the top should be golden brown for all variations. Times may vary depending on fruit choice or amount of topping.
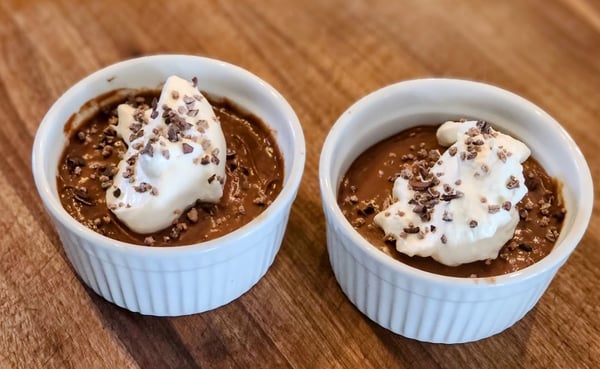
 Custards are another great option for using your cocottes for dessert. Making a pudding parfait, Crème Brûlée, or pot de crème are just some ideas to get you inspired.
Chocolate Pot de Crème
Yield: 4 servings
Active time: 15 minutes
Start to finish: 2 hours, 40 minutes
2 cups half and half
1/2 vanilla bean
6 ounces semisweet or bittersweet chocolate
6 egg yolks
1/4 cup granulated sugar
1/8 teaspoon salt
1/2 cup heavy cream
1 teaspoon powdered sugar
Chocolate shavings
- Preheat the oven to 350° degrees using the conventional setting on your oven, not convection.
- Place the half and half in a small saucepan. Scrape the pulp from the vanilla bean adding both the pulp and the pod to the half and half. Heat until steaming. Remove from the heat, and discard the vanilla bean pod.
- Add the chocolate to the saucepan, and whisk until completely melted and smooth.
- While the half and half is heating, whisk together the egg yolks, sugar and salt in a medium-size bowl.
- Slowly temper the warm half and half mixture into the eggs.
- Place the cocottes in a baking dish, and pour in the custard until they are 3/4 full. Fill the baking dish halfway up the sides with hot water.
- Cover with foil and bake for 25 to 30 minutes, or until jiggly but firm.
- Remove from the water bath, and allow to chill in the refrigerator for at least 2 hours or until cold. (May be refrigerated overnight and can stay refrigerated for up to 4 days.)
- While the custards are chilling, prepare the whipped cream. In a large bowl, measure together the heavy cream and powdered sugar. Using a whisk or an electric mixer, beat the cream until you have soft peaks.
- To serve the pot de crème, place a dollop of the whipped cream on top of the custard, and top with chocolate shavings.
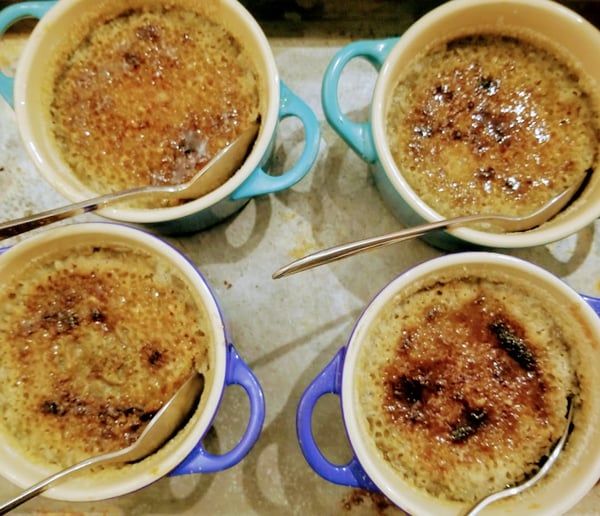
Ginger Crème Brûlée
Yield: 4 servings
Active time: 20 minutes
Start to finish: 3 hours
2 cups heavy cream
One 1-inch piece ginger, sliced
1 teaspoon vanilla bean paste
4 egg yolks
1/4 cup granulated sugar
Granulated sugar as needed for caramelizing
- Preheat the oven to 325° degrees on convention, not convection.
- Set 4 cocottes into a roasting pan with tall sides.
- Heat the cream, ginger and vanilla bean paste in a heavy saucepan over a medium-low heat until a film forms and tiny bubbles appear around edges. Turn off the heat and allow to steep for 10 minutes.
- While the cream is heating, whisk together the egg yolks and sugar in a large mixing bowl to combine thoroughly. Slowly pour in the warm cream while whisking gently. Strain the mixture through a fine sieve into another bowl or large measuring cup with a pouring spout.
- Pour the custard into individual ramekins, leaving about 1/2 inch at the top.
- Add enough hot water to the roasting pan so the water reaches halfway up the sides of the ramekins. Bake until the custard is set, but still slightly quivering, 25 to 30 minutes.
- Remove the ramekins from the roasting pan, and allow to cool in the refrigerator for at least 2 hours.
- Sprinkle the top of each custard with 1 to 2 teaspoons of sugar. Use a blowtorch or broiler to heat the sugar until it liquefies and caramelizes. Allow the sugar to harden before serving.
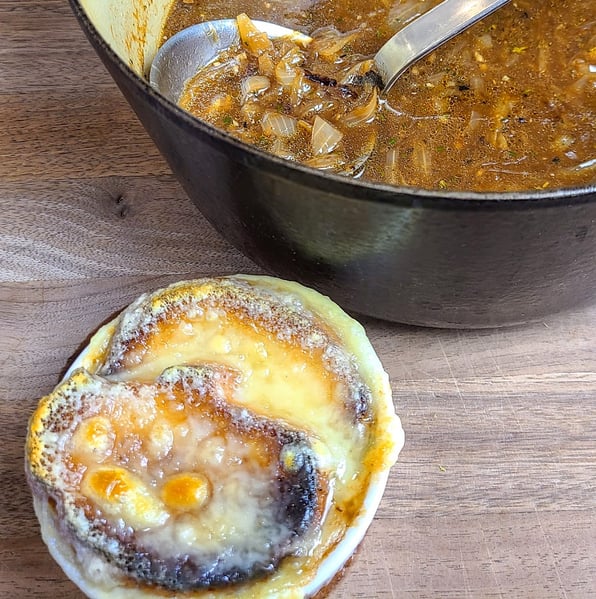
Cocottes are such a cute way to serve soups, like this classic French onion soup recipe.
French Onion Soup
Yield: 6 servings
Active time: 45 minutes
Start to finish: 1 hour, 10 minutes
3 Tablespoons butter
4 medium-size yellow onions, thinly sliced
2 cloves garlic, minced
2 tablespoons all-purpose flour
1/2 cup dry sherry
5 cups beef stock
1 Tablespoon fresh thyme, rough chopped
Salt and pepper to taste
6 slices French bread, lightly toasted
2 cups Gruyere cheese, grated
- Heat a large, heavy soup pot over medium heat and add the butter. Sauté the onions, stirring occasionally, until caramelized and soft, 30 to 45 minutes. If a lot of fond builds up on the bottom of the pan, add a splash of water to prevent the onions from burning.
- Stir in the garlic, and cook an additional minute. Sprinkle in the flour, cooking for 1 minute.
- Deglaze with the wine making sure you scrape the bottom of the pan to remove all of the browned bits known as fond. Simmer the wine until almost dry.
- Pour in the stock, and bring to a boil. Reduce the heat to a simmer and cook for 10 to 15 minutes to blend the flavors. Add the thyme, and season with salt and pepper to taste.
- Preheat the broiler to high.
- Ladle the soup into ovenproof soup bowls, and set on a foil-lined sheet tray. Place two slices of bread on top of the soup, and generously cover with the grated cheese.
- Slide the tray onto the bottom rack of the oven. This way the cheese can melt slowly before getting too brown.
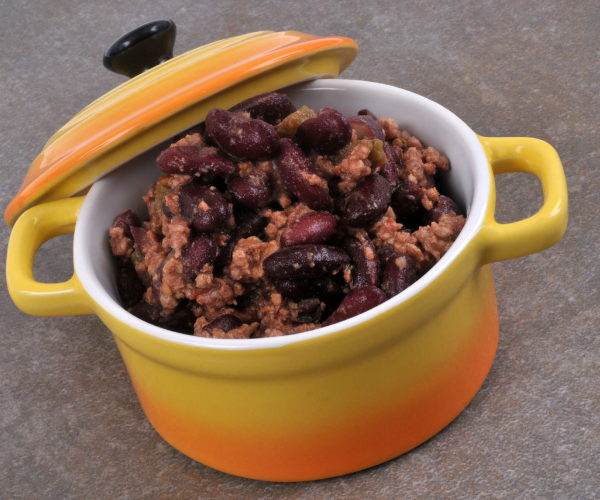
Another fun combination is this chili with cornbread baked right on top, or just use your cocotte for an individual serving of chili.
Three Bean Turkey Chili
Yield: 6 servings
Active time: 30 minutes
Start to finish: 1 hour
2 Tablespoons grapeseed oil
1 pound ground turkey
1 onion, medium dice
2 stalks celery, cut into 1/2-inch slices
3 cloves garlic, rough chopped
3 tablespoons chili powder
1 teaspoon ground cumin
One 28-ounce can whole tomatoes, crushed with their juice
1 cup chicken stock
One 15-ounce can black beans, drained and rinsed
One 15-ounce can pinto beans, drained and rinsed
One 15-ounce can kidney beans, drained and rinsed
Salt and pepper to taste
Hot sauce, as needed
- Heat a deep, heavy pot over medium heat and add the grapeseed oil.
- Sauté the turkey, breaking it up with a spoon, until cooked through and well browned.
- Stir in the onions and celery and cook until lightly caramelized. Add the garlic, chili powder and cumin and cook an additional minute to toast the spices.
- Add the tomatoes with their juice, stock, and the beans. Season with salt and pepper to taste.
- Simmer the chili, uncovered, until slightly thickened, about 25 minutes. If the chili gets too thick add a splash of water to thin it out.
- Adjust the seasoning with additional salt and pepper, if needed.
- Ladle the chili into the cocottes and spoon the cornbread batter (recipe below) on top of each one and bake in a 400° oven for about 10-15 minutes or until the cornbread is set and browned
Green Chili-Cheddar Cornbread
Yield: 6 servings
Active time: 15 minutes
Start to finish: 45 minutes
1 cup cornmeal
1 cup all-purpose flour
1/4 cup granulated sugar
1 teaspoon fine sea salt
1 1/2 tablespoons baking powder
1/2 teaspoon baking soda
2 eggs
1/3 cup grapeseed oil
3/4 cup milk
3/4 cup buttermilk
3/4 cup cheddar cheese, grated
One 4-ounce can chopped green chilies
- Preheat the oven to 350º, and line a muffin tin with paper liners. Note: If you don’t have liners, spray the tin with cooking spray to prevent sticking.
- In a large mixing bowl whisk together the cornmeal, flour, sugar, salt, baking powder and baking soda.
- In a separate mixing bowl, whisk together the eggs, oil, milk and buttermilk.
- Add the wet ingredients to the dry, and mix until just combined.
- Gently fold in the cheese and chilies.
- Using a large spoon or a portion scoop, place some of the batter on top of the chili-filled cocottes.
Note: this cornbread could be enjoyed baked straight in a cocotte without the chili as well!
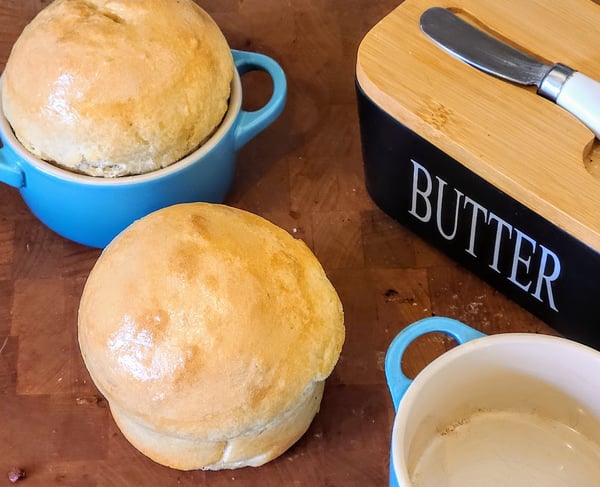
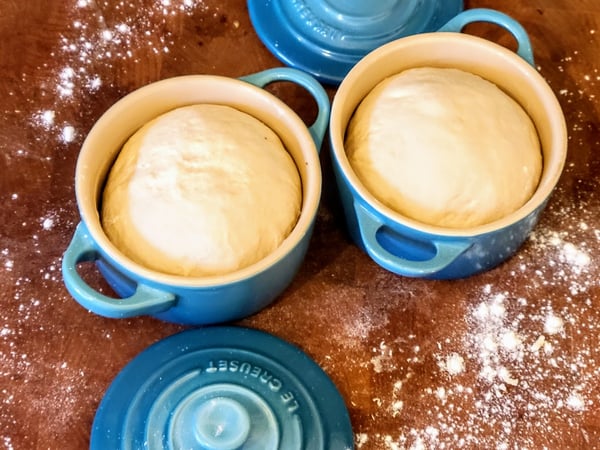
This brings me to yet another great use for cocottes: breads. This recipe is a pretty simple yeast dough but when baked in the cocotte creates this great individual loaf.
Cocotte Bread
Scroll down for a printable version of this recipe
Yield: 6 cocottes
Active time: 15 minutes
Cook time: 30 minutes
Inactive time: 1 hour, 15 minutes
Start to finish: 2 hours
For the dough:
1 tablespoon active dry yeast
1 1/4 cups lukewarm water (110–115º)
2 tablespoons extra virgin olive oil
1 1/3 cup bread flour
1 1/3 cup all-purpose flour
1 teaspoon fine sea salt
- Sprinkle the yeast on top of water in the bowl of a stand mixer and stir gently until dissolved. Allow to proof until creamy and aromatic to ensure yeast is alive, about 5 minutes.
- Add oil, 1/2 of each flour and salt. Mix on medium low speed with a dough hook until incorporated, scraping down sides as necessary.
- Add the remaining flour, and knead on low speed until the dough is smooth and elastic, about 5 minutes. The dough will be very sticky.
- Place dough in an oiled bowl and cover the bowl with plastic wrap.
- Let dough rise at room temperature until doubled, about an hour. Dough can also be proofed in the refrigerator overnight.
- Preheat the oven to 400º degrees.
- Grease 6 cocottes with olive oil. With your oiled hands, gently punch down the dough to deflate turn out onto work surface and divide into 6 portions.
- Gentle shape the dough portions into balls and place into the cocottes.
- Allow to proof for 10-15 minutes at room temperature.
- Brush tops with olive oil and sprinkle with sea salt.
- Bake until light golden brown, about 25-30 minutes.
 Besides all of these fabulous recipes to inspire you to use our cocottes, they also make for excellent vessels for dips, relishes or other condiments for use on a charcuterie board or serving at parties.
 I can’t wait for you to try these recipes and if you do, make sure to post in our private Facebook group. I always love seeing pictures of home cook successes! We use cocottes and ramekins in a lot of our cooking classes so if you are looking for more ways to use yours, check out our class calendar.


Cocotte Bread
Ingredients
- 1 tablespoon active dry yeast
- 1 1/4 cups lukewarm water (110–115º)
- 2 tablespoons extra virgin olive oil
- 1 1/3 cup bread flour
- 1 1/3 cup all-purpose flour
- 1 teaspoon fine sea salt
Instructions
- Sprinkle the yeast on top of water in the bowl of a stand mixer and stir gently until dissolved. Allow to proof until creamy and aromatic to ensure yeast is alive, about 5 minutes.
- Add oil, 1/2 of each flour and salt. Mix on medium low speed with a dough hook until incorporated, scraping down sides as necessary.
- Add the remaining flour, and knead on low speed until the dough is smooth and elastic, about 5 minutes. The dough will be very sticky.
- Place dough in an oiled bowl and cover the bowl with plastic wrap.
- Let dough rise at room temperature until doubled, about an hour. Dough can also be proofed in the refrigerator overnight.
- Preheat the oven to 400º degrees.
- Grease 6 cocottes with olive oil. With your oiled hands, gently punch down the dough to deflate turn out onto work surface and divide into 6 portions.
- Gentle shape the dough portions into balls and place into the cocottes.
- Allow to proof for 10-15 minutes at room temperature.
- Brush tops with olive oil and sprinkle with sea salt.
- Bake until light golden brown, about 25-30 minutes.