

At the end of the previous installment of The Sugarbush Chronicles, we had collected a good amount of sap and were putting it through a reverse osmosis system to increase the sugar content of the sap without having to boil. Boiling would have to wait until we were able to procure some firewood. Well since then, procuration has occurred and we have been able to start boiling our sap down into syrup.
Once we had collected all the sap we had about 150 gallons. This may seem like a lot. It certainly looks like a lot in person. However since our maple sap was coming in at around 1.5-2 brix, we would need a lot of sap to make even a modest amount of maple syrup. The ideal tree for tapping for maple syrup is, of course, the sugar maple. Sugar maple sap typically clocks in at around 3-5 brix, however you can tap other types of maple for syrup. In fact, the only type of maple that's typically not worth bothering with for tapping is the Norway maple. Our sugarbush consists of mainly red maples with some silver maples as well which accounts for the lower brix of the resulting sap. This means that even though 150 gallons of sap seems like an extraordinary amount, we can really only expect to net about 2 gallons of finished syrup out of it.
But before we can sample any of our finished product, we have to get boiling. Boiling maple sap down into syrup can basically be as simple or complex as you want. You could simply pour the sap into a pot on your stove, but this method is extremely slow and fairly inefficient. Not to mention it lacks any of the romance of what I imagine when I think of boiling maple syrup.
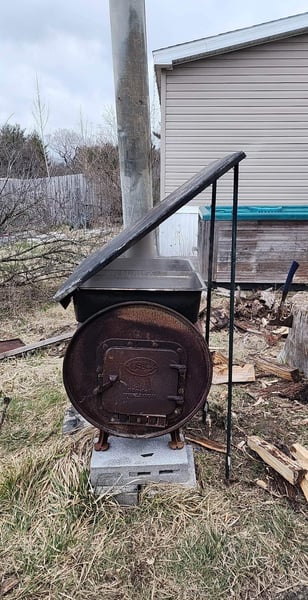
Purpose built maple syrup boilers are referred to as evaporators. Derek built his own wood fired evaporator from an old barrel stove. He cut a section out of the top so that you could sit two hotel pans directly over the fire.
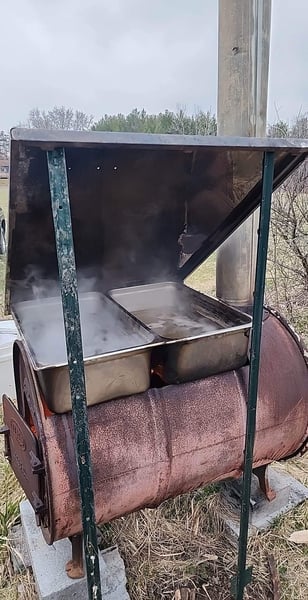
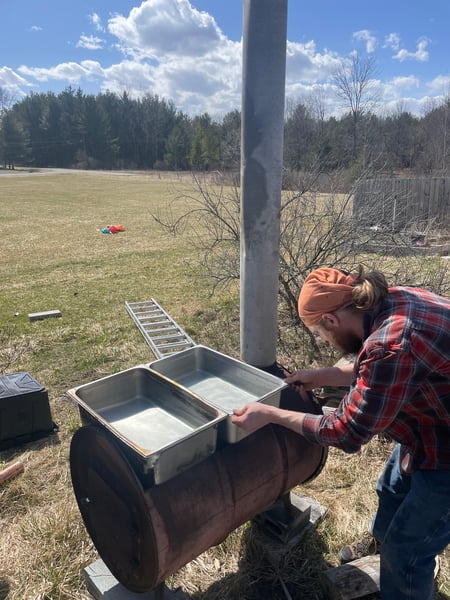 This improves on the stovetop method in a few ways. First you can fit way more syrup in two hotel pans than you can in your typical home kitchen pot. This allows you to process more of your sap at once. Second, the dramatically increased surface area of the two hotel pans increases the rate of evaporation allowing you to concentrate your syrup more quickly using less fuel. Lastly, positioning the pans directly over a very powerful heat source allows you to get much more energy into the pans than you would be able to on a typical home burner.
There are extremely efficient evaporators even for small maple syrup operations that range into the many thousands of dollars, but for something DIY with a cost of about $35 not including fuel, I’d say our evaporator is nicely positioned for our level of commitment and experience.
The other nice thing about our evaporator is that since its wood-fired, and fairly modular, if you take one of the pans off, you can cook your lunch on it too.
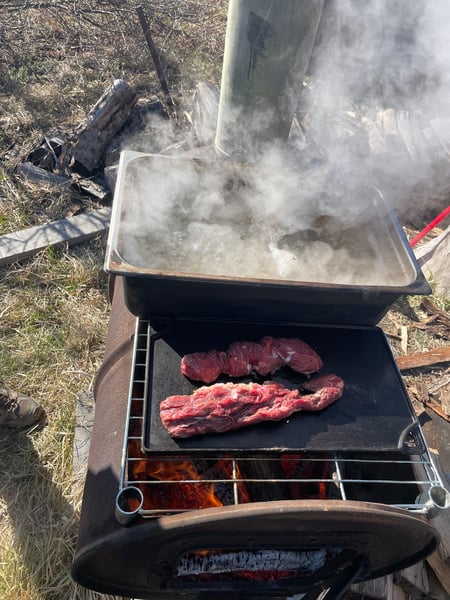 This is the chain from a fore-quarter of beef that we were breaking down while we boiled syrup, but that's another post.
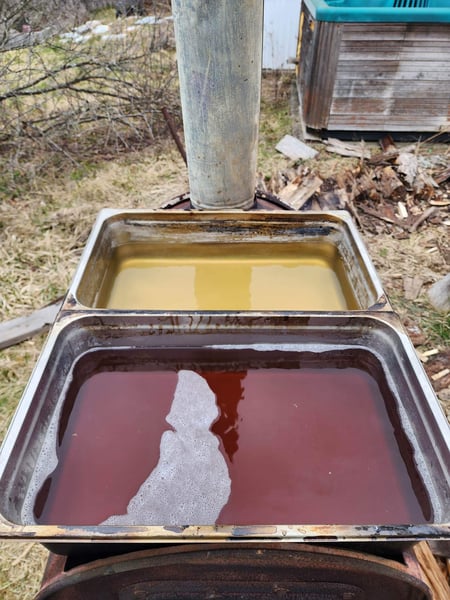
The way our evaporator is set up, there are two distinct zones beneath the two pans. The pan closest to the smokestack gets very hot, and boils rapidly. This is where you put in the raw sap to bring it down as quickly as possible. Once it has been reduced by at least half, you can transfer it to the second pan which boils at a much more relaxed pace. This is good because it allows us to more easily manage the high sugar content of the concentrated sap. The more sugar the solution has the more quickly it will seem to concentrate, so a lower heat is ideal to ensure you don’t over-reduce the syrup, or, in the worst case, burn it. In the image below you can clearly see the color difference between the less concentrated sap on the hot side, and the darker, more concentrated sap on the cooler side.
You may have heard the term “sugar shack” before. Indeed, any serious maple syrup operation has its evaporator house in a structure of some kind. This not only supplies a place to collect and ready sap for boiling, but also provides shelter for the evaporator from the elements. This is perhaps the biggest annoyance we faced when trying to boil with our outdoor evaporator. We kept getting waylaid by the weather, and we really needed to boil our sap, or risk spoilage. Thankfully Derek rigged up a surprisingly effective DIY solution to this problem too. He built a lean-to of sorts over the pans, so we could continue to boil come rain, come snow, come heat, come gloom of night.
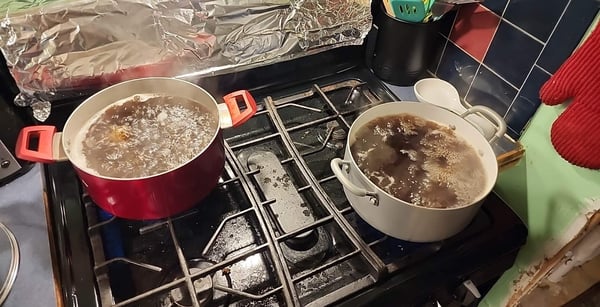
 With our makeshift shelter in place, we could boil continuously until the sap was concentrated enough to be finished on the stove inside. I know I was just talking about how boiling on the evaporator is better than boiling in a pot on your stove, but once your sap becomes concentrated enough, finishing on your stove can be beneficial. It allows you to precisely dial in the sugar content of your finished syrup, and makes it much more convenient to monitor in the final stages of reduction.
 The sap as it came off the evaporator at about 35 brix
 The same sap reduced further to about 55 brix. Notice the color change as it concentrates. This is going to be a particularly dark run.
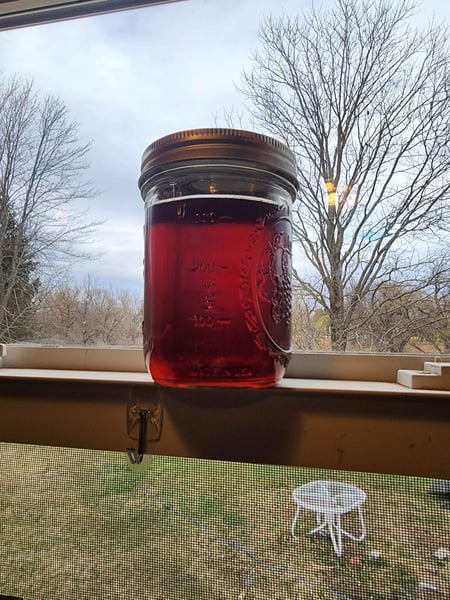
We continued boiling the syrup down on the stovetop until it reached about 65-70 brix. After which the finished syrup was filtered and jarred. Here's a comparison of different runs of syrup from earlier in the season, and a batch from last year.
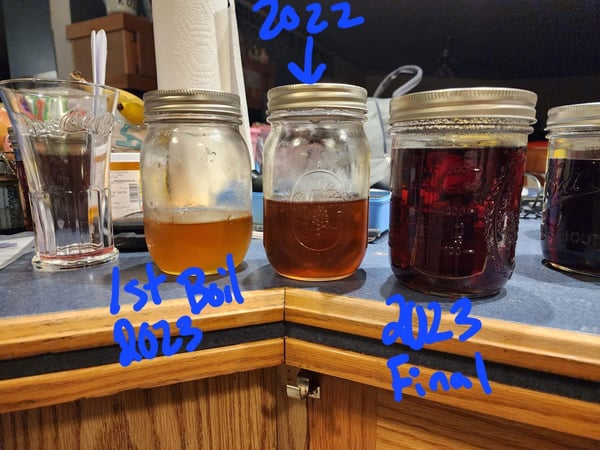 Notice the extreme color difference between the first boil of 2023, and the syrup we finished with. The later in the season the sap is collected, the darker (and more flavorful) the resulting syrup will be.
And with that, our sugarbush experience for 2023 came to a close. The finished syrup we got was pretty extraordinary. Certainly better than I had any reason to hope for. Deep, rich, and incredibly complex, with a hint of smokiness from the wood fired evaporator (most maple syrup makers would consider that a flaw, but I quite like it). I’m already anticipating next March, and making plans for upgrades to our set up this summer.
If this has you craving the delights that only spring can provide, I encourage you to check out our upcoming Spring Dinner Party class on Saturday, April 15 at 6pm which has a menu filled with other delicacies of the season:
- Mixed Green Salad with Radishes and Goat Cheese
- Herb Crumb-Crusted Rack of Lamb with Parsley-Mint Pesto
- Risotto with Peas and Parmesan
- Individual Strawberry-Rhubarb Crisp
