

My first experience with pita bread was 40 or more years ago in the small Midwestern town from where I am from. I don’t exactly remember what was in the pita, but I do remember thinking pita bread was pretty gross. It was really dry and flavorless, and I was in no hurry to run out and try it again. I did, of course, try it again and every time, I had the same experience. That is until I moved to San Diego and later to Chicago. These big cities are where I was finally able to experience the tender, fluffy, somewhat chewy and yet tender pita bread. Try driving up to Devon Avenue or down to Greektown in Chicago for some quick fixes when you don’t have time to make your own. The difference between that pita and store-bought pita is staggering! Much like corn tortillas, they have to be fresh and are best made by small producers.
Here it is 40 years later, and once again, I live in a small town (Union Pier, Michigan), and I cannot find good fresh pita anywhere near where I live. I really try not to be a food snob, but I see no reason to try and choke down a dry and flavorless pita bread. Like so many people, I try and watch my carb intake and don’t want to waste my carb binge on a cruddy piece of pita. I actually have taken to the idea that if I am going to splurge on something that is high in calories or carbs, I am going to make it myself. I think it’s the healthy way to go. I am less likely to have a bunch of junk lying around and when I do splurge, it will be with something homemade and not full of preservatives. Hopefully it is as equally delicious as it is healthy!
Pita is one of the easiest breads to make and something that really can be done in a matter of hours. If you are new to bread baking, it is a good place to start.
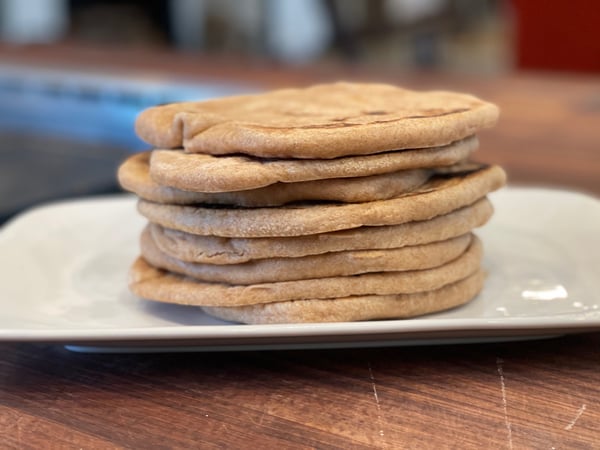
Whole Wheat Pita
Scroll down for a printable version of this recipe
Yield: 8 pitas
Active time: 1 hour and 15 minutes
Start to Finish: 2 hours and 45 minutes
1 1/4 cups lukewarm water, 105-110 degrees
1 teaspoon dry active yeast
Pinch of sugar
1 1/2 cups bread flour
1 1/2 cups whole wheat flour
1 1/2 teaspoons kosher salt
Step 1: Proof the Yeast
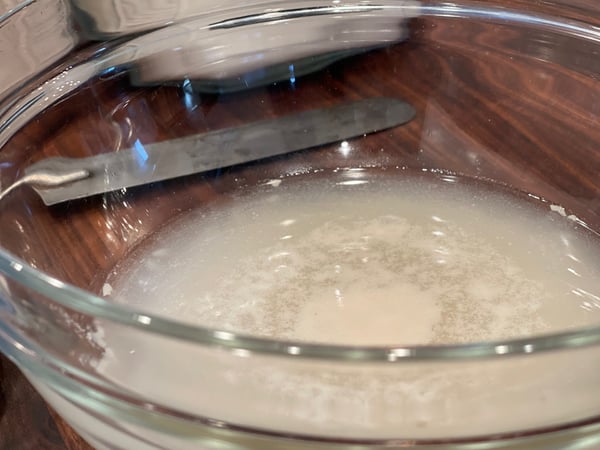
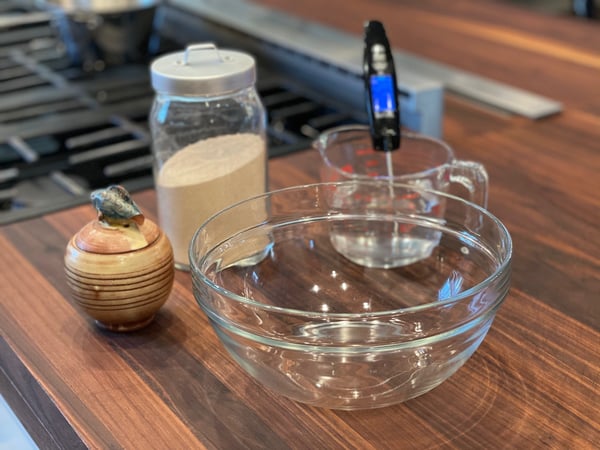 Put the warm water into a medium-sized bowl and sprinkle sugar and yeast on top. Let sit for 5 to 10 minutes, just until you see a little bubbling in the bowl. What is happening in there is that we are proving that the yeast is still alive and active before we move on with the recipe. When you see a little bubbling happening you know the yeast is still perky and alive and you can proceed.
Make sure to be cautious with water temp. If it's too hot, you can kill the yeast, but if it's too cold, it can be hard to wake up the yeast.
If you are confident your yeast is fresh and alive, you can skip the waiting and immediately move to step 2.
 Step 2: Prepare the Sponge
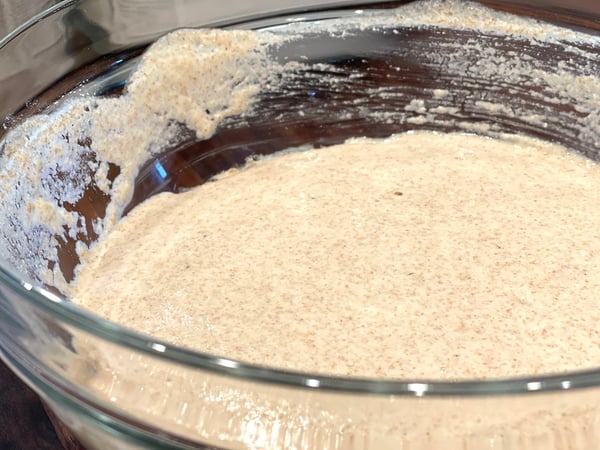
Add 3/4 cup of bread flour and 3/4 cup of whole wheat flour to the proofed yeast. Stir the sponge in the same direction 100 times to develop the gluten. Cover the bowl and let it sit for 30 minutes.
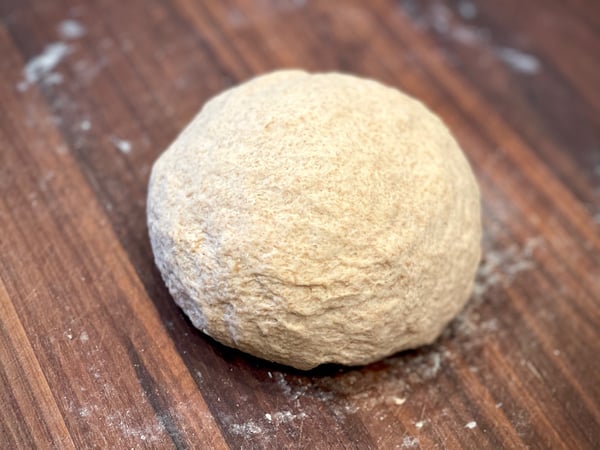
 Step 3: Knead the Dough
Stir the salt into the sponge and follow with the remaining flour. Stir until it becomes too stiff to stir, then turn it out of the bowl and knead for 8 to 10 minutes or until the dough is smooth. Put the dough in a bowl and cover. Let rise until dough has doubled in size, approximately 1 hour.
The ideal room temperature is around 75 degrees for rising. It may be that your home is cooler or hotter than this, so try putting the dough in your oven. Do not warm the oven or turn it on, just put the dough in your turned off oven. Ovens are insulated and it tends to be a little warmer in there on a cold day and cooler in there on a hot day.
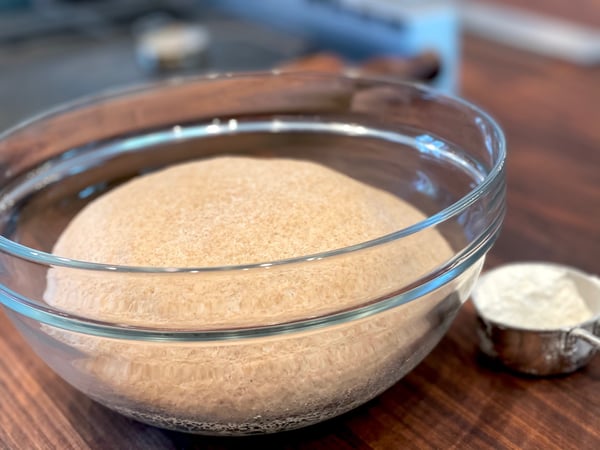
 After the dough has doubled, gently push the dough down (remember it is alive, so be somewhat gentle) and let the dough double in size one more time before you shape the dough.
If you want to make the dough a few days in advance, divide the dough in half and put each half into a large plastic bag and refrigerate. Make sure there is ample room in the bag for the dough to rise in the fridge. The dough will keep for up to 3 days in the refrigerator. Let the dough come up to room temperature before moving to step 4.
Step 4: Shape the Pita
 Cut the dough into eight equal size pieces and shape roughly into a round ball. Roll each piece into about a 5-inch circle and put under a dish towel so it doesn’t dry out. I find it easier to roll the pita in two phases since it will want to spring back and be difficult to roll right after you cut it and shape it. Go back to the first piece of dough you rolled and roll it into an 8-inch circle or about an 1/8 thick piece of dough. Repeat with remaining dough, keeping each piece covered as you go.
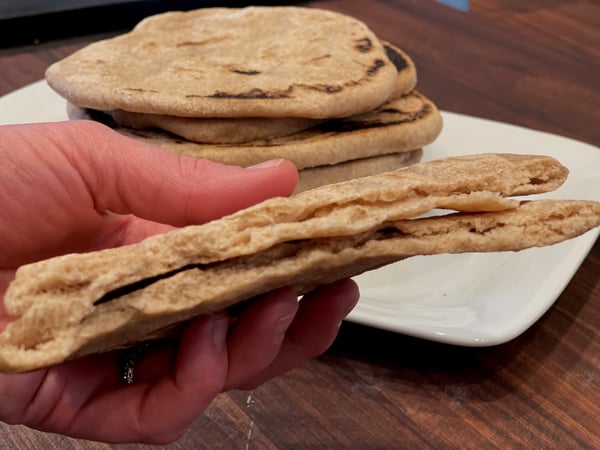
Step 5: Cook the Pita
Preheat a cast iron skillet or heavy-duty sauté pan over high heat. The pan should be about 475 degrees on a surface thermometer. This high heat is essential to achieve a pocket. If it's too cold, you won’t get enough steam to form the pocket. If it's too hot, you can get burnt spots, like some of mine. These spots can become brittle and can break letting the steam escape instead of remaining trapped inside the pita, so it will not inflate. If the pita is browning too quickly, turn the heat down.
Place the pita dough circle on the dry hot pan and cook for approximately 15 seconds on the first side and 1 minute on the second side or until bubbles begin to form inside the dough. Turn over again to the first side and the dough will now puff up like a balloon. When it has completely inflated, it is done.
Repeat the same process with the remaining pita.
 If you want to learn how to make the classic gyro filling at home, check out our upcoming virtual class Trip to the Greek Islands this Friday, April 9 at 7pm CST. You'll learn how to make:
- Homemade Gyros with Tzatziki Sauce
- Lemony Greek Potatoes with Feta Cheese
- Greek Villagers Salad

If you want to sharpen up your bread skills with a real master of bread, don't miss our special virtual demonstration all about sourdough bread with Chef Melina Kelson of Bootleg Batard this Sunday, April 11 at 1pm CST. Get a sneak peak of what to expect in the class in our interview with the chef.


Whole Wheat Pita
Ingredients
- 1 1/4 cups lukewarm water, 105-110 degrees
- 1 teaspoon dry active yeast
- Pinch of sugar
- 1 1/2 cups bread flour
- 1 1/2 cups whole wheat flour
- 1 1/2 teaspoons kosher salt
Instructions
- Put the warm water into a medium-sized bowl and sprinkle sugar and yeast on top. Let sit for 5 to 10 minutes, just until you see a little bubbling in the bowl.
- Add 3/4 cup of bread flour and 3/4 cup of whole wheat flour to the proofed yeast. Stir the sponge in the same direction 100 times to develop the gluten. Cover the bowl and let it sit for 30 minutes.
- Stir the salt into the sponge and follow with the remaining flour. Stir until it becomes too stiff to stir, then turn it out of the bowl and knead for 8 to 10 minutes or until the dough is smooth. Put the dough in a bowl and cover. Let rise until dough has doubled in size, approximately 1 hour.
- After the dough has doubled, gently push the dough down and let the dough double in size one more time before you shape the dough.
- Cut the dough into eight equal size pieces and shape roughly into a round ball. Roll each piece into about a 5-inch circle and put under a dish towel so it doesn’t dry out. I find it easier to roll the pita in two phases since it will want to spring back and be difficult to roll right after you cut it and shape it. Go back to the first piece of dough you rolled and roll it into an 8-inch circle or about an 1/8 thick piece of dough. Repeat with remaining dough, keeping each piece covered as you go.
- Preheat a cast iron skillet or heavy-duty sauté pan over high heat. The pan should be about 475 degrees on a surface thermometer. This high heat is essential to achieve a pocket. If it's too cold, you won’t get enough steam to form the pocket. If it's too hot, you can get burnt spots, like some of mine. These spots can become brittle and can break letting the steam escape instead of remaining trapped inside the pita, so it will not inflate. If the pita is browning too quickly, turn the heat down.
- Place the pita dough circle on the dry hot pan and cook for approximately 15 seconds on the first side and 1 minute on the second side or until bubbles begin to form inside the dough. Turn over again to the first side and the dough will now puff up like a balloon. When it has completely inflated, it is done.
- Repeat the same process with the remaining pita.