Isn't homemade, fresh bread always better than anything you can find in the store? That's a rhetorical question. I have been thinking about making fresh pita bread for some time now, and I finally put it on my to-do list. I am so glad I did because it was so much fun and very rewarding!
As I have mentioned in previous blogs, I design the class curriculum for The Chopping Block, and it's my responsibility to make sure our recipes are tried and true. We have a class coming up called Rock the Casbah, and one of the items on the menu is homemade pita bread. Because I have never made it before I wanted to test the recipe at home to make sure we pass along a great product to you!
You will be surprised to hear that it's a very simple recipe with amazing results. I also had the advantage of getting a lot of extra help from my daughter, Delilah. Because she is always so eager to help out in the kitchen it made this activity a real treat for both of us.

I know making bread can be a little intimidating, but this is a great recipe for beginners. So grab your apron and let's make some flatbread! Before you get started, I want to share some information about the different types of flour you'll be using in the recipe. It's helpful to understand the hows and the whys before you dive in.
What is Wheat Flour?
All wheat flours come from the wheat berry, which is made up of three parts:
- The bran is the hard outer shell covering the wheat berry. It contains the fiber and most of the minerals found in wheat. Because of its effect on gluten development, it is removed during the milling process.
- The germ, if cultivated, would become the plant. Wheat germ is very high in protein and vitamin B. Because of its fat content, wheat germ is removed to make white flours. This helps prevents the flour from becoming rancid. Wheat germ can be stored in the refrigerator to slow the natural breakdown process.
- The endosperm is the food that the plant stores to help the seed grow. The endosperm contains the starch and protein of the wheat berry. White flours are made of the endosperm only, with the bran and germ removed.
Here is a list of the most commonly used flours and what they are best used for.
All-Purpose Flour: 10% to 12% Protein
All-purpose flour is the finely ground endosperm of the wheat berry separated from the bran and germ during the milling process. All-purpose flour is made from hard wheats, or a combination of soft and hard wheats from which yeast breads, cakes, cookies and pastries can be created.
- Enriched all-purpose flour has iron and B-vitamins (thiamin, niacin, riboflavin and folic acid) added in amounts equal to or exceeding that in whole wheat flour. The majority of all-purpose flour in the United States is enriched.
- Bleached all-purpose flour is exposed to chlorine gas or benzoyl peroxide to whiten and brighten flour color.
- Unbleached all-purpose flour is bleached naturally by oxygen in the air during the aging process which is why we prefer the unbleached variety.
Bread Flour: 12% to 14% Protein
Bread flour is ground from a high-gluten blend of hard-wheat flour, malted barley flour and vitamin C. Because of its greater gluten strength it is generally used for yeast breads.
Whole Wheat Flour: 11% to 15% Protein
Whole wheat flour is a flour containing the bran, germ and endosperm. The presence of the bran reduces the gluten development, therefore, baking products made from whole wheat flour tend to be heavier and denser than those made from white flour. Whole wheat flour has more dietary fiber than white flour. It also contains about five percent fat which is why it should be stored in the refrigerator. It is used for breads and pastas, usually as no more than 50% of the total flour.
Now that you know the properties of the different flours you're ready to take on this recipe.
Whole Wheat Pita
Yield: 8 loaves
Active time: 1 hour, 15 minutes
Start to finish: 2 hours, 45 minutes
1 teaspoon dry active yeast
11/4 cups lukewarm water
1 1/2 cups bread flour
1 1/2 cups whole wheat flour
1 1/2 teaspoons kosher salt
1 1/2 teaspoons extra virgin olive oil

To prepare the sponge, sprinkle the yeast over the water in a medium bowl, and let it sit for a few minutes to hydrate the yeast. Stir in the olive oil, then add half the flour and stir until combined. Stir 100 times in the same direction, to develop gluten.

Cover the bowl with plastic wrap and set aside for 30 minutes.
Stir the salt into the sponge, and then add the remaining flour.

When the dough becomes too stiff to stir, turn it out of the bowl and knead for 8 to 10 minutes until the dough is smooth.

Put the dough in a lightly oiled bowl, cover with plastic wrap, and let it rise until double, about one hour. (At this point, you can punch the dough down, re-cover it or transfer it to a large plastic bag, and refrigerate it for up to 3 days. Allow dough to come to room temperature before baking.)

Preheat a heavy-duty pan or griddle over medium heat. (Cast iron is great.)
Punch the dough down and divide it into 8 pieces.

Roll each piece into a ball and cover with plastic so they don’t dry out.

With a rolling pin, roll one of the balls out to a circle no more than 1/8" thick. It will be 6 to 7 inches across. Repeat with the other seven pieces of dough.
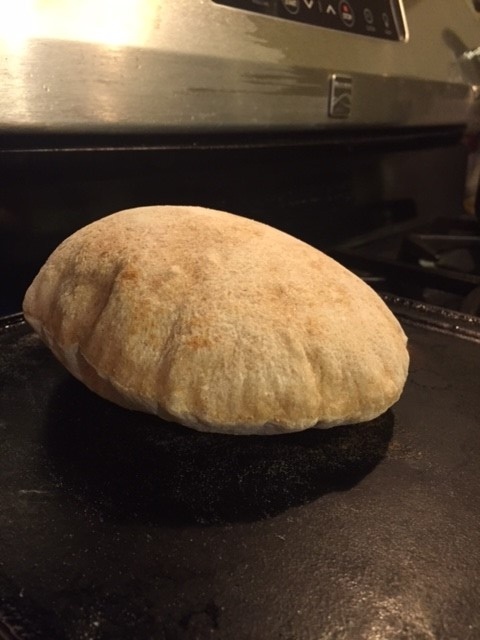
Place one of the loaves in the dry pan and cook for 15 seconds.
Turn the loaf over and cook the second side for about a minute, until bubbles begin to form inside the dough. Turn over again to the first side.

The loaf will now puff up like a balloon just like this! When it has completely inflated, it is done.
Important tips:
- Make sure you flip the loaf before any brown spots become too dark. Dark brown spots are very brittle, and the steam will break through them instead of remaining trapped inside the loaf, so it cannot inflate. If browning occurs too quickly, reduce the heat under your pan.
- If the loaf is too thick, it will be difficult to get it to puff. (It will still be delicious!)
Set it on a wire rack or a towel to cool, and repeat baking with the next loaf.
We have several other bread making classes at The Chopping Block that focus on bread baking that will give you an excellent foundation of the technique. On June 4th we are offering our popular Artisanal Breads Boot Camp, and on May 13th is the debut of a new class designed by chef instructor Melissa Novak called Everyday Breads which teaches you how to make your own bread all year round.