

Even though I have been working in the food industry for over half of my life, I still have so much to learn about making bread. Other than spending a unit on breads in culinary school (which was 24 years ago), I haven’t had a lot of professional training on the subject. Because I love eating homemade bread, enjoy the art of making homemade bread, and want to improve my skills, I have spent a lot of time reading about bread-making techniques and practicing at home in order to be a better and more well-rounded cook.
I typically stick to straight forward bread recipes such as pizza dough, dinner rolls or focaccia, but my family and I had a craving for challah, so I set out to make this traditional bread… another one which I consider fairly straight forward. I grew up eating challah on a regular basis, and have very fond memories of my mom making it from scratch, so this felt nostalgic to me.

The recipe for challah isn’t very complicated, but before I started making the dough, I consulted with one of my best girlfriends who just happens to be a certified master baker, certified executive pastry chef and certified bread baker. She is an excellent resource to say the least!
The recipe itself is very informative, but here are some tips I want to share with you that helped me feel more confident throughout the process. Keep in mind that there are so many different types of bread around the world, and depending on the final product, some of the kneading techniques, rise times and temperatures will vary, so be sure to thoroughly follow your specific recipe carefully.
Temperature Matters
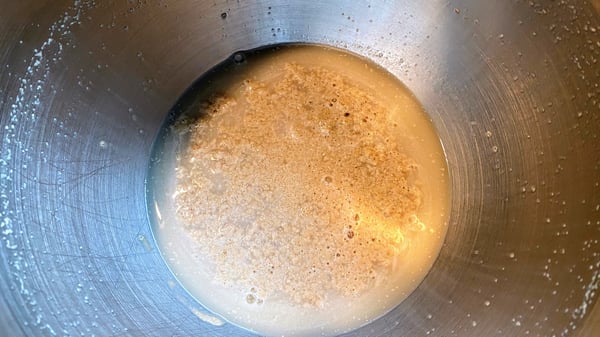
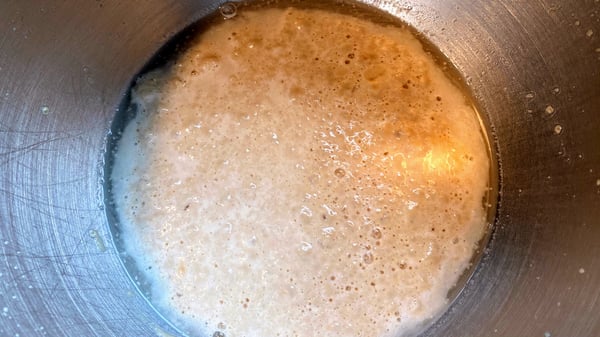
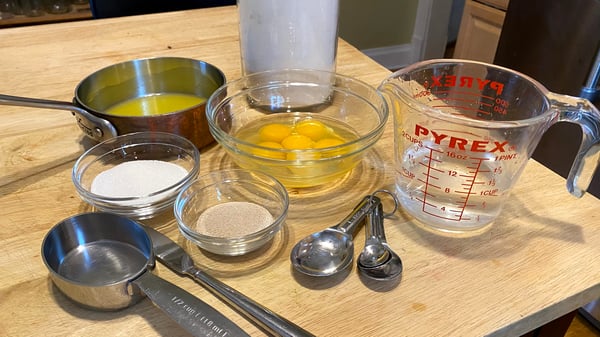
The first step in the recipe is to mix together the yeast, warm water and a pinch of sugar. The purpose of this step is to ensure your yeast is active and will do its job of raising the dough. Yeast thrives in warm temperatures and is slow to wake up in a cold environment, so the ideal temperature for your 3/4 cup of water is between 110° and 115°. Any hotter and you may end up killing the yeast, and any colder the yeast will be sluggish. A digital or instant read thermometer is a foolproof way to determine the temp of your water, but if you don’t have one, just make sure it’s warm to the touch.
Enrich Your Dough
It’s important to know that challah is what you call an enriched dough. Enriched doughs have a higher fat and sugar content, resulting in a soft and tender crumb (interior). The enriching components in this dough are melted butter, whole eggs, egg yolks and sugar. Keep in mind you need to allow your melted butter to cool a bit before adding it to the recipe. If it’s too hot, you risk killing the yeast, so build some time into the recipe to cool your butter. I used a spoon, and stirred my butter to let off the steam. I also took the temperature of the butter to ensure it was good to go.
Kneading
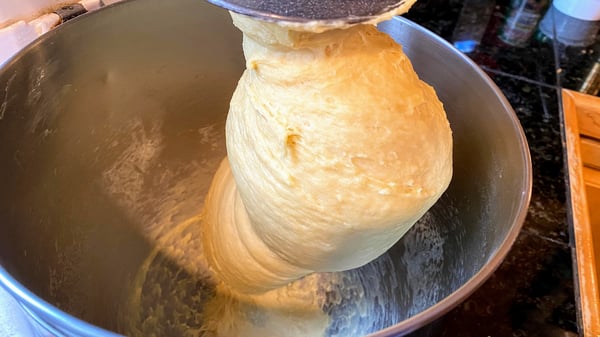
Kneading is significant because this creates the structure of the dough. When you knead dough, you’re developing the gluten (protein) in the dough, which in turn creates a sturdy structure in order to trap the CO2 bubbles released by the yeast. Once I added the dry ingredients (flour, sugar and salt), I used the dough hook to do most of the kneading for me. At first the dough will look very shaggy, but as you continue to knead the texture will start to smooth out. You know you have added enough flour if the dough pulls away from the sides of the bowl when kneading. If there’s a lot of sticking, add a touch more flour. I continued to knead my dough for just about 5 minutes to ensure I didn’t over work the dough. Over kneading can make the dough feel tough, and the gluten structure will tear instead of stretching.
If you’re kneading by hand, really get your whole body into the process in order to work the gluten. It really is like getting a workout! Knead the dough for 7 to 10 minutes, or until it’s smooth and elastic, adding a bit of flour at a time if the dough is too sticky.
What if you don’t knead enough? Your dough will lack strength and structure, and will have a hard time keeping its shape. Instead of rising, your dough will most likely fall flat.
The First Rise
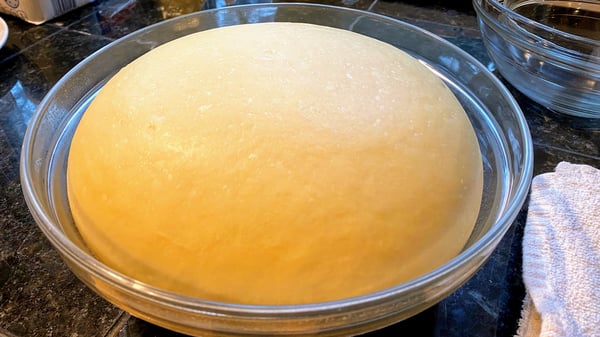
This step not only creates the light and airy crumb we all know and love, it develops flavor, too! The rate at which your dough rises really depends on the dough, but a sure way to encourage the yeast to multiply is all about maintaining the proper temperature. The longer it takes your dough to rise, the more flavorful it will be. And the opposite of this is true: your dough will lack flavor if it rises too quickly. The ideal rising temperature of dough is around 75°F, but unless it’s summer time, whose kitchen is 75°F? There are a few ways to MacGyver this situation, so once your dough has been properly kneaded, place it in a bowl or a plastic container that has extra room to account for the rising. Cover the bowl or container with plastic wrap or with a lid, which will help trap humidity. This is key to getting a good crust. You can place your covered dough in an oven with only the oven light on, as this will gently heat the environment. You can also place your dough on top of the fridge, where it tends to be a bit warmer. You know when the dough has risen enough when it’s doubled in size. And, depending on your ambient temperature, this can take anywhere from 1 1/2 to 3 hours.
Shaping
This is my favorite part, because the bread you’re making is really starting to take shape. Ha! See what I did there? Once your dough has risen, punch it down and divide into equal-sized pieces, the number of which depending on how many loaves you want to make. I like using a kitchen scale to ensure my pieces are the same size, which will also ensure the loaves will bake at the same rate.

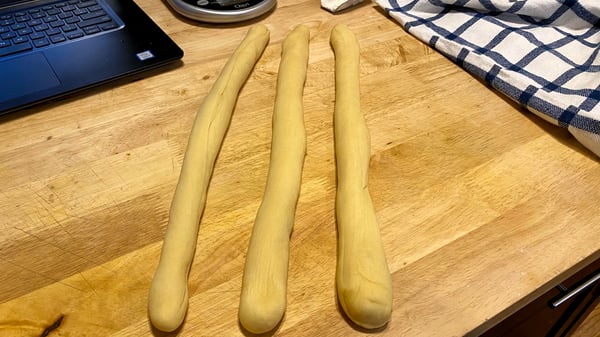
For the challah, you then roll the dough pieces into ropes that are about 1 1/2-inches in diameter. What I found in this step was that the surface of my dough was a bit dry, and when trying to roll the pieces into ropes, it just slid around on my table. What I needed was a bit of friction to give the dough something to grab onto. The answer? Water! I filled a small bowl with water, lightly dipped my hands in the water, allowing any excess to drip off, and then started rolling the ropes. This created enough traction to make the dough more cooperative.
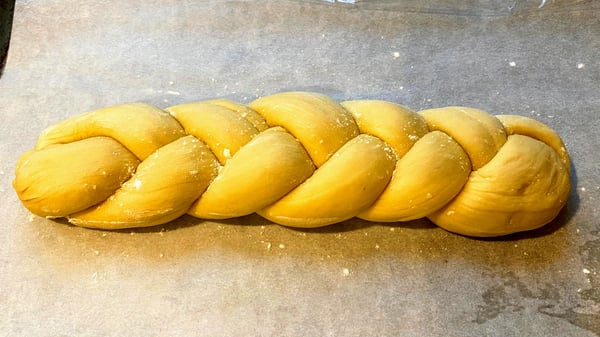
Once the challah had been braided, I used a bit of water to help bring the ends of the loaves together, and then just gently tucked them under.
The Second Rise, Known as Proofing
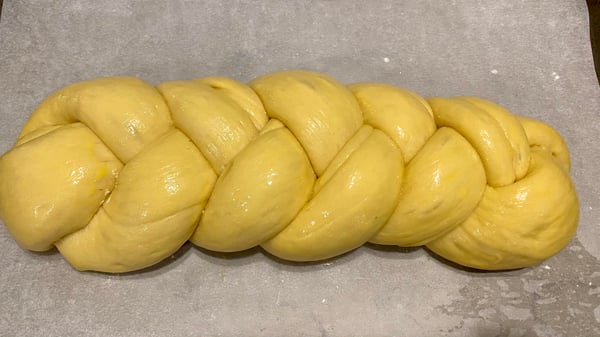
This is the final rise after you have shaped your loaves, and is the last opportunity to develop flavor. Loosely cover your shaped challahs with plastic wrap, and allow them to rise until they have doubled in size. Again, the slower the rise, the more flavor your dough will develop. Be careful not to over proof your loaves; if they proof too much, the air bubbles get too big, causing them to pop and then deflate in the oven.
The Bake
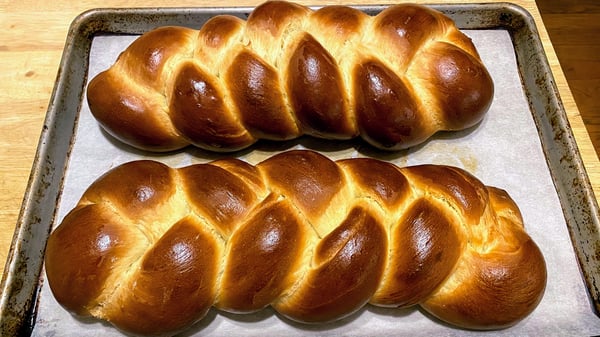
Slide your proofed and egg washed loaves into the preheated oven, and bake, rotating the pans as necessary, until golden brown. This final opportunity for your loaf of bread to rise up before the crust is formed is called oven spring. How do you know when your bread is done? Follow the allotted bake time in your recipe. Otherwise, you can go based on look and feel. The crust on the challah should be a medium-dark brown, and when you lift up the loaf and tap the bottom, it should sound like a hollow thud. I know it’s tempting to cut right into your freshly baked loaf of bread, but be sure to let it cool for about 30 minutes.
Challah
Scroll down for a printable version of this recipe
Yield: 4 small loaves or 2 large loaves
Active time: 40 minutes
Start to finish: 3 1/2 hours
4 1/8 teaspoons active-dry yeast
3/4 cup warm water (110º to 115º)
6 tablespoons unsalted butter, melted and then cooled
3 whole eggs
3 egg yolks
6 tablespoons granulated sugar
1 1/2 teaspoons salt
4 1/2 to 5 cups all-purpose flour
For the egg wash:
2 egg yolks
1 to 2 teaspoons water
- In the bowl of a stand mixer, fitted with the dough hook, or in a large mixing bowl, measure together the yeast, warm water and a pinch of the sugar. Allow this mixture to bloom for about 5 minutes, or until you see bubbles form on the surface of the water.
- Add the butter, eggs and egg yolks, and whisk until just combined.
- Add the sugar, salt and 4 1/2 cups of flour.
- If using a stand mixer, knead the dough until all of the ingredients are combined and the dough is no longer sticking to the sides of the bowl, about 5 minutes. If making this by hand, knead the dough for 7 to 10 minutes until smooth and elastic, adding a sprinkling more flour if needed.
- Place the dough in a lightly-oiled bowl. Cover with plastic wrap, and allow to proof until doubled in size, 1 to 3 hours depending on your ambient temperature.
- To shape the challah, punch down the dough, and divide it into 12 equal pieces if making 4 small loaves or 6 equal pieces if making two larger loaves.
- Line two sheet trays with parchment paper.
- Shape each piece into equal-size ropes that are about 1 1/2 inches in diameter, and cover with a towel. For each challah, place three ropes side by side on your work surface, and braid the bread. Tip: If the dough is sliding around too much while trying to roll it into a rope, lightly dip your hands in water, allowing any excess to drip off. The extra bit of water will create tension making it easier to roll the ropes.
- Tuck the ends of the dough under and carefully lift the braided loaves onto the prepared sheet trays. Cover the loaves with plastic wrap, and proof until the dough is light and puffy and almost doubled in size.
- Preheat the oven to 375°.
- In a small bowl, beat together the 2 egg yolks and water to make the egg wash. Brush the loaves with egg wash, and bake until golden brown, 35 to 45 minutes.
- The loaves will be a deep golden brown when finished, and shouldn't sound completely hollow, but make a nice thud.
- Allow to cool before slicing.
Note:
An optional step is to brush the loaves with an additional layer of egg wash half way through the baking process for extra sheen.

Even though I’m a chef instructor, I consider myself a student, too. I love opportunities to learn and fine tune techniques that need practice, and making bread from scratch is definitely one of those areas. I have to say that I have made many mistakes when making bread, but those mistakes are such valuable learning lessons. I look forward to my journey of making more mistakes, and making some pretty awesome loaves of bread, too!
Another great introduction to making bread is to try your hand at donuts! The recipe for making this sweet, enriched dough is very similar to making challah, except we deep dry the dough instead of baking it. Ready to get your hands wet? Sign up for our Virtual Paczki Party Workshop on February 13th for a fun and interactive experience!


Challah
Ingredients
- 4 1/8 teaspoons active-dry yeast
- 3/4 cup warm water (110º to 115º)
- 6 tablespoons unsalted butter, melted and then cooled
- 3 whole eggs
- 3 egg yolks
- 6 tablespoons granulated sugar
- 1 1/2 teaspoons salt
- 4 1/2 to 5 cups all-purpose flour
- 2 egg yolks
- 1 to 2 teaspoons water
Instructions
- In the bowl of a stand mixer, fitted with the dough hook, or in a large mixing bowl, measure together the yeast, warm water and a pinch of the sugar. Allow this mixture to bloom for about 5 minutes, or until you see bubbles form on the surface of the water.
- Add the butter, eggs and egg yolks, and whisk until just combined.
- Add the sugar, salt and 4 1/2 cups of flour.
- If using a stand mixer, knead the dough until all of the ingredients are combined and the dough is no longer sticking to the sides of the bowl, about 5 minutes. If making this by hand, knead the dough for 7 to 10 minutes until smooth and elastic, adding a sprinkling more flour if needed.
- Place the dough in a lightly-oiled bowl. Cover with plastic wrap, and allow to proof until doubled in size, 1 to 3 hours depending on your ambient temperature.
- To shape the challah, punch down the dough, and divide it into 12 equal pieces if making 4 small loaves or 6 equal pieces if making two larger loaves.
- Line two sheet trays with parchment paper.
- Shape each piece into equal-size ropes that are about 1 1/2 inches in diameter, and cover with a towel. For each challah, place three ropes side by side on your work surface, and braid the bread. Tip: If the dough is sliding around too much while trying to roll it into a rope, lightly dip your hands in water, allowing any excess to drip off. The extra bit of water will create tension making it easier to roll the ropes.
- Tuck the ends of the dough under and carefully lift the braided loaves onto the prepared sheet trays. Cover the loaves with plastic wrap, and proof until the dough is light and puffy and almost doubled in size.
- Preheat the oven to 375°.
- In a small bowl, beat together the 2 egg yolks and water to make the egg wash. Brush the loaves with egg wash, and bake until golden brown, 35 to 45 minutes.
- The loaves will be a deep golden brown when finished, and shouldn't sound completely hollow, but make a nice thud.
- Allow to cool before slicing.
- Note:
- An optional step is to brush the loaves with an additional layer of egg wash half way through the baking process for extra sheen.