

Food and fire. It’s primal; it’s a dance; it’s carbons bursting to life! It’s a skill. Taming live fire and manipulating it in such a way that the food you’ve placed on top of, beneath, or beside lives harmoniously with the fire as its sugars become sweeter, flesh becomes firmer, and its juices burst in excitement.
As a child born in the late 70’s in West-Central Illinois cooking on live fire was a right of passage, a tradition passed down from an older male to a younger one. Standing by my dad, who cooked on our Weber kettle all year round (in winter he would back the car into the driveway and cook in the garage), I learned about searing and indirect cooking and the difference between “charred” and “burnt”. He taught me about caramelizing fats, resting meat, and how to build flavor using smoke and heat properly. My dad isn’t a chef, he knows nothing about food science, he just understands food and fire. There were no gas grills when I was a child, not for home use and certainly not in rural areas. It wasn’t until high school that we got a gas grill, and we used it for vegetables and the occasional hot dog/hamburger, but never for proteins! Once the taste of charcoal and wood smoke gets into you, nothing tastes as good after that.
I moved to Chicago in 1994 and for the next 12 years lived a basically fire-free life. There were a few good BBQ places and just two wood oven pizza places at the time. Most restaurants just used their gas grills and broilers, and it was a sad time for fire eaters. In 2006, I moved back home and was given my grandfather's old Weber kettle, and it was like I’d been given a family heirloom! I cooked on that thing constantly for the next six years perfecting all the tips and tricks I had gleaned.
It was also at this time that smoking competitions started becoming a summertime thing, and some of the folks I was hanging out with were really into it. I immersed myself in this amazing sub-culture of smoked pork, rock n' roll, and comradery. I watched and learned from these folks just as I had from my father. They taught me that my kettle was essentially the same as the smokers they had hitched to their trucks, just a smaller area. I would go home and practice, making wood chip trays out of tin foil, figuring out what type of chips go with what, working on rubs and brines.
When I moved back to Chicago in 2012 it seemed that the entire city was smoking and cooking on hard wood. It was the hipster restaurant trend, and I was such a snob about it! At any of the restaurants I was cooking for during the next few years, I would beg to man the smoker. I was living in a studio apartment in Rogers Park at the time and had nowhere for a grill. When I became Sous Chef, any dish of mine on the menu had some type of smoked or charred element to it. When I ran my own kitchen, there were a lot of smoked and charred elements. It’s my bag, and I’m good at it.
I still couldn’t play at home though, not until a few years back when my partner and I moved in together. She was fortunate enough to find a place with a private rooftop deck, and I am fortunate enough to date her. The first thing I did was go out and buy a bigger-than-I-needed kettle grill. Now remember that I am still a smoke snob so there was no way I was going to buy gas, and I wasn’t just going to get dumb ol’ Kingsford brand charcoal either. I opted for a big bag of natural charcoal, a chord of hickory and a chord of cherry wood which of course was completely unnecessary and much to my partner's chagrin. She was very nervous about that much smoke and fire on a wooden deck on top of a rubber roof. I assured her that I was a “professional who’s been cooking like this for years.” Everything was beautiful the first summer. We used the rest of the deck space to plant a huge garden and spent all of our free time up there. Then it happened.
The next May my mom came up for Mother’s Day and it was a beautiful weekend so I planned a great meal all to be done upstairs so we could enjoy the sun. We also enjoyed wine, maybe a lot of wine. Maybe too much wine to finish smoking a tri tip in the dark. You see, the fire got a little too low between the salad and pasta and the sun had gone down. I wanted to get a bit more crust on the meat so I was going to flash it. While stoking the fire some embers may have flown out onto the deck and roof unnoticed. Unnoticed until the next day when three holes that had been burnt into the deck and roof were found. There was a lot of yelling, maybe some crying, and eventually acceptance- no more live fire on the roof.
What was I to do? I can’t live without cooking over fire, and I refused to get a gas grill or smoker. Summer came and I had no fire, so I broke down and got a gas grill and a cast iron smoker box. It was... fine, and I begrudgingly cooked on it, but it wasn’t the same. I needed smoke! I started to research gas and electric smokers; I read all the comparative articles. I learned about how much better of a seal on the door you need on gas smokers because the smoke isn’t as dense. I learned that for what I’m doing at home, a gas smoker is perfect. I learned that electric smokers are garbage.
When I found the right smoker for me, I went out and bought it along with some bags of hickory, apple, and cherry wood chips. I also started to really focus on rubs. I was still unsure about how much flavor the smoke would give so I wanted to give the meat a bit of a kickstart. I bought a pork shoulder, salted it, rubbed it, and let it sit in the fridge wrapped in plastic wrap for two days. The apple and cherry chips were soaked, and I was ready to test this contraption out. I was immediately impressed!
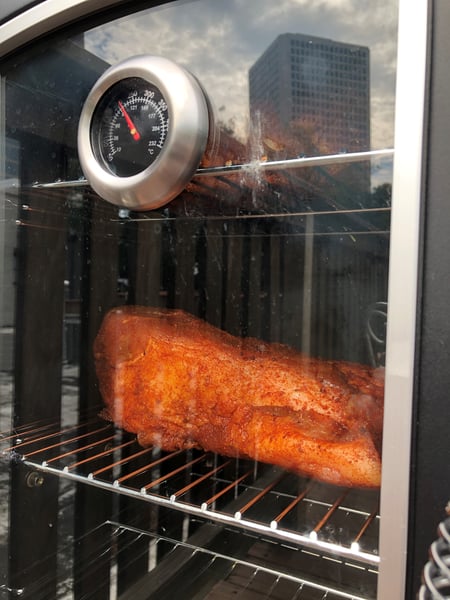
Pork shoulder in gas smoker
The chips heated up and started smoking almost instantly. I put the pork in, sealed it up and walked away. 30 minutes later I came back to see smoke billowing out and could smell the sugars in the rub and fat start to caramelize. An hour later the smoke started to thin out and the water in the tray had evaporated. You know what that means? This ain’t no set it and forget it job, you have to have just as much patience and timing and tend to the fire just as much as working with live fire. Plus, being able to control the size of the flame makes managing the heat so much easier!

Smoked shoulder
I made pork steaks out of that shoulder and they were just as good as when I had made them on my kettle, so I was a believer. I started using that gas smoker for everything; it starts smoking so quickly how couldn’t I? I smoke tomatoes for pomodoro, mushrooms for vegetarian bolognese, all of the root vegetables for everything! Cherries for desserts, grapes for charcuterie and garnish, I’ll even start steaks in the smoker and finish them on the grill giving them an open fire flavor.
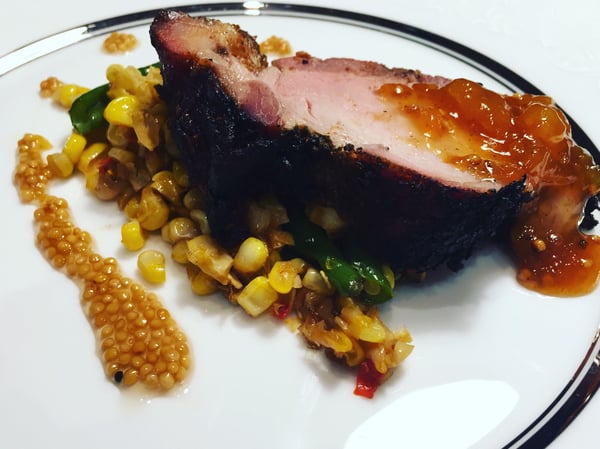
Pork steaks with succotash, pickled mustard seeds and smoked peach mustarda
It took over 40 years, but this purist was finally convinced that there’s more than one way to cook on fire. That live fire is great when you have space, but when you’re living on top of each other.. not so much. So if you’re an urbanized country kid, or a live fire purist, have faith, gas cooking can be your friend. Play with your wood chips, find a combo you like. Perfect your timing, ensuring that not a wisp of smoke or degree of heat is wasted. Finally rubs, cures, and brines are an art all of their own. Play with spices, salts and sugars. Play with time and liquids... the world is your spice rack.
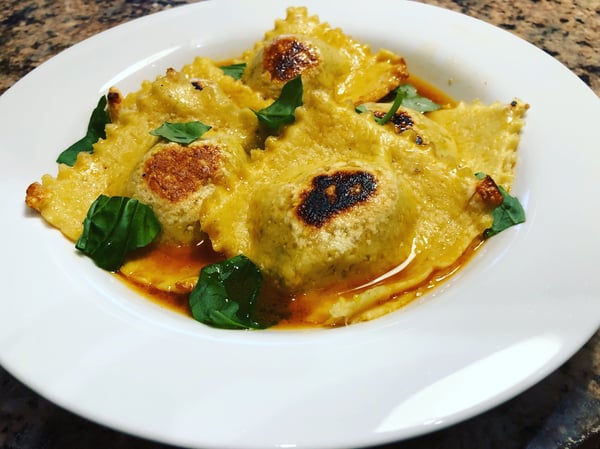
Pulled pork ravioli in a smoked tomato brodo
If you don’t know where to start, you can always buy pre-made rubs (The Chopping Block's retail shops are a good place to start) or if you’re feeling more hands on, I’ve included my pork rub below.
Pork Rub
Scroll down for a printable version of this recipe
Yields: Approximately 1 pint
1/4 cup cumin
1/4 cup sweet paprika
1 Tablespoon white sugar
1 Tablespoon dark brown sugar
1 1/2 teaspoons garlic powder
1 1/2 teaspoons onion powder
1 teaspoon Coleman’s mustard powder
1 teaspoon celery seed
1/2 teaspoon cayenne
1/2 teaspoon red pepper flake
Season pork generously with salt.
Mix spices together in mixing bowl.
Rub pork with spices making sure every inch is covered, getting into every crack and crevice.
Wrap rubbed pork with plastic wrap or seal in a food sealer.
Place in fridge for 2 days (if using plastic) or 24 hours (if using food sealer).
The Chopping Block's popular grilling and smoking classes on our Lincoln Square patio arrive in June, so stay tuned for details on those.


Pork Rub
ingredients:
- 1/4 cup cumin
- 1/4 cup sweet paprika
- 1 Tablespoon white sugar
- 1 Tablespoon dark brown sugar
- 1 1/2 teaspoons garlic powder
- 1 1/2 teaspoons onion powder
- 1 teaspoon Coleman’s mustard powder
- 1 teaspoon celery seed
- 1/2 teaspoon cayenne
- 1/2 teaspoon red pepper flake
instructions:
How to cook Pork Rub
- Season pork generously with salt.
- Mix spices together in mixing bowl.
- Rub pork with spices making sure every inch is covered, getting into every crack and crevice.
- Wrap rubbed pork with plastic wrap or seal in a food sealer.
- Place in fridge for 2 days (if using plastic) or 24 hours (if using food sealer).