

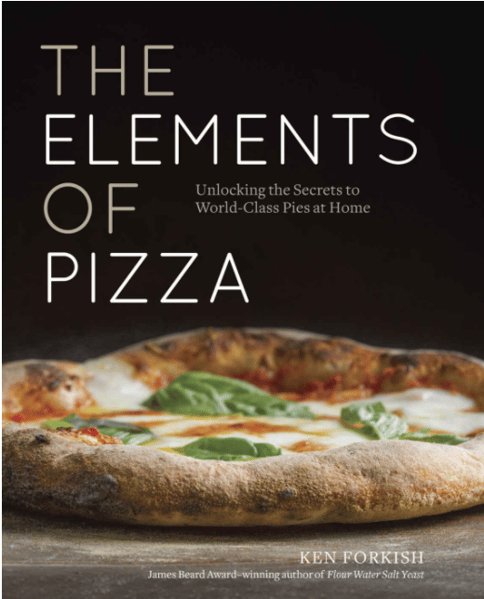
When a chef friend of mine recently told me about his latest adventures in making homemade pizza thanks to a book called The Elements of Pizza, I knew I had to give this dough with a very long fermentation time, yet very little yeast a try.
I do love to make homemade pizza (especially on the grill in the summer), but typically reserve it for special occasions such as friends coming over. Since there's been little of that thanks to the pandemic, I decided to break in my new pizza stone I received for Christmas with some homemade pizza made in the style of Ken Forkish.
Ken Forkish is the The James Beard and IACP Award-winning author of Flour Water Salt Yeast and one of the most trusted baking authorities in the country. He owns Ken's Artisan Bakery, Ken's Artisan Pizza and Trifecta Tavern in Portland, Oregon. The premise of his pizza book is that home cooks can make much better pizza than you can get out except for the very best independently-owned pizzerias, even with only a standard home kitchen oven. And he shows you how.
Ken's research for the book took him to Naples, Italy, the birthplace of Neapolitan pizza where he learned a valuable lesson from the pizzaiolos, that pizza and bread are not the same. "Bread wants to expand to its maximum volume; pizza does not. Pizza dough has structural needs - to stretch without breaking and without being too elastic. I knew this before, but I was still thinking of pizza as a kind of bread," writes Forkish. Until I read this book, so did I.
Pizza is a very personal experience as evidenced by the arguments of the best pizza in our own country. Is it New York's claim to fame, New Haven, Connecticut's prized possession or are Chicago's deep dish pies worth a mention? You likely have strong feelings on how you like your crust, the amount and sweetness level of the sauce, whether you stick with traditional toppings or think outside of the box. Whatever your pizza preferences, you can get better at making it with this book. Forkish covers Neapolitan, Roman, American pan, New York, creative flatbread, even gluten-free pizzas.
Time and Temperatures as Ingredients
The doughs in this cookbook are long-fermented which create the best flavors and textures, and the beauty of this process is that a lot of the work happens while you sleep. Whether you have three days or simply a few hours, there's a pizza dough to fit your schedule. Forkish uses time and temperature (of the dough, the room, etc.) as ingredients and builds out dough-rising schedules for each type of dough and names them as such.
There are the quicker "Saturday Pizza Dough" and the "I Slept In but I Want Pizza Tonight Dough" as well as longer fermented doughs such as the "24 to 48-Hour Pizza Dough" and the "48 to 72-Hour Biga Pizza Dough." The last one intrigued me the most and since I had some time on my hands on a recent cold winter weekend, I read the book from cover to cover and set out on my pizza adventure.

The book is truly a love story to pizza and features Forkish's favorite types of pies made in Italy as well as America. It's a lesson in using quality ingredients, in respecting the culture surrounding this dish and the role it plays in peoples' lives.
You learn how the craft of pizzaiolo in Naples has been handed down from generation to generation. They aren't chefs; they aren't bakers; they are pizzaiolos. You learn that in order to call a Neapolitan pizza truly "pizza Napitolitana" you must follow some pretty strict rules, have the right kind of wood-burning oven that averages a temperature of 905 degrees Fahrenheit, cook the pizza for only 60 to 90 seconds and use the proper ingredients.
Ingredients
You may need to purchase some special ingredients for a special pizza, but it's all a part of the experiment!
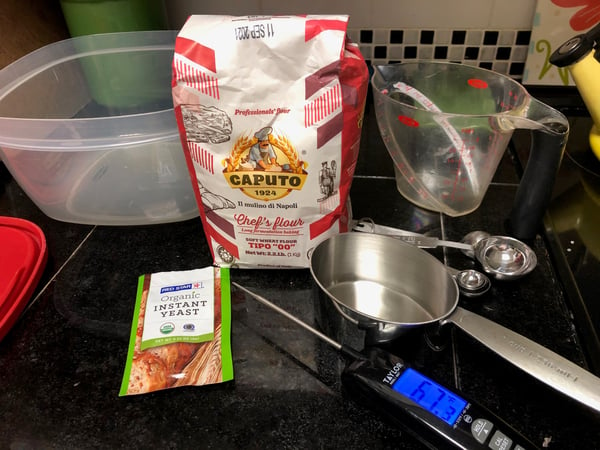
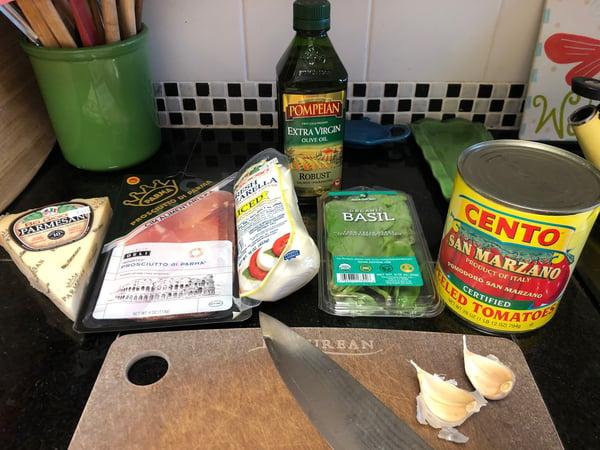
- Flour: 90-percent of the pizzerias in Naples use flour from one single mill: Molino Caputo. The pizza flour blends several kinds of wheat selected to produce flours with good flavors and the right physical characteristics for pizza baking. It's called "double zero" and gives the flour a refined, almost powdery consistency. So, order some online like I did to be ready for your pizza-making days.
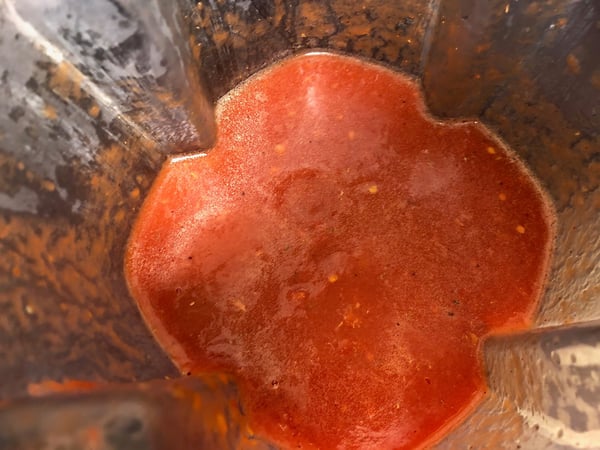
- Tomatoes: There's a myth that all Neapolitan pizzas use San Marzano tomatoes. That's because true San Marzano tomatoes are regulated (much like "pizza Napitolitana") and only represent 30,000 tons of a total of 2.5 million tons of tomatoes harvested each year in the south of Italy. So, buy San Marzano tomatoes whether regulated or not, and you'll be good.
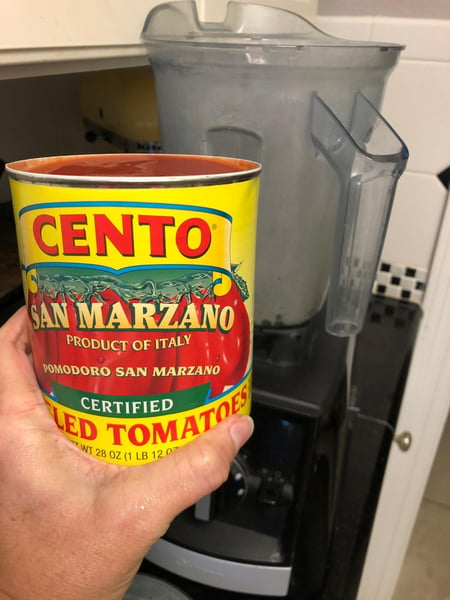
What surprised me most about the pizza sauce in the book is that it wasn't cooked to thicken it. Forkish says cooking the sauce to thicken it before making pizza removes the freshness of flavor and is rarely done in Italy. The sauce I made from the book was simply olive oil, salt, garlic, oregano, chile flakes and a can of San Marzano tomatoes barely processed in a blender. It was definitely thinner than the pizza sauce I'm used to making, but it was perfect on the pizza.
- Cheese: I could write a whole blog just on the cheese you can use on pizza, but I'll just say you don't want to skimp on quality and please never buy pre-shredded cheese for your artisan pizzas. For my creation, I used a combination of fresh mozzarella and freshly grated Parmesan cheese. Forkish interviews a cheesemonger in his book about the best types of cheese for pizza and even provides a recipe for raclette pizza.
Equipment
There are a few pieces of equipment you'll need for successful pizza making, some of which I had and others I did not.
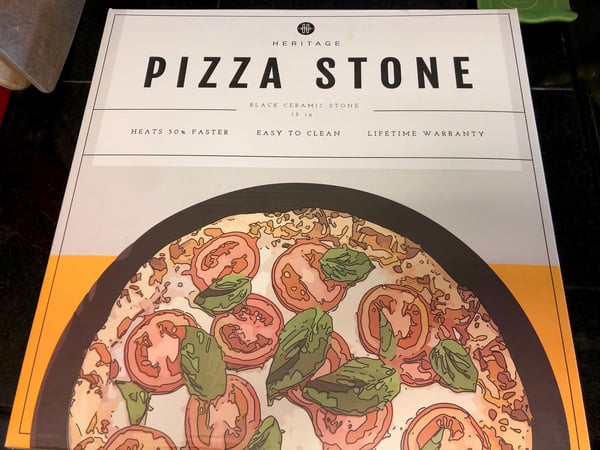
- Pizza stone: I mentioned I received one for Christmas that I was eager to try out. Apparently, pizza steels are even better for making pizza in a home oven according to Forkish, so if you need to purchase one, I'd try one of those. If you already have a pizza stone, you'll be fine. Mine worked like a charm, and I just leave it on the bottom rack of my oven when not using it to help regulate the temperature of my oven. For baking pizzas, you'll want to move it to a higher rack (before pre-heating!) since we use a combination of oven and broiler to really crank up the heat.
- Pizza peel: You want a wooden pizza peel for building the pizza on and transferring to the hot stone in your oven. I purchased one recently by Epicurious. It's a little smaller than I would have liked, but since I'm usually only making pizza for 1-2 people lately, it works just fine for Neapolitan-style pizzas which are traditionally 10-12 inches in diameter. Just dust it lightly with flour and your pizza won't stick. Don't use cornmeal, which affects the texture of the pizza and can burn.

- Kitchen scale: I have one, but I had no idea the minute amounts of ingredients we're talking about in this book. Some of Forkish's recipes use as little as .1 gram of dry yeast which is about 1/10 of a 1/4 teaspoon. There are inexpensive kitchen scales on the market that can measure these tiny amounts, so I would suggest investing in one if you want to use this book regularly. In the meantime, you can just estimate like I did.
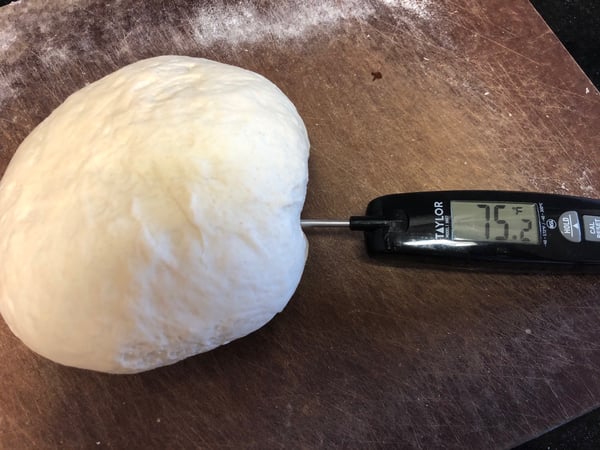
- Digital probe thermometer: I'm always amazed in our virtual classes when students don't have an instant-read thermometer in their kitchens. Not only are they essential for knowing when your meat is done, but they are very handy in the world of baking. I don't know about you, but I can't tell by touch whether water is 95 degrees (the perfect temp to kickstart yeast) versus 120 degrees (the temp which kills yeast). You'll also use the thermometer to take the temp of the dough after needing to make sure you are on point, which for this dough is 75 degrees.
Why Hand Mix the Dough?
I always used my Kitchenaid stand mixer to mix pizza dough before, but Forkish says hand-mixing makes dough that creates the most delicate pizza crust. I have to agree that you definitely get a better feel for what the dough should be like if you hand mix your dough. Executive Chef Lisa Counts always says in our virtual cooking classes that she likes to teach students to do something by hand first, before breaking out the power tools. I think this is a good rule of thumb for all home cooks.
Why the Long Fermentation?
Remember how I said earlier that pizza is different from bread? That's the main lesson Forkish provides in his book and the reason he relies on long fermentation to develop flavor and texture. In Naples, the pizzaiolos let the bulk of the fermentation happen once the dough has been portioned and shaped into balls, rather than making dough and letting it rise until it's doubled in size, like the majority of pizza recipes (TCB's included).
To get the best flavor and best texture of the pizza, you can't take shortcuts and rush your dough. Cutting the timeline short will give you a dough that is too elastic and difficult to stretch. The crust will be dense and chewy. But a dough that has been allowed to ferment slowly will give you a delicate, less chewy crust which is also crisp and light.
The Biga Method
I had never heard of a biga (pronounced bi-guh) before reading about in this book, but it's simply a mixture of water, flour and a small amount of yeast that is allowed to ferment overnight. When you make the dough with a biga, you build it in two stages. On the next morning, you add more flour, water and salt to the biga to complete the final dough.
It takes some planning, but the pizza is well worth it!
48-to-72 Hour Biga Pizza Dough
Adapted from The Elements of Pizza
Scroll down for a printable version of this recipe
Makes: 3 regular pizza dough balls
Biga Fermentation: 12-14 hours
Final Dough Fermentation: 45 minutes
Second Fermentation: 36-60 hours in fridge
For the Biga:
Water (90-95 degrees) 165 g or 2/3 cup + 1 1/2 teaspoon
Instant dried Yeast .2 g or 1/5 of 1/4 teaspoon
"00" Flour 250 g or 2 cups
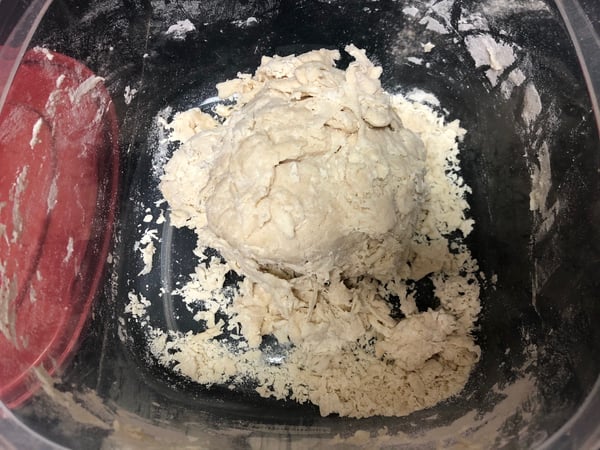
Two nights before you plan to make the pizza, measure and mix the biga ingredients. Put the water in a 4 or 6-quart plastic container with a lid. Add yeast to the water and let sit for a minute to hydrate, then swish it around until dissolved. Add the flour and mix by hand until all of the ingredients are incorporated. Put a lid on it and let it sit at room temperature for 12-14 hours or overnight.
My dough was very shaggy, and I had to add very small increments of water to get it to come to a cohesive ball. Just wet your hands as you mix the dough so that you don't add too much water.

For the dough:
Water (95-100 degrees) 185 g or 3/4 cup + 1 1/2 teaspoon
Fine sea salt 13 g or 2 1/2 teaspoons
"00" Flour 250 g or 2 cups
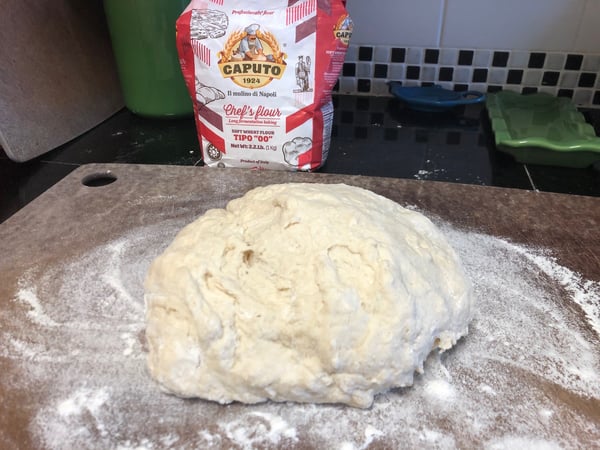
Remove the biga from the dough tub and add the water. Add the salt and swish it around until dissolved. Add the flour and mix by hand until you have a single dough mass.

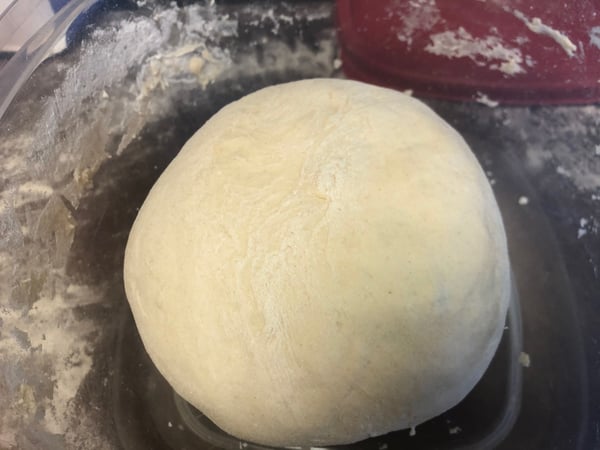
Add the biga to the dough and mix by hand until both doughs are incorporated. Feel free to take a break after a couple of minutes to let the dough rest. Because the biga and the dough are different consistencies, it can take longer than usual for the dough to unify. The target dough temp at the end of the mix is 75 degrees Fahrenheit.
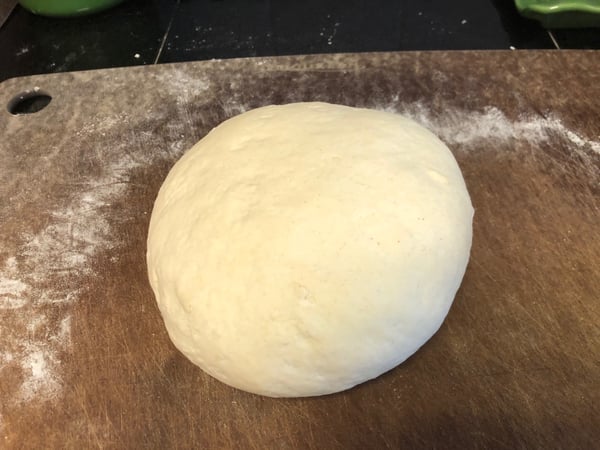
Let the dough rest for 20 minutes, then knead it again for a minute. The skin of the dough should be very smooth by now. Place the dough ball seam down in the same container and cover with lid. Let rise at room temperature for 45 minutes.
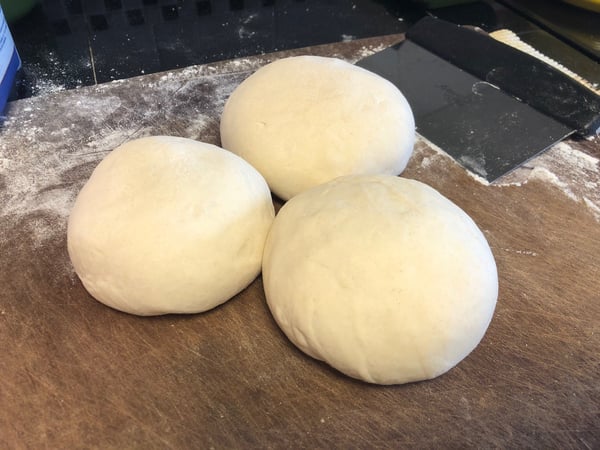
Remove the dough from the tub and cut into 3 equal pieces with a bench scraper or knife.
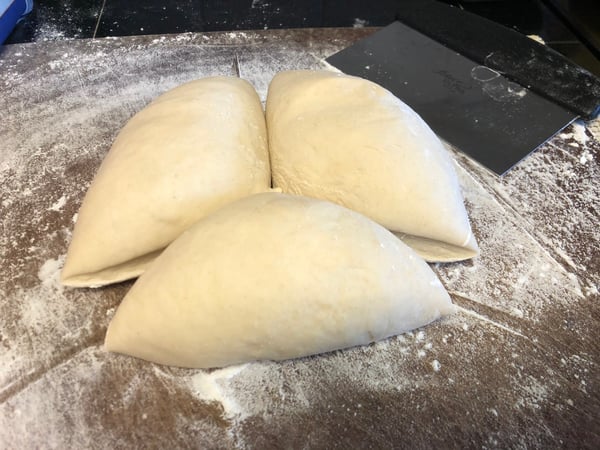
Shape each piece of dough into a ball.
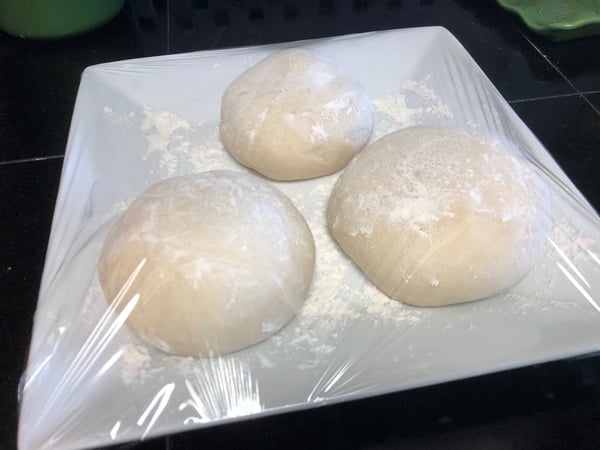
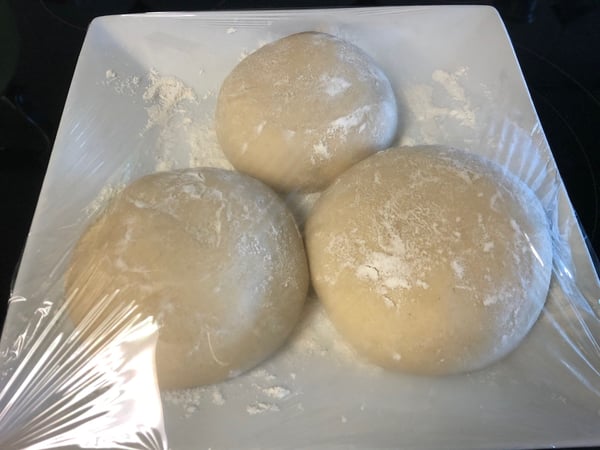
Place the dough balls on a large, floured plate so that they are not touching. Wrap in plastic wrap. Let them rest at room temp for 2 hours and then move to the refrigerator. They will hold in the fridge for 2-3 days. You can freeze them for up to a week. Or, you can par-bake them into pizza shells, but more on that later.
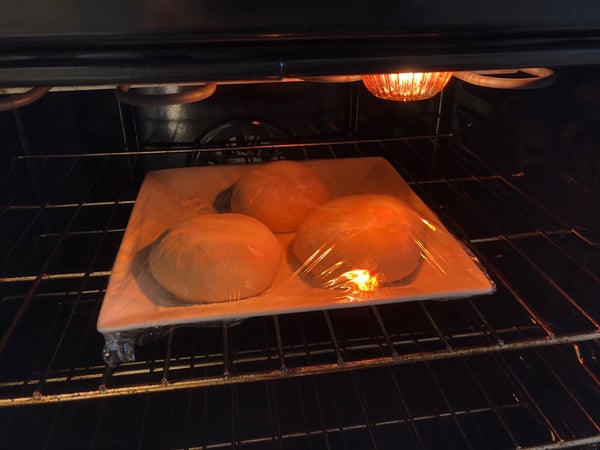
I mentioned I did this pizza project on a cold winter's day so you need to account for the temperature of your kitchen when proofing your dough. Since my kitchen was colder than the standard 68 degrees Forkish uses in the book, I put my dough balls in the oven with the oven light on but the heat off so they would proof in a warmer place than the countertop.
Remove the dough balls from the fridge 60 to 90 minutes before shaping them to make pizza.
Here's video of Ken Forkish showing you how to shape the dough balls into a pizza.
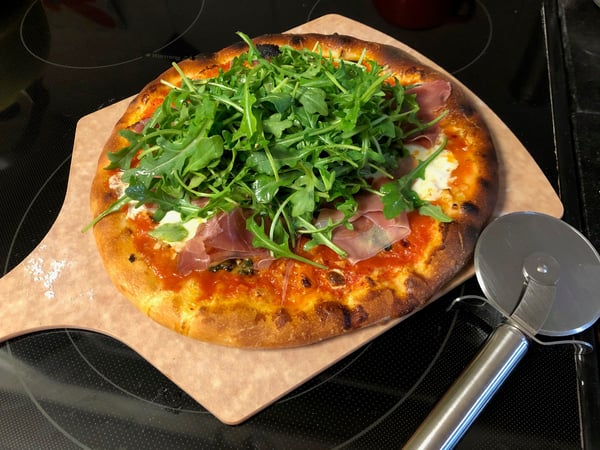
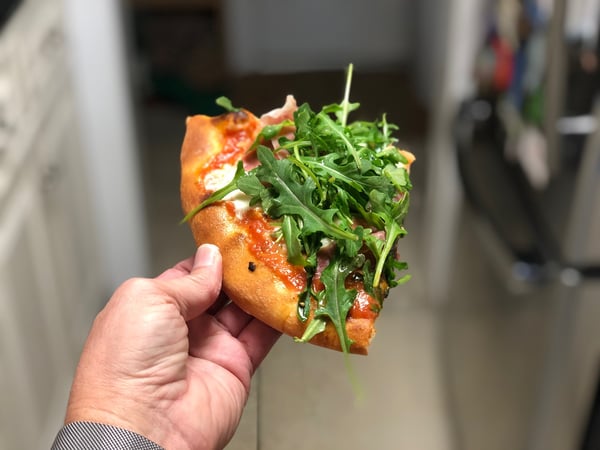
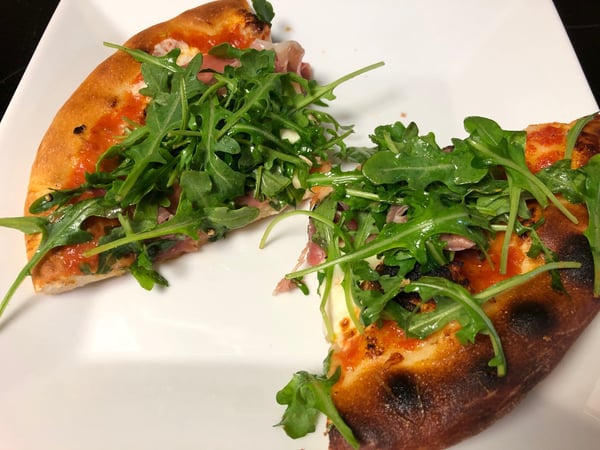
There are a lot of great pizza recipes to try in this book, and I wanted to start with a somewhat traditional one that Forkish uses in his own pizza restaurant, the Prosciutto pizza. I made a few tweaks of the book's recipe to fit my taste, including adding an arugula salad on top of the Neapolitan pizza. My friend who suggested this book swears by a thin coating of olive oil with a sprinkling of raw garlic on the crust, so that also went on my pizza.
Prosciutto Pizza
Makes one 10-12" pizza
Extra virgin olive oil
1 clove garlic, finely minced
1/3 cup tomato sauce
3 1/2 ounces fresh mozzarella, sliced
1/2 cup Parmesan cheese, freshly grated
4-5 whole basil leaves, torn
2 ounces prosciutto, about 6 very thin slices
Arugula
1 lemon, squeezed
Chile flakes, to taste
Salt and pepper, to taste
1. Remove a dough ball from the refrigerator 60-90 minutes before beginning to shape your pizza.
2. Pre-heat the pizza stone or steel in your oven to 550 degrees about 45 minutes before beginning to shape your pizza.
3. Turn off the oven and turn the broiler on high about 10 minutes before you build your pizza.
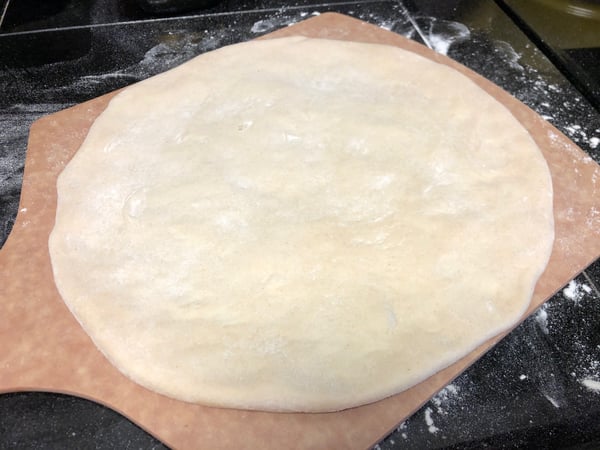
4. Flour the pizza peel lightly. Shape the dough ball into a 10-12" round and place on the pizza peel.
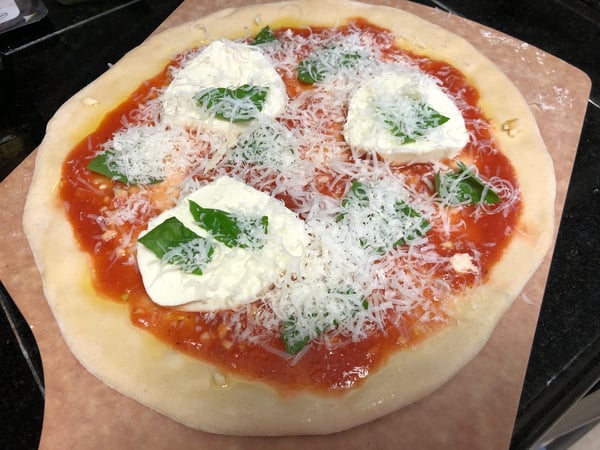
5. Brush with olive oil and sprinkle with raw garlic.
6. Ladle sauce onto pizza and spread to within 1/2 inch of the edge.
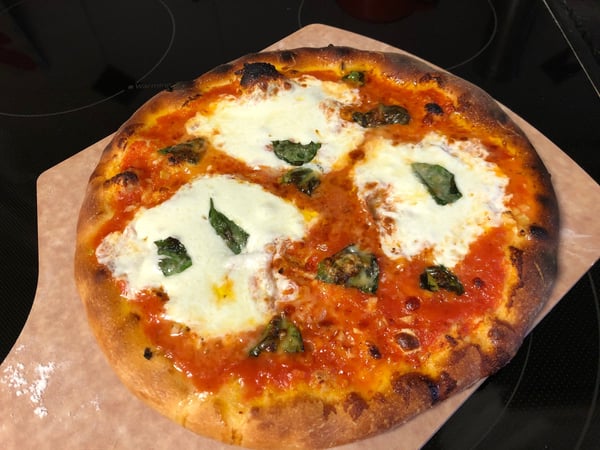
7. Add mozzarella cheese, Parmesan cheese and basil.
8. Turn off the broiler and turn the oven back to 550 degrees and slide the pizza from the peel onto the stone. Bake for 5 minutes.
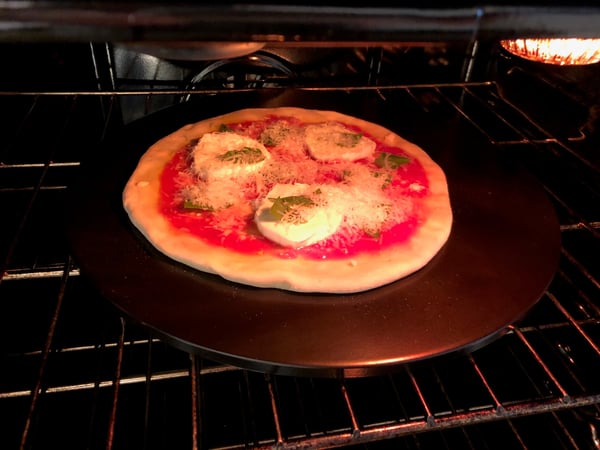
9. Turn the broiler on high and cook for 2 minutes. Check it after 1 minute to make sure it's not burning. There should be some charred bits on the edge of the crust. Remove from oven by using tongs to place the pizza back on the peel.
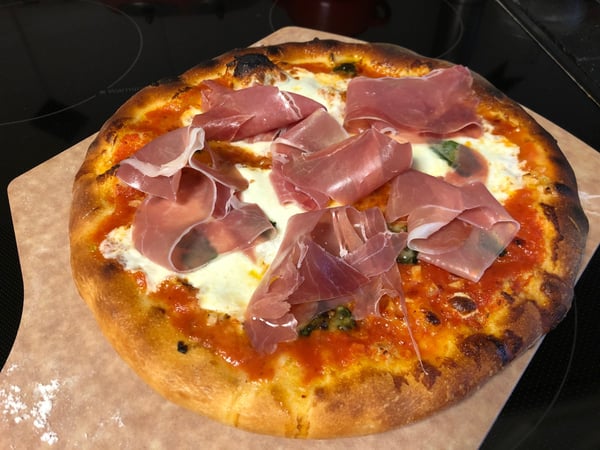
10. Add the prosciutto in little piles to the pizza, sprinkle with chile flakes and drizzle with a little olive oil.
11. Top with arugula that has been dressed in olive oil and lemon juice.
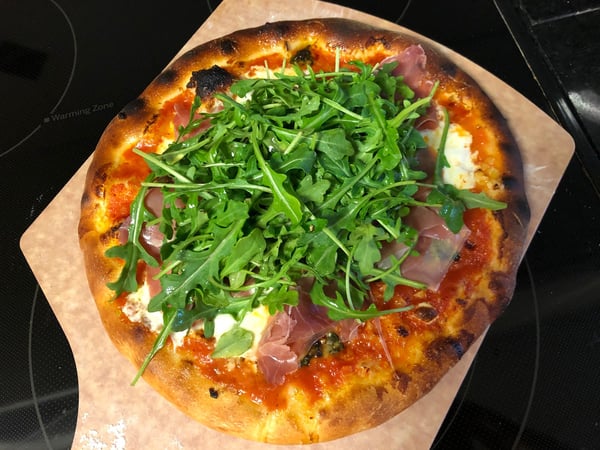
12. Enjoy the best homemade pizza you've ever made!
The Leftover Dough
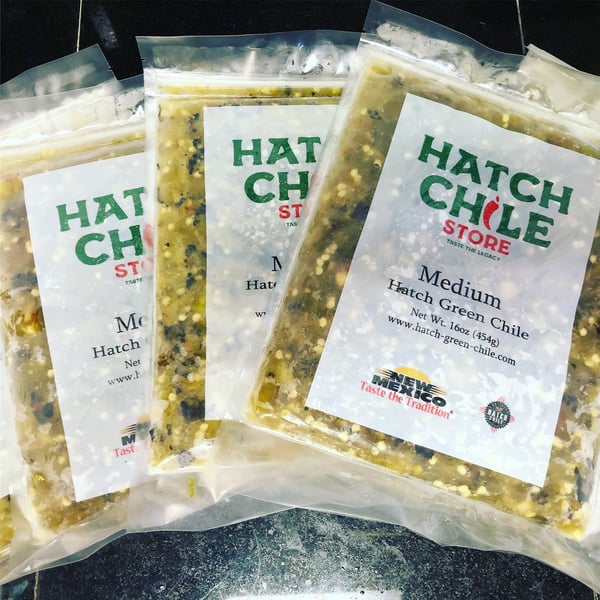
I mentioned that I was cooking for one this weekend, so that left two dough balls. I knew I wanted to freeze one dough ball for next weekend (it's Super Bowl Sunday after all), so I wrapped it tightly in plastic and put it in my freezer. I'll thaw this out overnight in the fridge and make a different pizza on Sunday for the game. I'm thinking something really different that will utilize the Hatch chiles that just arrived from New Mexico and are also in my freezer. Hatch chile pizza, anyone?
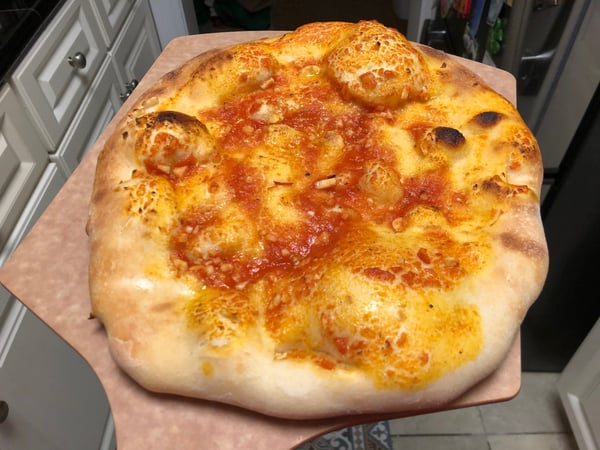
If you want the dough to last more than just a week, Forkish recommends par-baking it. To do this, shape a dough ball just as if you were making a pizza. I brushed mine with olive oil and sprinkled with garlic like before but only added about half of the sauce that I would have put on a pizza, about 1/4 cup. Bake the pizza in a 550 degree oven on a pizza stone for 3 minutes. Change the oven to broil and broil on high for 2 minutes. Remove from oven and let cool. Wrap in plastic wrap, put in a zippered freezer bag and put in the freezer.
Here's another video from Forkish on how to par-bake a pizza shell:
To defrost, remove from freezer and let defrost as your oven heats up. Add more sauce and toppings and bake just like the Prosciutto pizza. Here's what my par-baked pizza dough looked like before freezing. Check out those bubbles!
Forkish has more videos on the different steps to making pizza, so check out all of them on his YouTube channel. If you are intrigued by this pizza recipe I've shared, I guarantee you won't be disappointed by purchasing The Elements of Pizza. I can't wait to work my way through all of the different types of doughs and pies!
If you are interested in learning how to make The Chopping Block's pizza and calzone recipes which are not as labor intensive as this one but just as delicious, join us for a virtual Cook Along Pizza and Calzone Workshop on Saturday, February 20 at 3pm CST. You'll learn how to make:
- Caesar Salad with Homemade Croutons
- Homemade Pizza Dough
- Neapolitan Pizza
- Spinach-Ricotta Calzone

Pizza is this week's challenge in our private Facebook group, so make a pizza and share your creation with other home cooks. It can be this elaborate biga dough, the trusted recipe from The Chopping Block or simply purchased fresh pizza dough from your favorite grocery store and topped however you like.


48-to-72 Hour Biga Pizza Dough
Ingredients
- Water (90-95 degrees) 165 g or 2/3 cup + 1 1/2 teaspoon
- Instant dried Yeast .2 g or 1/5 of 1/4 teaspoon
- "00" Flour 250 g or 2 cups
- Water (95-100 degrees) 185 g or 3/4 cup + 1 1/2 teaspoon
- Fine sea salt 13 g or 2 1/2 teaspoons
- "00" Flour 250 g or 2 cups
Instructions
- Two nights before you plan to make the pizza, measure and mix the biga ingredients. Put the water in a 4 or 6-quart plastic container with a lid. Add yeast to the water and let sit for a minute to hydrate, then swish it around until dissolved. Add the flour and mix by hand until all of the ingredients are incorporated. Put a lid on it and let it sit at room temperature for 12-14 hours or overnight.
- Remove the biga from the dough tub and add the water. Add the salt and swish it around until dissolved. Add the flour and mix by hand until you have a single dough mass.
- Add the biga to the dough and mix by hand until both doughs are incorporated. Feel free to take a break after a couple of minutes to let the dough rest. Because the biga and the dough are different consistencies, it can take longer than usual for the dough to unify. The target dough temp at the end of the mix is 75 degrees Fahrenheit.
- Let the dough rest for 20 minutes, then knead it again for a minute. The skin of the dough should be very smooth. Place the dough ball seam down in the same container and cover with lid. Let rise at room temperature for 45 minutes.
- Remove the dough from the tub and cut into 3 equal pieces with a bench scraper or knife.
- Shape each piece of dough into a ball.
- Place the dough balls on a large, floured plate so that they are not touching. Wrap in plastic wrap. Let them rest at room temp for 2 hours and then move to the refrigerator. They will hold in the fridge for 2-3 days. You can freeze them for up to a week. Or, you can par-bake them.
- Remove the dough balls from the fridge 60 to 90 minutes before shaping them to make pizza.