Those of you who follow me on Instagram may know that last week was a total cake-a-palooza of a week for me! I had three cakes to bake: one for my niece’s baptism and two birthday cakes. To stay as organized as possible, I try to get all my cake layers baked ahead of time. This way, they have lots of time to firm up in my refrigerator, making them easier to frost and decorate. Also, it allows me to not have my oven heating up the kitchen while I’m trying to spread frosting and decorate – that added heat can make the process so frustrating!
I know for some, there’s nothing like American Buttercream! I think all that sweetness from the butter and confectioner’s sugar is what a lot of us grew up with, and it brings back a lot of “sweet” memories. I don’t know about you, but these days I tend to prefer my buttercream a bit less sweet. I feel like the flavor of the cake comes through a bit more, and the cake is usually sweet enough to carry everything through.
As a result, my buttercream of choice is usually Swiss Meringue Buttercream. However, for those of you who have taken this path before, while the end result is delicious, it’s definitely time-consuming: separating eggs, heating egg whites and sugar, whipping the meringue, letting it all cool down so the butter won’t melt, and finally adding the butter. I used this on the baptism cake I made, but knowing the birthday cakes would both be frosted in chocolate, I decided to use my much quicker “go-to” frosting recipes. Each of these take less than 30 minutes of active time to put together, and they’re simply delicious! I thought it would be fun to share them with you so you can have them in your back pocket for quickly getting your baked goods looking gorgeous – and tasting just as amazing!
The first is my Chocolate Condensed Milk Buttercream. It turns out silky smooth and light as air – and definitely falls in the “less sweet” category of buttercreams. The recipe I’m sharing yields a little more than 3 cups, which is plenty for a dozen cupcakes! You can certainly scale up or down, depending on your own particular needs – and having extra in your refrigerator is never a bad thing!
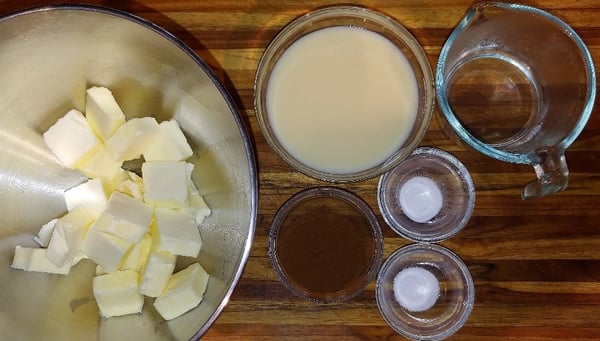 You will need:
- 16g cocoa powder
- 1/4 tsp baking soda
- 3 T BOILING water
- 340g unsalted butter at room temperature (this is approximately 3 sticks of butter)
- 300g sweetened condensed milk
- 1/4 tsp kosher salt (I use Diamond Crystal kosher salt)
First, stir together the cocoa powder and baking soda in a small bowl. Then add the boiling water. This will make a chocolate paste mixture. Set the mixture aside.
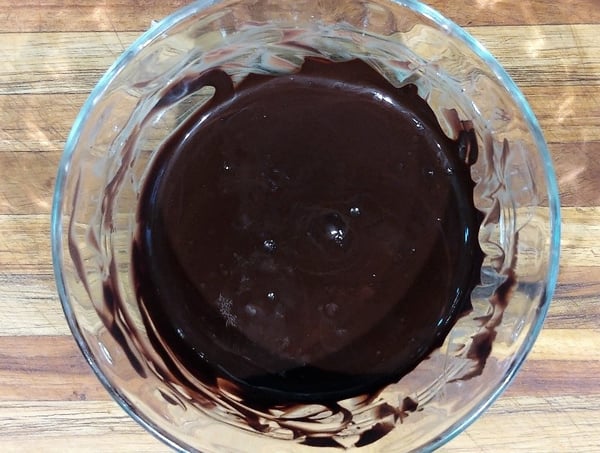 Note that the baking soda is added so that it reacts with the cocoa powder, making it darker and richer. Make sure your water is truly at the boiling point. This will allow the cocoa to “bloom” more fully, meaning that it will absorb the water and yield a deeper cocoa flavor.
Next, using the paddle attachment on your stand mixer, beat the butter at medium-high speed for 5-6 minutes. You can see in the ingredients photo that I actually weighed my butter right in my mixing bowl – one less dish to clean! Be sure to scrape down your bowl.
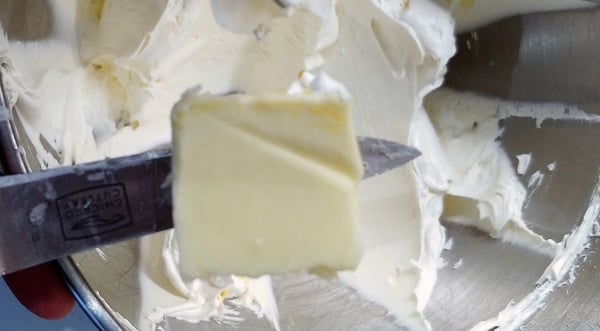 You will see the butter become much lighter in color and a lot fluffier as it is beaten. In the above photo, you can see the huge difference between the unbeaten pat of butter and the beaten butter.
Now add the condensed milk. Do this in three additions, approximately one-third of the condensed milk at a time, beating on medium-high speed between each addition until completely combined. After all the condensed milk is combined, scrape down the bowl and add the salt. Beat again until combined.
It’s time to add the chocolate! Add all of it at once, scraping the chocolate bowl with a silicone spatula to get every bit. Mix on medium-high speed until the chocolate is completely combined. Be sure to scrape down your bowl one last time to get whatever buttercream may have missed being “chocolate-ized”! Finally, turn your mixer to the lowest setting and let it run for 3-5 minutes to release most of the larger air bubbles that may have formed.
You can see how super-smooth and creamy this is! You can use it right away or let it sit out for up to 24 hours. After that, store it in the refrigerator. If you do refrigerate it, let it come to room temperature and then give it a good stir before using. You may need to freshen it up a little by quickly beating it in your mixer – just be sure to again run the mixer at the lowest speed to release the air bubbles once it’s done. This buttercream spreads and pipes beautifully, and it holds up and maintains its shape really well.
The second quick frosting recipe I’d like to share with you is my Chocolate Ganache Frosting. This one is a rich, creamy dark chocolate concoction that is absolutely decadent! While your active prep time will again be less than 30 minutes, this one will need to sit for several hours to get to its best frosting consistency. Honestly, I’ve never really timed it, I just always prepare it the night before I’m going to need it. Once I wake up in the morning, it’s perfect – and will stay that way until I use it! So for this one, you just need to bear in mind that you’re not going to use it immediately and plan accordingly. This recipe is not only wonderful on cakes and cupcakes, but it’s absolutely delicious spread across the top of a pan of brownies!
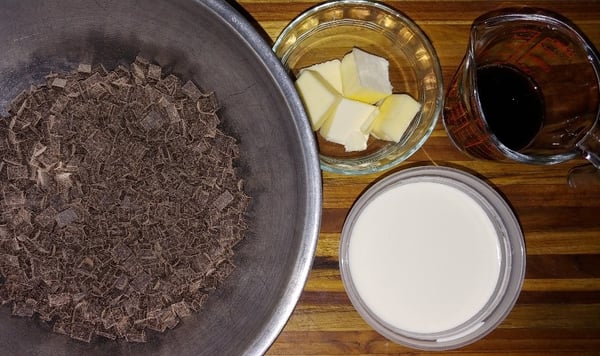 You will need:
- 700g chopped dark chocolate (I like using the Trader Joe’s “Pound Plus” dark chocolate bar – it’s a great buy! – but any good chocolate will work) Note that it does not need to be chopped very finely; a rough chop will work perfectly.
- 350g heavy cream, room temperature or slightly cooler
- 70g butter
- 4 T (1/4 c) brewed coffee, room temperature (adding coffee is optional, and I will sometimes omit it if I’m going to serve it to children)
This is such an easy recipe, but since there are moments when you’ll be asking yourself, “Can this be right?”, I’m including little videos to let you know you’re doing just fine!
I’d like to note a couple of things for you here. You should use a metal bowl to melt the chocolate and butter. You’ll be creating a double boiler (also known as a “Bain Marie”), setting the bowl over hot water in pot on your stove, so using glass or plastic won’t work. The metal will get warm, so be sure to have a pot holder or towel nearby for when you touch the bowl, in case it is too warm for you to comfortably handle. Also, your bowl with the chocolate and butter should nestle nicely into the top of the pot of water, but the bottom of the bowl should not touch the water – you want the bottom of the bowl above the water. This is important because chocolate melts at approximately body temperature and if you place the bowl into boiling water at 212⁰F, it will scorch and seize and end up unusable.
Now bring about an inch of water just to a boil on your stove top. Once your water just begins to boil, turn the heat all the way down to low and place the bowl of chocolate and butter on top of the pot. Give the chocolate mixture a stir and then just let it melt. It will only take a few minutes. I usually stir it once or twice during the melting process, but for the most part, it will melt all on its own.
Once the chocolate and butter mixture is melted, remove the bowl from the pot of water and set it on a hot pad. Give it one last stir to make sure there are no chocolate lumps left. Add the cream all at once and stir to combine. When you first add the cream, it will seem like it’s not going to combine but have faith - it will after just a minute or two of stirring!
Finally, add the coffee (if you are using it) and stir to combine. Adding coffee will not make this taste like mocha – you are not adding enough coffee for that to happen. The coffee will simply enrich the ganache, enhancing the chocolate flavor, giving it a bit of a boost.
Your active prep time is complete and now it’s just a matter of waiting for the ganache to thicken. Cover the bowl and let it sit overnight and let the magic happen!
Be prepared to be in chocolate heaven when you lift that cover off your bowl!
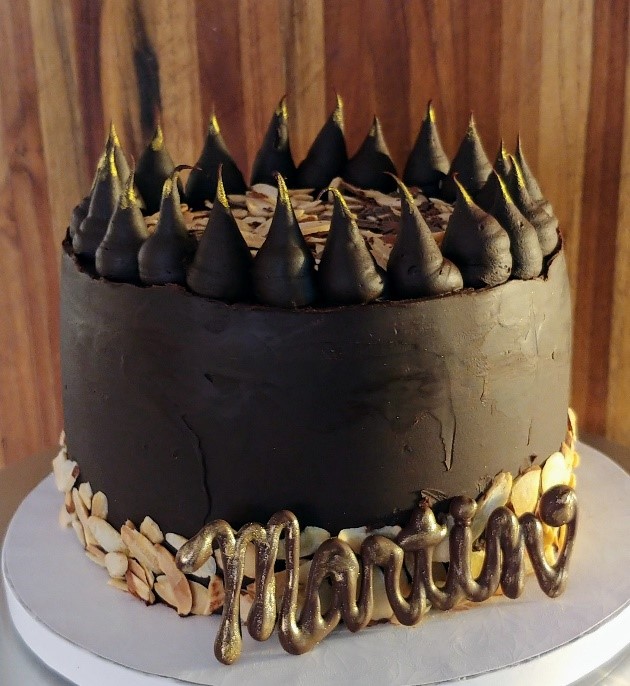
If you need some inspiration, here are a couple of photos of the cakes I made using these frostings. The photos make these look really huge, but they’re only six inches in diameter.
This is the cake made using the Chocolate Condensed Milk Buttercream. It had four thin chocolate layers with raspberry filling.
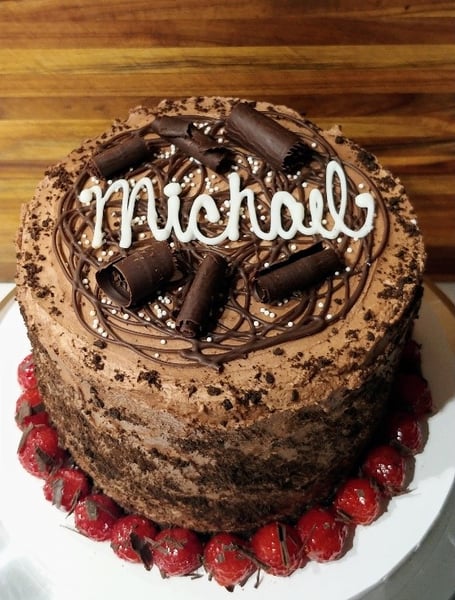
This is the cake made using the Chocolate Ganache. It had two thicker almond white cake layers, with almond cream filling. Note that the photo was taken when it was taken straight from the fridge. As it got closer to room temperature, the chocolate softened and the ganache became shinier.
 While these are two of my favorite “go-to” frosting recipes, there are so many wonderful flavors out there! Check out The Chopping Block’s Hands-On Cupcake Boot Camp scheduled for Sunday, May 22 to add some fantastic cupcake and frosting combinations to your recipe collection.