

Previously on The Advantages of Charcoal Grilling Part I: we learned about different types of charcoal grill, how to start the charcoal, how to elevate our grill grate, and we learned about the extended temper to facilitate perfect edge-to-edge doneness. In the dramatic conclusion to the charcoal grilling blog series, we will focus on some more esoteric techniques. I will reveal the archaic rites used to apply glaze and smoke to meats, and the incantations developed by generations of Magicians of the Charcoal Grille to control the heat of the flame, and I will draw back the mystical Smokey shroud and illuminate the chaos spells used to transmute any cut of meat into a tender steak cut.
Before we dive in a few (hundred) words about the most common types of charcoal and the relative pros and cons thereof.
Briquettes: these are by far the most common type of charcoal. Good because they are ubiquitous and inexpensive. They also burn evenly and light easily. Bad because they burn cooler than all other types, and have a distinct aroma and flavor (especially the easy light type impregnated with fuel), though some may like this flavor.
Hardwood Lump: the next most common type of charcoal. Size and quality vary by brand, but in general this type of charcoal is nice because it burns hot and clean. This means only delicious smokey grill flavor, and no fuel-like or acrid flavors. They are slightly more expensive than lump, but nothing crazy.
Sumi: this is a manufactured charcoal that is compressed into straight sided rods with a hole running through them. This type of charcoal is Japanese in origin and was originally created for use in yakitori grills. These burn very hot, very evenly, and very clean, releasing very little smoke. They also burn much longer than conventional briquettes or lump charcoal. On the other hand they are much harder to find (there is a somewhat readily available brand called Thaan that you can find here in Chicago), and are more expensive as well.
Binchotan: this is the traditional Japanese charcoal. It looks like black logs and tree branches, and is widely considered the best charcoal in the world. True white binchotan burns incredibly hot and clean. When fully lit there is no perceivable smoke emitted from binchotan. They burn for a long time and provide the cleanest purest flavor of the grill. However this refinement comes with a pretty steep price tag. Ranging into the $30/lb range. It can also be very difficult to find.
I typically use a combination of hardwood lump, and sumi which provides a fairly hot, and clean fire that is easy (and cost effective) to maintain.
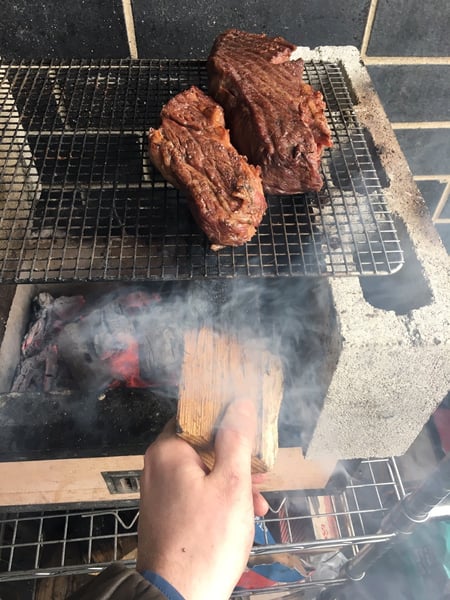
The first new technique I want to introduce in part two is applying smoke. The easiest way to do this is by utilizing the elevated grill grate we learned about in the previous post. I use hardwood logs (I’m a fruitwood person myself, but you do you. Oak, hickory, mesquite, all the good barbecue woods will work nicely.) laid across the fire with the meat tempering above it. The idea here is to have the log smoldering, not actively burning. If your fire is too hot to maintain your log at a smolder, move most of your coals to one side of the grill and keep your log on the other.
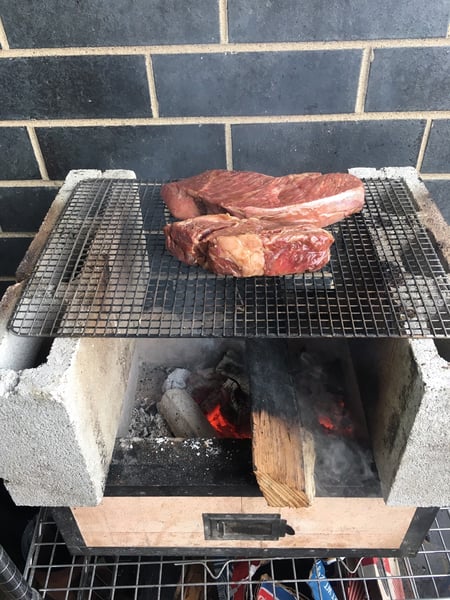
You can also lift the logs up and apply smoke to specific items by hand, strengthening the smoke flavor on certain things (like steaks or roasts) while keeping it delicate and subtle on others (like fish, fruits, and vegetables).
One of my favorite ways to add complementary seasoning and flavors to meats I’m grilling is to glaze them. Different meats take well to different types of glazes. Pork, for instance, does well with something a little sweet, whereas beef usually pairs well with something more straightforwardly savory. Like a salad dressing, a glaze should be intensely flavored, but balanced. Not too sweet or too salty or too sour. Use your palate and taste as you go to make sure your glaze is dialed in. Some recent glazes I’ve used and enjoyed are:
- rhubarb jam, fish sauce, butter, and lemon juice for pork;
- reduced dashi, maple syrup, fish sauce, and rice wine vinegar for beef;
- and honey, Sauternes, and chamomile for chicken.
Glazes are great not only because they are delicious, but also because they perform some interesting technical functions. When properly applied (which is to say: as soon as you flip the meat, apply glaze to the side that was just facing the heat) you are actually reversing the flow of heat within the meat thereby helping regulate internal temperature resulting in a more evenly cooked final product. You also put a fresh surface on the meat which can now absorb more smoke flavor. In this way you can apply multiple layers of smoke over the course of the cook giving you even more control over the final taste of the meat.
When trying to do any kind of precision cooking over a live fire, knowing how to regulate your temperature is key. I employ a few methods to do this, but they all center around one idea: controlling the fire’s access to oxygen. In general terms more oxygen equals a hotter fire that burns fuel quickly, and less oxygen equals a cooler fire that burns more slowly.
To make the fire hotter:
Fanning: Fanning the charcoal fills the grill with fresh air giving the coals all the oxygen they need to burn as hot as the fuel will allow. This is an important part of the searing process where we want our fire as hot as possible.
Opening vents: Most grills have some kind of vent system to manage airflow. These are roughly analogous to a flue in a fireplace. Open vents to increase airflow and therefore heat. Important to note that most grills have vents located on opposing sides of the grill (either side, or top and bottom) letting air run all the way through the grill increasing the current and therefore the amount of oxygen supplied when both sides are fully open.
Stoking: For those of you that didn’t grow up with a wood stove to heat your house, stoking refers to the action of agitating the lit coals to expose new surface area to the air. This leads to a temporary but sometimes significant increase in heat.
Mounding charcoal: The bigger the mound, the hotter the fire.
To make the fire cooler:
Closing vents: As above, so below. Just like opening the vents will increase airflow, closing them, either entirely or partially, will decrease it causing the heat to diminish. This is a good strategy for the extended temper discussed in part one.
Spreading charcoal: The more the charcoal is dispersed across the grill the less concentrated, and therefore less intense, the fire will be.
Adding new charcoal: The immediate effect of tossing fresh, unlit charcoal on your fire is that it will shield your food from the coals, as well as diminish available oxygen for the lit charcoal thereby greatly reducing the heat of your fire. Keep in mind though, that as the new charcoal ignites, it will burn quite hot.
When to use each of these techniques comes mainly with experience, but you can pretty quickly learn to dial in your fire to keep whatever you’re cooking in an ideal temperature zone. You can even regulate the heat to such a degree that you can hold large cuts of meat at their doneness temperature (say, medium rare) for long periods of time increasing either their tenderness, grilled flavor, or both.
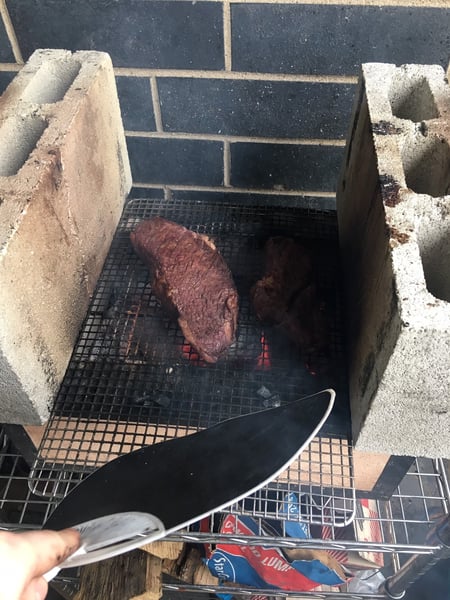
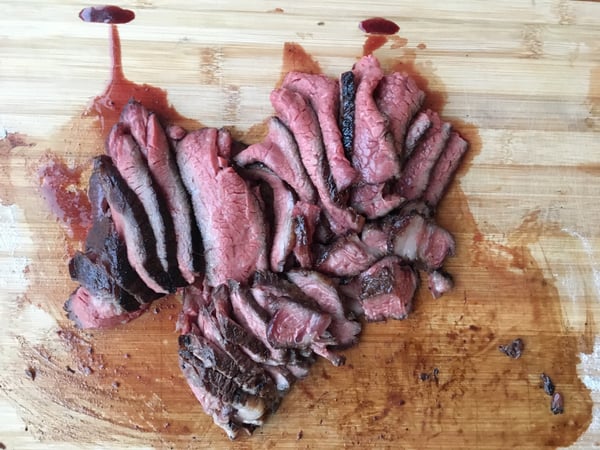
The last thing I want to mention is sort of grilling adjacent. Not strictly charcoal grill related, but it does pertain to meat cookery in general. People think you can only cook to doneness (i.e. rare, medium, well, etc.) cuts of meat that are naturally tender (think steak cuts like rib-eye, New York strip, pork chops), but this is just not true. You can cook the toughest cuts (Seriously, the toughest. I’ve done this with beef shank successfully.) to medium-rare and have a very enjoyable product if you pay attention to two things: cutting across the grain of the meat, and the thickness of your slices. You may be surprised to learn that the hunk of meat used in all these photos in this post and the previous is actually a 3 lb piece of chuck, a cut usually reserved for long slow braising, or grinding due to its naturally rough texture. I cooked it to medium-rare, and sliced it relatively thinly across the grain and ended up with a steak about the texture of a flank steak. Not the most tender cut, but perfectly palatable, and incredibly tasty (also, I don’t care how many wealthy fops, weak of jaw, and soft of tooth say otherwise, chewing is an important part of any satisfying gustatory experience). Conventional wisdom tells us the tougher cuts are more flavorful (they also tend to be cheaper) so why not save money, maximize deliciousness, and take actions that fly in the face of the prevailing zeitgeist all at the same time?
With that our charcoal grilling series comes to a close. To get some hands-on practice, check out our upcoming Grilling Boot Camp which will get you more than comfortable enough to use some of the techniques discussed in these two posts.
