

How odd to talk about apples now, right? We have an abundance of fresh Summer fruits and berries available, and I’m suggesting you cook with apples? But stick with me for a minute! What’s one of the best things to do with all those amazing peaches, cherries and berries? Well, for me, it’s to bake pies and tarts: juicy, sweet and a perfect way to show off the sweeter side of Summer’s bounty.
I typically make my pie dough and freeze it in disks until I know I’ll be needing it (they thaw easily in the fridge overnight). My pies for just the two of us are often smaller and since these disks are for full-size pies, that leaves me with leftover pie dough that I just hate to throw away. I have fried or baked it into crunchy shapes, but today I wanted to share with you my absolute favorite way to use it up. And so I ask you to consider the humble apple. I’ll grant you that it’s not exactly a notable fruit during this glorious season, but it is very much up to this task!
I don’t know about you, but I almost always have an apple or two in the fridge. And I can tell you that leftover pie dough and apples are a match made in heaven. Baking thick apple slices wrapped in pie dough, that wonderful apple pie flavor comes through but with a lot less fuss! My husband and I have long struggled to figure out what to call these things. They’re not mini-pies. And they aren’t doughnuts or Danish. But they are delicious… apple-icious, to be exact! And while it’s a great way to use up leftover pie dough, honestly, there have been times when I make pie dough just for these.
 Whether you’ll be using leftover pie dough or dough you’ve made specifically for this purpose, I’m thinking you probably have a favorite, go-to pie dough recipe. If you do not – or if you want to try one of my favorites – you can watch how The Chopping Block’s Owner/Chef Shelley Young makes her pie dough in this video:
If you’re new to pie dough, you’ll be amazed how easily it all comes together. It is this dough that I’m using today, just leftover and re-rolled. Just as a side note, re-rolling pie dough is not something you would generally do in making an actual pie. You lose those chunks of butter/shortening that give pie crusts that beautiful flakiness. But for this purpose, the re-rolled dough works just fine.
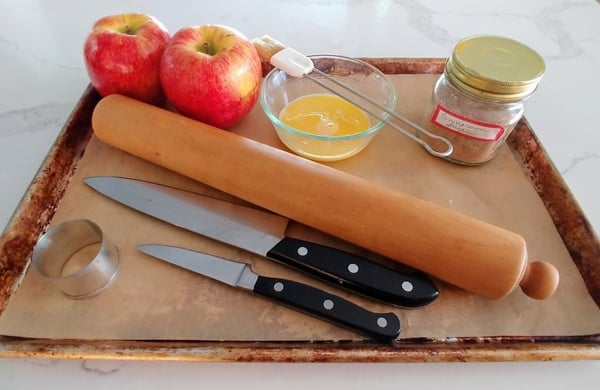
In addition to pie dough you will need an apple or two, a beaten egg and a mixture of cinnamon and sugar for sprinkling. For the cinnamon-sugar mixture, simply combine some granulated sugar and cinnamon together to your liking. Since I love to sprinkle cinnamon-sugar on anything from buttered toast to ice cream, I keep a small jar handy in my spice cabinet. Trust me, this is something you will never regret!
Equipment-wise, you’ll need a rolling pin, a chef’s knife and paring knife, a sheet pan lined with parchment and a pastry brush. You will also need a small cookie/biscuit cutter, about 1 3/4” in diameter. If you don’t have one, don’t worry. I have found that a shot glass is about the same diameter, and you can use that as a guide.
 Be sure to preheat your oven to 375⁰ F.
Let’s first start with the apples, because once you roll and cut the dough, you’ll need to use it as quickly as possible so it doesn’t get too warm and soft to handle.
You’ll want a nice large apple, since you’ll be looking to get a couple of thick slices from it when cut cross-wise. The ones I have today are Envy apples, which I love for their crispy sweetness. In a true apple pie I generally opt for a more tart apple like Granny Smith, since sugar is added to the pie filling. However in this case, the apple stands alone, so getting one that already has some sweetness to it is a better bet.
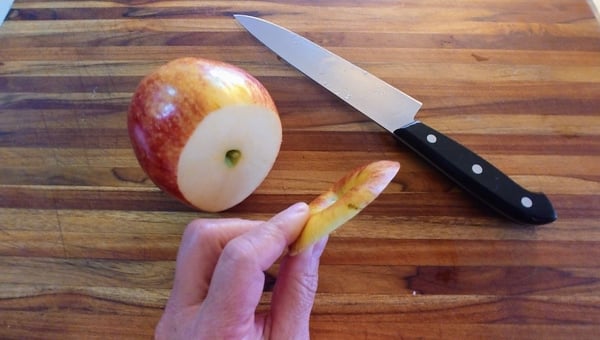
Start by slicing the top off the apple. This does not need to be a thick slice, just enough to give you nice, even edge for the first slice you’ll use. You can see in the photo below that I really didn’t take much off.
 Now slice the apple cross-wise – right through the core! – into slices about 1” to 1 ½” thick. It will be better to err on the thicker side than making the slices too thin. They shrink a little when they bake, and when they are too thin, you end up with a lot of dough and not enough apple after baking. You should get at least two slices from each apple. You may get a third slice if the apple is very large. Don’t worry about what’s left of the apple, just set any apple scraps aside for now.
Next take your cookie/biscuit cutter and press it through the center of the apple slice to remove the core. You may notice that the hole is considerably larger than just removing the core itself. This will help you later as you wrap dough around the apple slice. If you don’t have a cutter, you can use a shot glass to mark where to cut, and then slice along the marking with a paring knife to remove the core. This method may not yield the same smooth result as using the cutter, but don’t worry, it will never be noticeable once these are all wrapped up. The point here is to end up with a centered hole in the the apple slice. Set your apple slices aside. Here’s a little video that shows you how I core the slices – both with my biscuit cutter, as well as using the shot glass and paring knife.
Take your pie dough out of the fridge and roll it out. If you would like a refresher on rolling out pie dough, check out Shelley’s blog post How to Roll Pie Dough. If you are working with scraps and not a full recipe, you may not end up rolling the 11” – 12” circle you would for an actual pie. Just take roll the dough to the thickness you normally would if you were baking a pie. If you are working with a full crust, then rolling it to an 11” – 12” circle will give you the thickness you need.
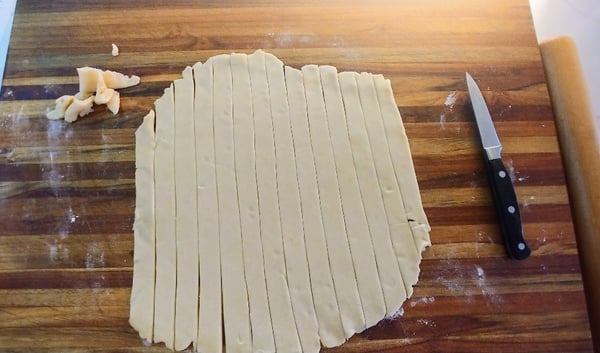
Now cut your rolled dough into strips about 3/4” wide. I used a paring knife, but a pizza/pasta cutter is also a good option. Again, you want to minimize the time in working with your dough. The colder it remains, the easier the strips are to handle when wrapping the apple slices. So whatever allows you to move the fastest will be your best tool for this task!
 Take each strip and wrap it around one of the apple slices. I like to start in the center, bring the strip to the outside and back through the center again. You will notice that as you wrap the dough around the apple slice, the dough takes up space in the middle, shrinking the size of the center hole. Giving you the space you need to wrap is exactly the reason why the hole was cut as large as it was. If the strip of dough breaks, don’t worry. Just press the remainder of the strip onto the end of where it broke off and continue on. Repeat with additional strips of dough until the apple slice is covered. There may be gaps in the dough where a bit of apple is exposed; this is not a problem, just let them be. Note that the dough should not fill the center. You definitely want a hole in the middle so they bake properly. Here is a short video that shows how I wrapped the slices:
Place your dough-wrapped apple slice on the parchment-lined sheet pan. Brush the dough all over the top and inner/outer sides with the beaten egg, and sprinkle with cinnamon-sugar. Be generous with that cinnamon-sugar! Repeat for additional apple slices until you’ve used up all your pie dough. If you cut too many slices, just set them aside with the rest of your apple scraps.
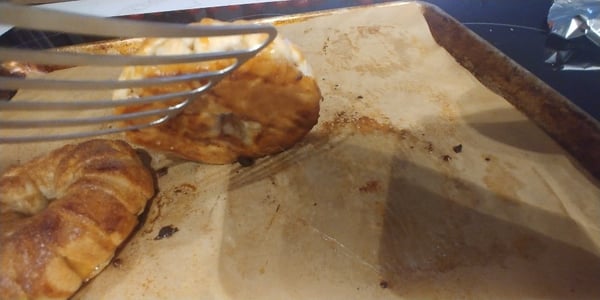
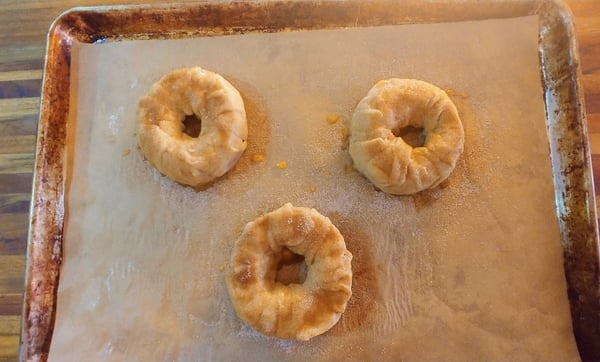 Put the sheet pan in the preheated oven and let them bake for about 30-40 minutes. Start checking them after 20 minutes. The timing will depend on the final size of the apple slices, how thickly the dough has been wrapped, as well as the idiosyncrasies of your particular oven. You want the crust to be golden brown. Any juices that escape should be bubbling. Because the thickness of the crust will vary a bit due to the wrapping, you may see some spots getting done faster than others. If it looks like some areas may be getting too dark while others need more time to bake, just drape a piece of aluminum foil over the top to prevent the darker areas from burning. Another thing you’ll look for is to be sure the bottoms are nice and brown. As you can see in the photo below, I checked the bottom and they are beautifully golden!
 By the way, remember those scraps of apples you had left over after throwing the cores away? While the wrapped apple slices are baking, I like to dice them, drizzle them with a little bit of lemon juice to keep them from browning, and toss them with cinnamon-sugar. They will keep for a couple of days in the fridge to use over yogurt, waffles, French toast, oatmeal – or just eating them plain as a snack!
Once done, remove the pan from the oven and let the wrapped apple slices cool on the pan for about 20 minutes.
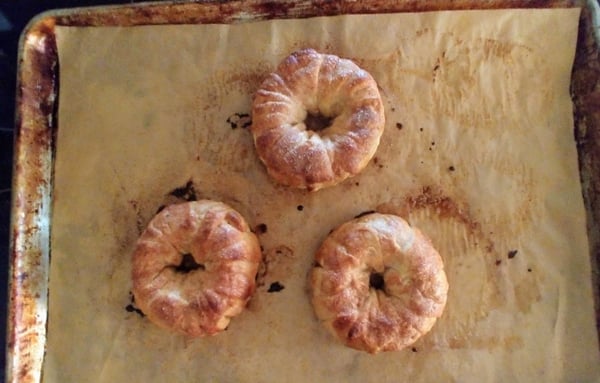 Now here’s the beautiful part! You know how you have to wait for hours to let a pie settle before you can dig into it? Well, at this point you can slide them right onto plates and enjoy them without waiting any further! Feel free to dust them with a bit of powdered sugar, if you wish, or maybe a drizzle of caramel. Oh, and of course they’re just as delicious when cooled completely to room temperature. Yes, they are “apple-icious”!
 To get a full understanding of how to make pies from scratch, join us for our Hands-On All-American Pie Workshop on Sunday, August 15 at 10am at Lincoln Square. You'll make the most of seasonal produce with:
- Individual Summer Berry Pies with Pecan Streusel
- Raspberry-Nectarine Hand Pies
- Individual Lemon Meringue Pies
But hurry! There are just two spots left in this class.
To learn more about incorporating apples into your cooking, mark your calendar for our Fall Apple Feast Demo on the Patio on Saturday, September 25 at 6:30pm at Lincoln Square. You'll learn how to take apples to the next level with this apple-forward menu:
- Grilled Fennel, Apple and Watercress Salad with Apple Cider Vinaigrette
- Brined and Smoked Pork Loin with Apple-Onion Chutney
- Farro Salad with Grilled Brussels Sprouts, Apples and Toasted Almonds
- Wood-Fired Apple Cobbler with Vanilla Ice Cream
